Recover Data from RAW Hard disk, USB Disk, SD Card (How-to)
A common issue with hard disks or other storage devices (e.g. USB disks, Memory Cards) is that they suddenly become inaccessible (RAW disks) without any obvious reason. When this issue happens, you realize that all your data are lost, but don't panic because with a little luck you can get your data back
by using one of the programs mentioned in this article.
The "RAW hard disk" term is referred to any storage device that is not formatted from NT file system (NTFS, FAT or FAT32). When a disk is in a RAW format (RAW file system), Windows OS cannot recognize the file system on it and whenever you try to access the disk in order to view its contents in Windows Explorer, you receive one of the following warning messages:
- Disk is not accessible. Parameter is incorrect.
- You need to format the disk in Drive X: before you can use it. Do you want to format it?
- Cannot Access Disk. The volume does not contain a recognized file system.
- The file system type on the disk is in RAW format and it is not recognized by Windows.
- The type of the file system is raw. CHKDSK is not available for RAW drives. (when using the CHKDSK command).
How to Recover Data from RAW, Corrupted or Formatted disk.
In this tutorial we present five (5) reliable recovery programs to retrieve lost (or deleted) files from a corrupted, formatted or inaccessible (RAW) storage device (HDD drive, USB disk, Memory Card, etc.).
Notes:
- The first two recovery tools (Photorec & Puran File Recovery) are Free of charge. The next three recovery tools are TRIAL and can recover only 1Gb of data for free. You can use the trial versions to verify if they can recover your data before you buy the full version.
- The main differences between the Free recovery tools vs the Paid, is that the paid one can recover the disk's structure and the original filename of the missed files.
Attention:
- The unreadable disk must be recognized properly in BIOS in order to be able to recover your files. If the disk cannot be recognized in BIOS then it has a hardware damage. At this case, the best choice you have, is to go to a data recovery professional in order to retrieve your data.
- Do not save (store) the recovered data on the same recovered storage device.
- After recovery, format the corrupted storage device and then check it for hardware problems, before using it again.
-
PhotoRec
-
Puran File Recovery
-
EaseUS Data Recovery.
-
Stellar Data Recovery Professional Windows
-
ZAR – Zero Assumption Recovery
How to recover lost files with PhotoRec (Free).
The first recovery software in this guide – and one of my favorites – is the PhotoRec recovery tool. Photorec is packed with TestDisk, a powerful data recovery software that was primarily designed to help recover lost partitions. (A detailed guide on how to recover lost partition(s) with TestDisk can be found here.)
PhotoRec is a free file recovery software, designed to recover the lost files (documents, pictures, videos, etc.) from hard disks, CD-ROMs, and lost pictures from digital camera memory cards (SD, XD, etc.). PhotoRec ignores the file system and goes after the underlying data, so it will still work even if your media's file system has been severely damaged or reformatted.
1. Download TestDisk 7.0 with Photorec from here.
2. When the download is complete extract the “testdisk-7.0.win.zip” file.
3. From the extracted folder, double click at qphotorec_win application to launch the GUI environment of PhotoRec recovery tool.
4. Select the unreadable disk from the list (1) and then select the "No Partition" type on the list (2). *
* Note: If you want to find and recover deleted files from a storage device, then choose the listed partition (e.g. "NTFS").
5. Click Browse and select a location to your computer, to save the recovered files.
6. When done press the Search button and wait until the search process is completed.
Tip: If you want to retrieve a specific type of files (e.g. Word documents) then click the File Formats button and choose the corresponding file format (e.g. "doc")
7. Finally navigate to the store location you selected, to view the recovered files.
How to recover lost files with Puran File Recovery (Free).
The second recovery program that you can use to get back the lost files, is the Puran File Recovery utility from Puran Software. Puran's data recovery program is Free for private and non-commercial use only.
1. Download and install Puran File Recovery tool. *
* Note: You can download the portable version of the program, which doesn't need installation.
2. Launch Puran File Recovery.
3. In Puran File Recovery main window select:
- Physical Drive X if your disk cannot be accessed from Windows (RAW file system), or the
- Drive letter (NTFS file system) of the disk that you want to retrieve deleted files from it.
4. Finally press the Scan button and then wait until Puran File Recovery utility, searches the disk for lost or deleted files.
5. When the search process is completed, check the Tree View checkbox (1) and select the type of files that you want to recover (e.g. jpg) or expand a category to select individual files (2).
6. When done with your selections, press the Recover button.
7. Select a destination to save the recovered files and press OK.
8. When the recovery process is completed navigate to the destination you selected to view the recovered files.
How to recover lost files with EaseUS Data Recovery.
The next program in the list is the “Data Recovery Wizard Professional” from EaseUS Software Company. EaseUS Data Recovery program has a more easy to understand environment plus it is a reliable recovery software to recover lost files. Unfortunately, the free version of the program allows you to recover only 1GB of data, but you can try the program before buying it, to find out if it can find and recover your missing files.
1. Download and install EaseUS Data Recovery Wizard Free.
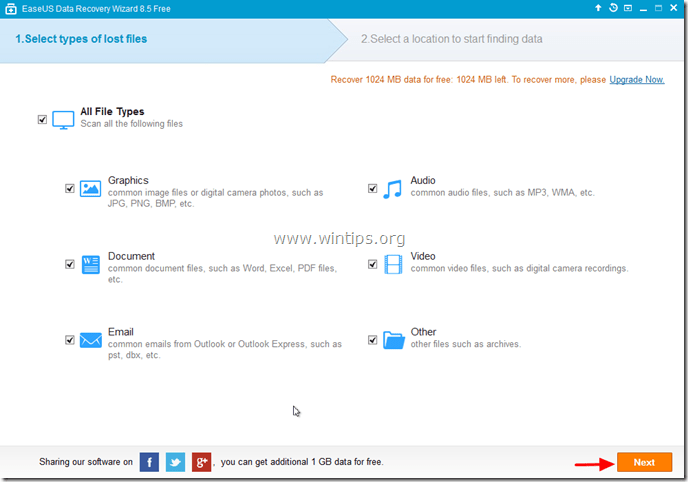
2. Launch EaseUS Data Recovery Wizard and at the first screen, select the file type of the lost files (e.g. music, video, documents, etc.) that you want to search for and press “Next”.
3. Select the unreadable disk and press “Scan”.
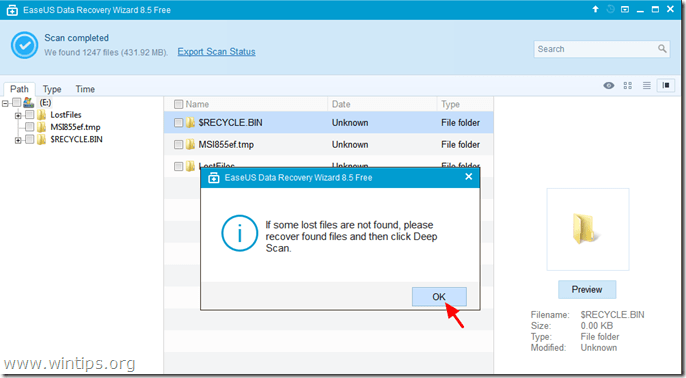
4. When the scan (for lost files) is completed, the program informs you that your lost files are not found during quick scan, then you have to use the ‘Deep Scan’ option of the program to perform a deeper search for lost files. Choose “OK” to that message.
5. Now at the left pane of “Easeus Data Recovery Wizard” expand all folders to find if your missed files and folders are listed there. If your missing files (or folders) are listed,* select (check) them (and then press the “Recover” option at the bottom right.
* Note: If your missing files are not listed (commonly this happens after disk format) after the quick scan, then press the “Deep Scan” button to perform a deeper scan for missing files.
6. Next, select the location (1) to save your missing files* (e.g. your Desktop) and press “Save” (2).
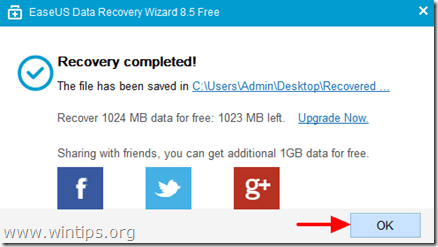
7. When the recovery is completed, press “OK” to close the information message and navigate to the recovery location to find your missing data* (e.g. your Desktop).
* Note: The recovered files are saved in a folder named “Recovered data_Current_Date_at_Current_Time” (e.g. “Recovered data 08-30-2014 at 15_03_40”).
How to recover lost files with Stellar Data Recovery Professional for Windows.
Another excellent program to recover deleted files or to retrieve data from an inaccessible (RAW) disk (or partition), is the Stellar Data Recovery Professional Windows utility, which is a powerful recovery suite that helps you to search, and retrieve missing or deleted data even from damaged disks. Unfortunately, the free version of the program doesn't allows you to recover data, but you can try the program before buying it, to find out if it can find and recover your missing files.
1. Download and install Stellar Data Recovery Professional.
2. Launch the Stellar Data Recovery Professional application.
3. At the first screen, click Next.
4. Select the Location or Drive from where you want to recover files and click Scan.
5. Be patient until the program searches for all files that can be recovered.
6. When the recovery process is finished, select the files that you want to recover and click the Recover button.
7. Then press the Browse button to choose a location for the recovered files.
8. Finally click OK and wait until your files are recovered.
How to recover lost files with Zero Assumption Recovery (ZAR).
The last recovery program on the list is called ZAR Data recovery. ZAR (Zero Assumption Recovery) provides a suite of recovery tools to search and retrieve the missed or deleted files from any storage device. The Demo version of the program can recover only (up to) four folders, but you can try the program to find out if it can recover your data before buying it.
1. Download and install ZAR – Zero Assumption recovery.
2. Launch ZAR and click the Data Recovery for Windows and Linux option.
3. Select the disk that you want to recover files from it and click Next.
4. Leave the ZAR recovery tool to search your disk for missed files.
5. Select the files that you want to recover and then press Next.
6. Select a destination for the recovered files.
7. Select Start copying to recover the selected files.
8. When the recovery process is completed, navigate to the recovery destination to view your files.
Good Luck!
Let me know if this guide has helped you by leaving your comment about your experience. Please like and share this guide to help others
We're hiring
We're looking for part-time or full-time technical writers to join our team! It's about a remote position that qualified tech writers from anywhere in the world can apply. Click here for more details.
- FIX: Numeric keypad Not Working on Windows 10/11 - July 24, 2024
- How to Share Files or Printers in Hyper-V? - July 22, 2024
- How to invoke Hyper-V Screen resolution prompt? - July 17, 2024








March 20, 2018 @ 8:07 am
Thanks.I could not use chkdsk method because of raw disk error. I used Photorec and it worked. Folder structure and File names are lost but it is acceptable for a free tool.
March 7, 2017 @ 8:12 am
Awesome explanation of windows data file recovery with different tools. But there is one more free tool is available which equi-comparable to the mention 5, i.e. SysInfoTools Software. You may review their windows file recovery software with the free version and I bet you that you can't prepare your next blog without including SysInfoTools Name.
July 29, 2016 @ 3:20 pm
Thanks for sharing this post with all people and I pay a visit day-to-day a few blogs and websites to read posts, except this website offers quality based writing. Keep it up.
Thank you.