How to Upgrade to Windows 11 25H2 on Unsupported Hardware.
This guide provides the most effective, current methods for upgrading to Windows 11 version 25H2 on systems that don't officially meet Microsoft’s hardware requirements.
Windows 11 version 25H2 (the 2025 update) brings new features, improved security, and performance improvements. However, many older PCs don't meet Microsoft's strict requirements (such as TPM 2.0, Secure Boot, compatible CPU) for installing Windows 11.
The good news, however, is that you can still install or upgrade to Windows 11 25H2 on unsupported hardware using one of the reliable methods listed below.
* Important Disclaimer: These methods are reliable but unofficial solutions. Running Windows 11 on unsupported hardware may result in compatibility issues or the absence of future security and feature updates. Always back up your data before proceeding.
How to Install Windows 11 25H2 on Unsupported PCs (TPM/Secure Boot Bypass).
Requirement: SSE4.2
Since the Windows 11 24H2 update, CPUs must support the SSE4.2 instruction set; otherwise, the system may fail to boot. Therefore, run CPU-z and verify that your CPU supports SSE4.2 instructions (Intel CPUs) or SSE4a instructions (AMD CPUs). Otherwise, the system may not boot after upgrading to Windows 11 25H2. The SSE4.2 instruction set enhances the performance of multimedia and computational tasks, ensuring that your CPU can handle the new operating system's demands efficiently.

1: Upgrade from Windows 11 24H2 to 25H2.
If your unsupported PC is already running Windows 11 24H2, a full reinstall is not required, just install KB5054156, which is the 25H2 Enablement package.
- Download the Windows 11 25H2 Enablement Package.
- Double-click on the downloaded "windows11.0-kb5054156-x64.msu" file to install it.
- Restart your computer and your computer will be upgraded to version 25H2.
Installing the enablement package is a seamless way to upgrade, as it activates the new features without needing a full OS reinstallation, preserving your settings and applications.
2. Upgrade from Windows 10 or Windows 11 23H2 to Windows 11 25H2 or Fresh Install Windows 11 25H2.
If you are still using Windows 10 or an older version of Windows 11 (e.g. 23H2 or 22H2), the easiest way to install Windows 11 25H2 is by using the ISO file with a command-line method or by using a bootable Windows installation USB drive created with Rufus.
* Important: Before attempting to upgrade your system to Windows 11 25H2, please complete the following important steps:
- Back up all important files to an external USB storage device to ensure that no data is lost if something goes wrong during the upgrade.
- Make sure that at least 64 GB of free storage space is available on the C: drive.
- Install all available Windows Updates, including Optional Updates.
- Visit your device manufacturer’s support website and check whether newer drivers are available for your hardware components. If available, download and install them before proceeding with the upgrade.
Step 1. Download Windows 11 v252 in a ISO File.
- Go to the Windows 11 download page and download the "Media Creation Tool" (MediaCreationTool.exe) by clicking the Download Now button under Create Windows 11 Installation Media.

- Run "MediaCreationTool.exe", accept the license terms, and then click Next on the Language and Edition settings page.
- On the 'Choose which media to use' screen, select ISO file and click Next.

- Select the Downloads folder as the location to save the “Windows.iso” file, and then click Save.

Once the ISO file is ready, you can proceed with the installation using one of the methods below.
Method 1. Upgrade to Windows 11 version 25H2 using a command.
One of the easiest ways to install the latest version of Windows 11 on an unsupported computer is by using the ".setup.exe /product server" command.
- Right-click the "Windows.iso" file you downloaded and select Mount. (Alternatively, double-click the “Windows.iso” file to open it directly.)

- In the new window that opens displaying the contents of the mounted ISO file, right-click an empty area and select Open in Terminal.

- In PowerShell window, paste the below command and press Enter:
- .setup.exe /product server
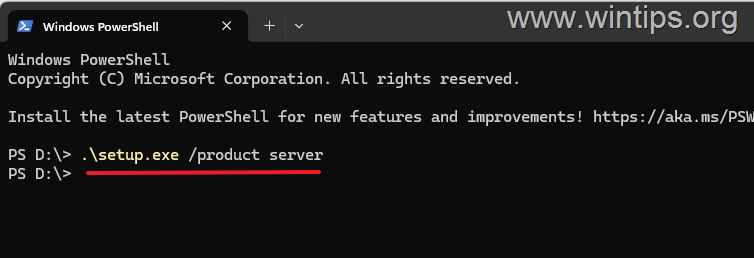
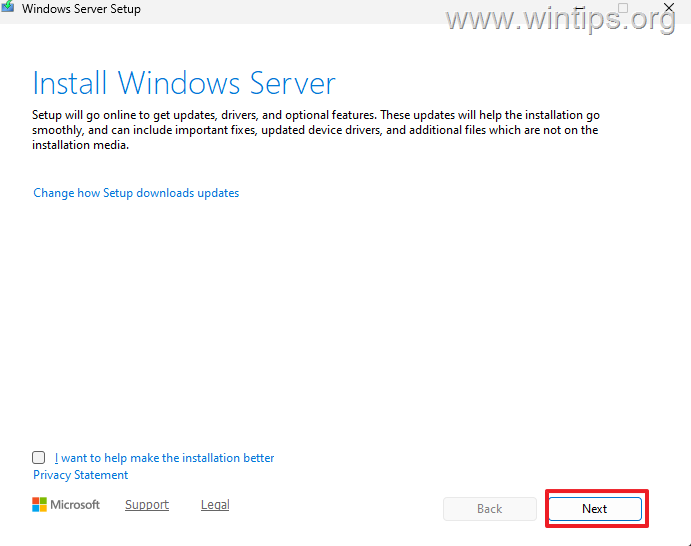
- After a few seconds, the "Install Windows Server" screen will appear. Although it displays "Install Windows Server", this is normal behavior. Click Next to continue.
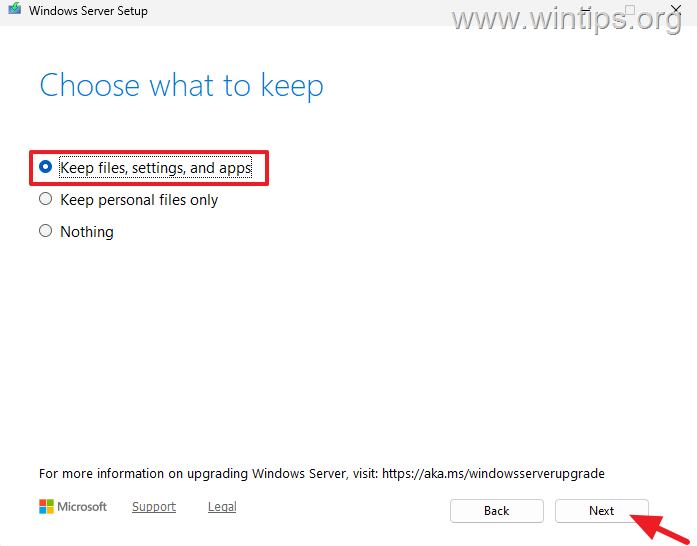
- Then accept the license terms and, at the next screen, select Keep files, settings, and apps, and click Next.
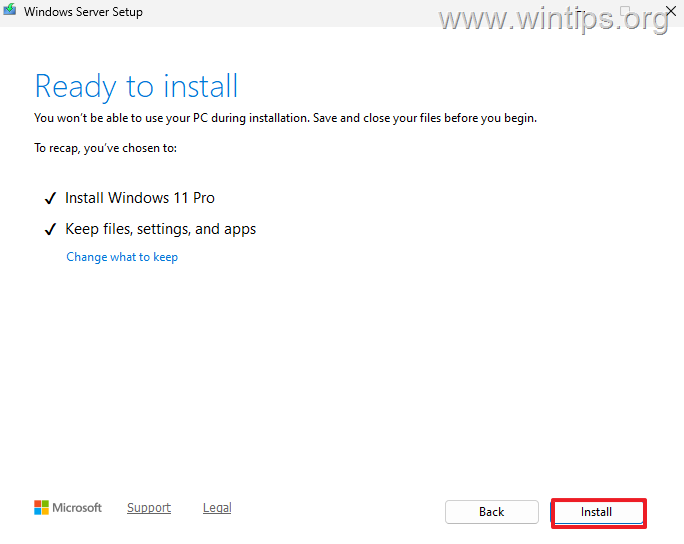
- Wait for the installer to check for updates, and when the process is complete, click Install.
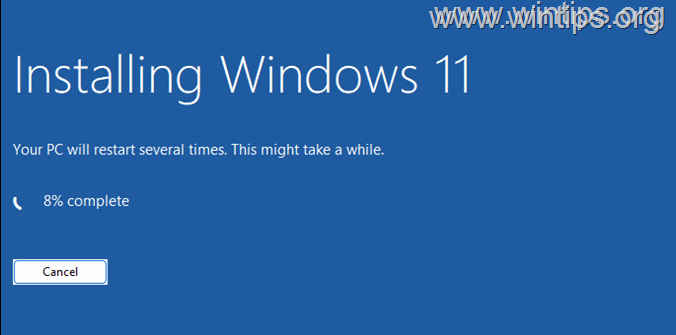
- The Windows 11 25H2 upgrade will begin, even though the screen says "Installing Windows Server". Sit back and allow the installation to complete without interruption.
* Note: Your computer will restart several times during the installation process.
- When the installation is complete, Windows will load normally with all your files, applications, and settings preserved.
- Verify that Windows 11 version 25H2 is installed by typing winver in Windows Search and pressing Enter.
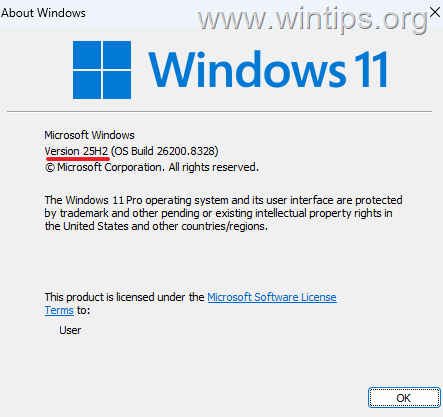
- Now, go to Start > Settings > Windows Update, check for available updates, and install them.
- Finally, to maintain the best performance after upgrading, manually install all of your device drivers and you're done!
Method 2. Upgrade to or Install Windows 11 25H2 Using a Modified USB Windows 11 Installation Media
Rufus is one of the most popular and user-friendly tools for creating a bootable Windows USB installation drive that can bypass the hardware requirements for Windows 11.
To Create a Windows 11 25H2 Bootable USB for Unsupported PCs:
- Download the latest version of RUFUS USB Creator Utility.
- Plug an EMPTY USB disk on your PC (at least 8GB), and remove all other connected USB drives.
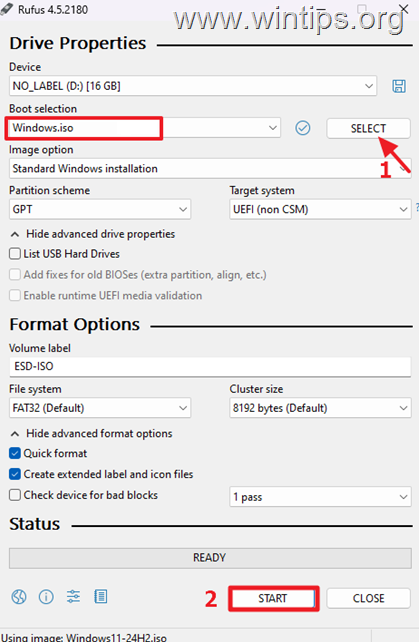
- Run the Rufus utility, click SELECT, and then choose the "Windows.iso" file you downloaded in Step-1 above. When finished, click the START button.
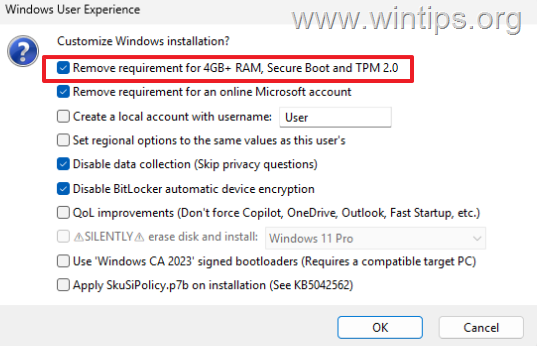
4. In the 'Windows User Experience' options, keep the Remove requirement for 4GB+ RAM, Secure Boot, and TPM 2.0 option selected. Optionally, check or uncheck any of the additional options below, depending on which settings you want applied to the Windows 11 USB installation media that will be created.
5. Now, carefully read the warning message informing you that all files on the USB drive will be erased. If you agree, click OK to continue.
Important: All files stored on the USB drive will be permanently deleted during this process.
![image_thumb[24]_thumb_thumb](https://www.wintips.org/wp-content/uploads/2024/10/image_thumb24_thumb_thumb-1.png "image_thumb[24]_thumb_thumb")
6. Wait for the process to complete and when the USB is "READY", click CLOSE to close the RUFUS utility.
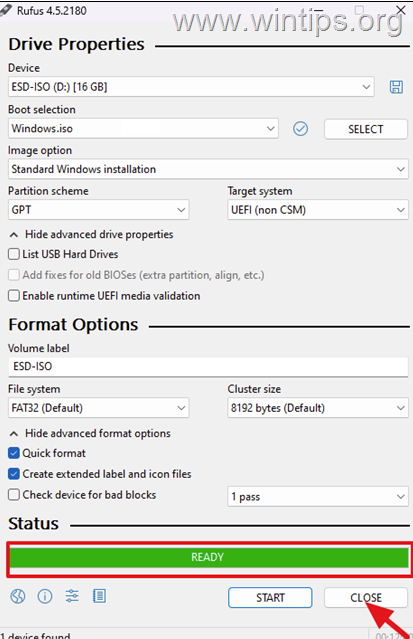
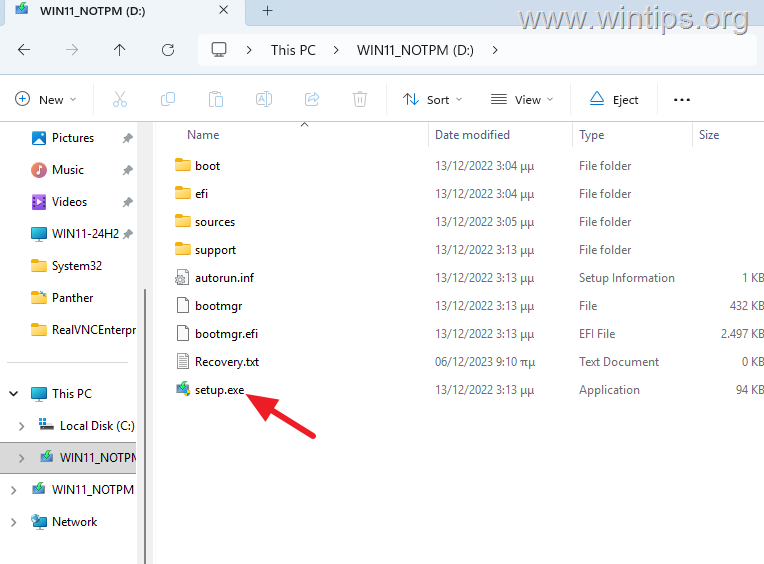
7. After the USB installation media is created, open it in File Explorer and run setup.exe to perform an in-place upgrade* from your current version of Windows (Windows 10 or an older version of Windows 11) to Windows 11 25H2.
* Note: For a clean installation, boot your computer from the USB drive and proceed with the Windows setup process.
8. At next, click Install and then Accept the license terms.
9. Next, choose to Keep files, settings, and apps, and click Next.
10. Finally click Install to start the installation.
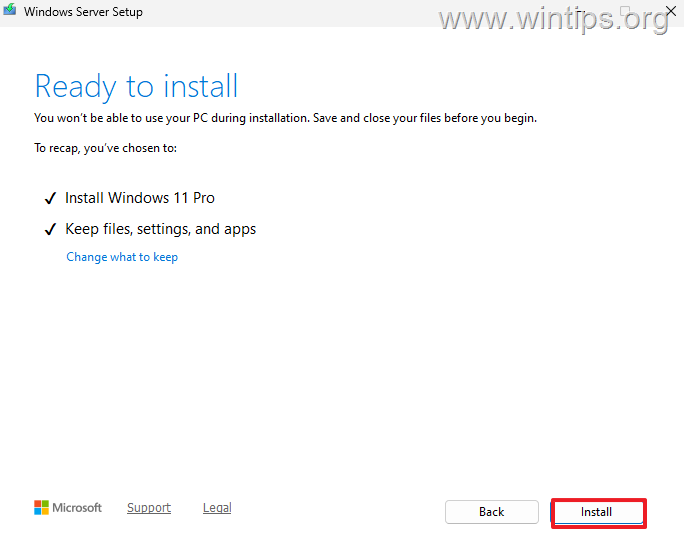
11. Now, sit back and allow the installation to complete without interruption.
* Note: Your computer will restart several times during the installation process.
12. When the installation is complete, install all the available Windows & driver updates and you're done!
Summary
Upgrading to Windows 11 25H2 on unsupported hardware is achievable through several methods. Whether you choose to use the enablement package for a seamless upgrade or create a bootable USB with Rufus, each method has its benefits and considerations. Always ensure your data is backed up, and your system meets the necessary requirements for a successful installation. By following these steps, you can enjoy the latest features and improvements of Windows 11 25H2, even on older hardware.
That's it! Which method worked for you? Let me know if this guide has helped you by leaving your comment about your experience. Please like and share this guide to help others.
Frequently Asked Questions
How can I upgrade my unsupported PC from Windows 10 to Windows 11 24H2?
You can upgrade your unsupported PC by using either a PowerShell command or by modifying the Registry. Detailed steps are provided in specific guides.
What precautions should I take before upgrading to Windows 11 24H2?
You should back up your important files to an external USB storage device and ensure you have at least 64GB of free storage space. Additionally, install any available Windows updates and check for new hardware drivers from your device manufacturer's support site. Confirm that your CPU supports SSE4.2 (Intel) or SSE4A (AMD).
Can I use the Windows 11 Installation Assistant to upgrade an unsupported PC?
No, the Windows 11 Installation Assistant will not work on unsupported PCs because it requires meeting the minimum system requirements of Windows 11.
Is downloading an ISO file necessary for upgrading using PowerShell?
Yes, downloading an ISO file of Windows 11 24H2 is necessary. You can obtain it using the Media Creation Tool, and then mount the ISO to proceed with the PowerShell upgrade.


- FIX: All Programs Open with Word or One Application (Solved). - August 12, 2026
- Fix Dell Random Shutdowns, Overheating and Intel IPF Errors after installing KB5095093 on Windows 11. - August 5, 2026
- How to View Folder Sizes on a Synology NAS. - August 3, 2026