KB5127648 Fails to Install (0x800f0845) or Causes Windows 11 to Loop in Recovery Mode (0xc000000d): How to Fix
If the Windows 11 update KB5127648 fails to install with error 0x800f0845, or your computer won't start after installing it and displays a Recovery screen or repeatedly enters Automatic Repair, follow the instructions below to troubleshoot the problem.
Some users and IT administrators have reported startup failures after installing KB5127648, including computers repeatedly entering Automatic Repair or displaying a Recovery screen with errors such as 0xc000000d or references to winload.efi.
Although these problems have been reported after the update, Microsoft has not publicly confirmed a single cause or a universal fix for all affected computers.
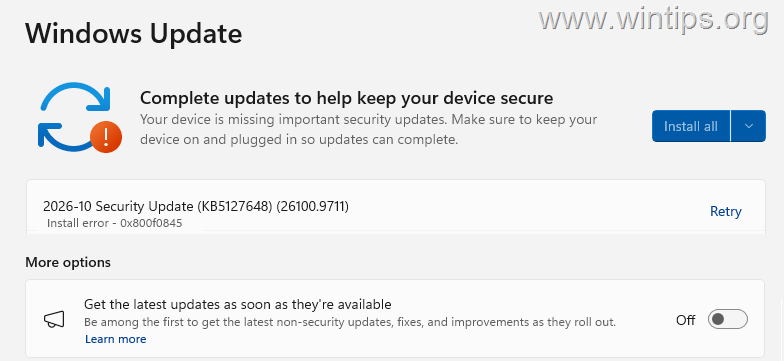
In this guide, you'll find detailed instructions to troubleshoot installation and startup problems after attempting to install the KB5127648 update on Windows 11. Depending on whether Windows starts normally, continue to the appropriate section:
- Part 1. Windows Starts, but KB5127648 Fails to Install with Error 0x800f0845
- Part 2. Windows Won't Start After KB5127648: Automatic Repair or Error 0xc000000d
1. How to Fix: KB5127648 installation fails with error 0x800f0845
Method 1. Manually Install the Latest Cumulative Update.
If Windows starts normally but KB5127648 fails to install, try manually installing a newer cumulative update that applies to your Windows version.
For Windows 11 25H2 and 26H2, one available option is KB5127936, the October 28, 2026 optional preview update. However, Microsoft has not identified it as a universal fix for error 0x800f0845 or the reported startup failures.
Note: KB5127936 does not apply to Windows 11 24H2.
To install KB5127936.
1. Depending on your Windows 11 version (25H2 or 26H2), download all MSU files for update KB5127936 from the Microsoft Update catalog.
2. For an x64-based PC running Windows 11 25H2 or 26H2, install the downloaded files in this order:
-
- windows11.0-kb5043080-x64_953449672073f8fb99badb4cc6d5d7849b9c83e8.msu
- windows11.0-kb5127936-x64_50caf2fe2be948935a804656404d11f17929830b.msu
3. Restart the computer, then check whether the update installed successfully.
Method 2. Reset Windows Update Components & Reinstall the failed update.
Step 1. Reset the Windows Update components:
1. Open Command Prompt as Administrator.
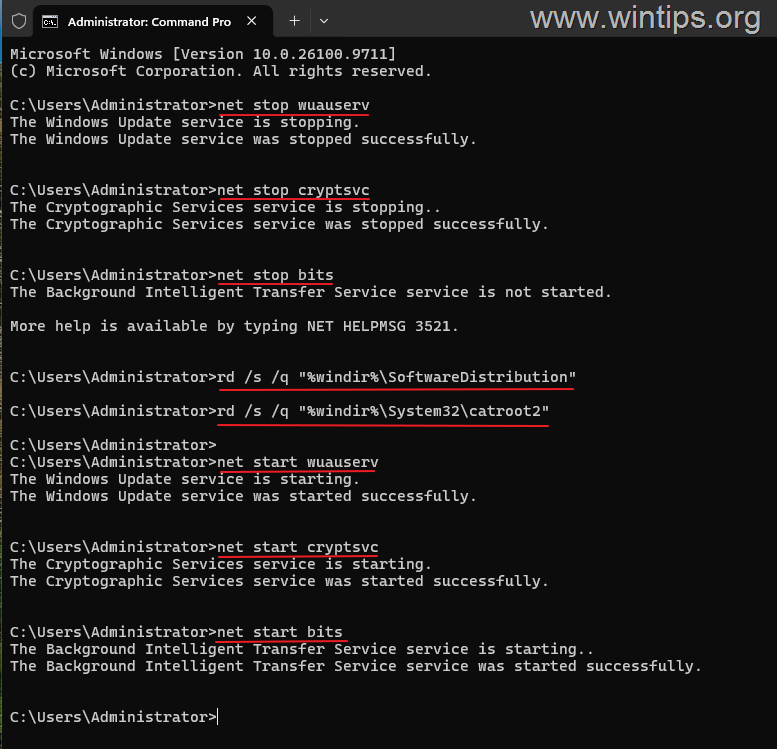
2. In the Command Prompt window, type the following commands in order (hit Enter after typing each command) to reset the update components:*
* Info: The commands stop the Background Intelligent Transfer Service (BITS), Cryptographic Services, and the Windows Update service. They then delete the SoftwareDistribution folder, which stores Windows Update files, and the catroot2 folder, which stores cryptographic catalog databases, and restart the services. Windows automatically recreates these folders as needed.
net stop wuauserv
net stop cryptsvc
net stop bits
rd /s /q "%windir%\SoftwareDistribution"
rd /s /q "%windir%\System32\catroot2"
net start wuauserv
net start cryptsvc
net start bits
3. Restart the computer and continue to the next step.
Step 2. Try to reinstall the failed update.
1. After restarting, go to Settings > Windows Update and click Check for updates.
2. Let Windows to try to install the update again. If the installation fails again, do the following:
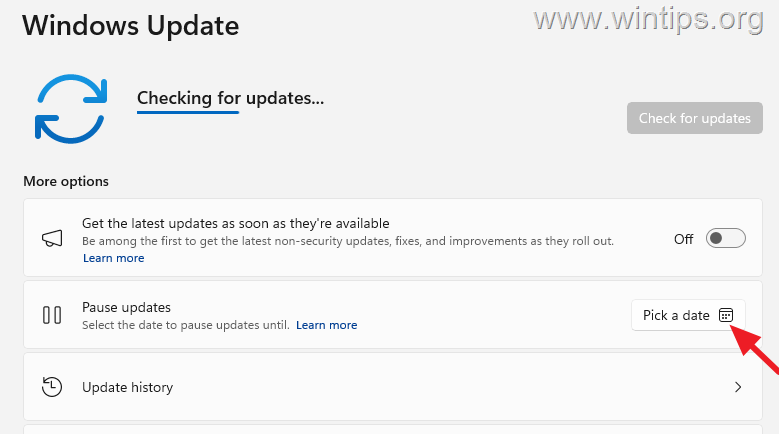
a. Click Retry and then while Windows is trying to install the update, click Pick a date and Pause updates for 1-2 days.
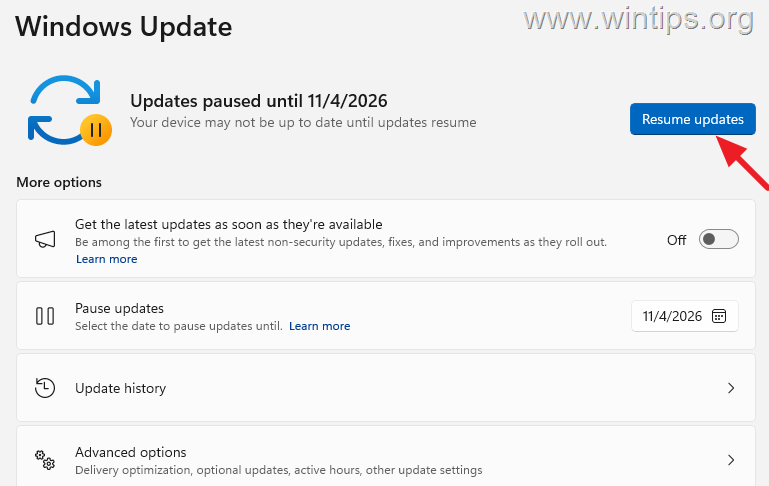
b. After pausing finished, click Resume Updates and let Windows to install the update.
Method 3. Repair Windows System Files with DISM and SFC
The next method to fix Windows Update errors is to repair the Windows component store and check for damaged system files using DISM and System File Checker (SFC).
1. Open Command Prompt as Administrator.
2. In the command prompt window, type the following command and press Enter:*
-
DISM /Online /Cleanup-Image /RestoreHealth
3. Wait while DISM scans and repairs the Windows component store. 4. Next, run the following command:
-
sfc /scannow
4. When the scan is complete, restart your computer and try installing the update again.
Method 4. Reinstall Windows Through Windows Update
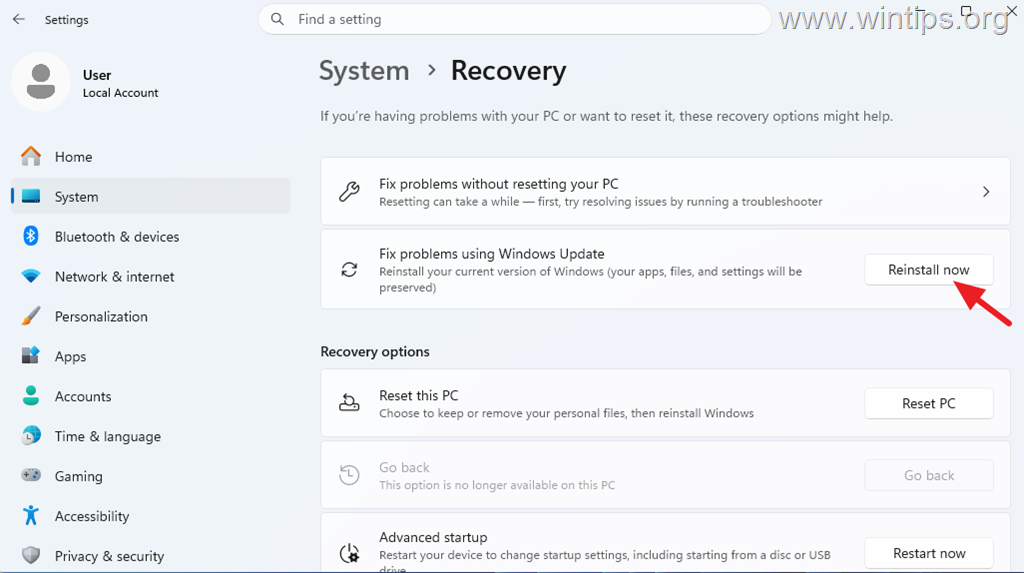
If none of the above methods fixed the problem, use Windows 11’s built-in Fix problems using Windows Update feature. This repair option reinstalls the current version of Windows to repair system files and components while preserving your apps, personal files, and settings. To repair Windows through Windows Update:
1. Go to Start > Settings > System > Recovery.
2. Find Fix problems using Windows Update and click Reinstall now.
3. Follow the instructions to reinstall the current version of Windows. The process can take some time and the computer will need to restart.
4. When the repair is complete, navigate to Settings > Windows Update and Check for updates to download and install all available updates.
2: How to FIX: KB5127648 Cause device to loop to Automatic Repair with error 0xc000000d
Important
KB5127648 was released on October 13, 2026, for Windows 11 versions 24H2, 25H2, and 26H2. The methods below are intended for computers that cannot start Windows normally after installing this update. Before proceeding:
- If your computer uses BitLocker or Device Encryption, make sure you have the recovery key. You can check your Microsoft account or contact your organization's IT administrator.
- If you have important files that aren't backed up, avoid resetting or reinstalling Windows until you have considered how to preserve them.
- If the computer belongs to your organization, contact your IT administrator before changing its recovery or security configuration.
Method 5. Uninstall the Latest Windows Quality Update from WinRE
Step 1. Enter the Windows Recovery Environment (WinRE)
Because Windows cannot start normally, you'll need to access the Windows Recovery Environment (WinRE). To do this:
1. Start your computer and when you see the manufacturer's or the Windows logo on the screen press and hold down the Power button for 5-7 seconds to turn off the computer.
2. Turn on your computer by pressing the power button again.
3. When the computer turns on and you see the manufacturer or Windows logo again, press and hold the power button again to force your computer off again.
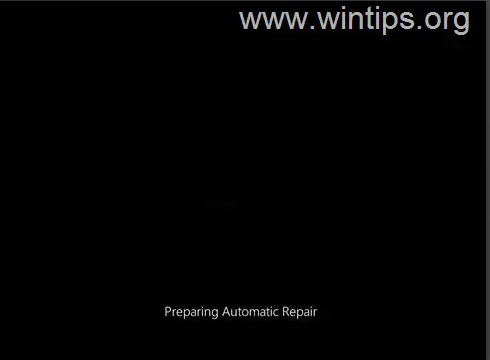
4. Turn on the computer for the third time and let it boot. Windows should display the "Preparing Automatic Repair" screen and then enter Automatic Repair.*
* Note: If this doesn't happen, repeat the above steps one more time to force shutdown you computer one more time, and power on it again.
5. When the 'Automatic Repair' screen appears, click Advanced options and continue to next step.

Step 2. Uninstall latest quality update.
1. In the next screen, choose Troubleshoot > Advanced options > Uninstall Updates
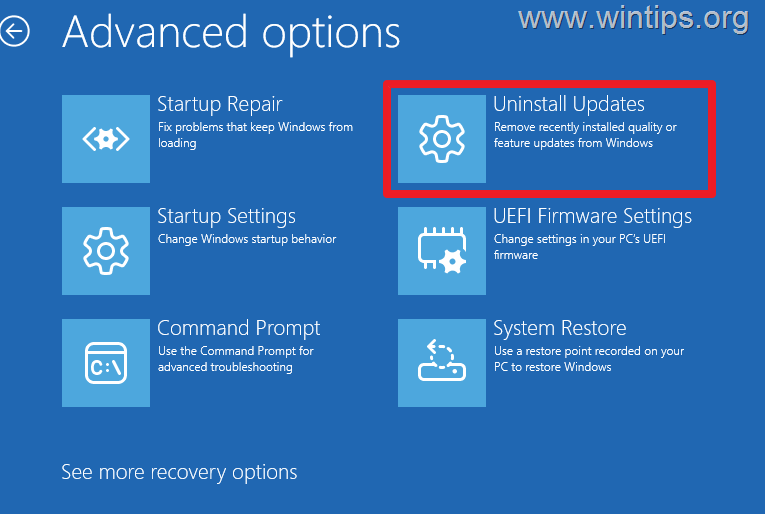
2. If prompted, type your password, and click Continue.
3. Choose Uninstall latest Quality update and follow the on-screen instructions to remove the update.*
* Notes:
- If your device is encrypted, you may be asked to enter the 48 digit BitLocker recovery key to continue.
- If Windows reports that the update cannot be uninstalled, continue to the next Method.
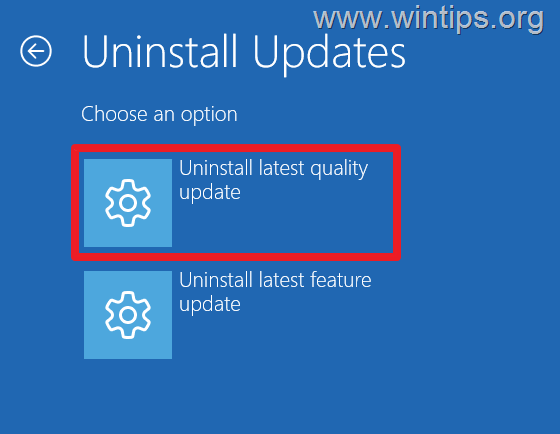
4. When the process finishes, restart your computer.
5. If Windows starts normally, follow the instructions in Method 1 above and install manually the Latest Cumulative Update.
Method 6. Revert Pending Windows Update Actions in WinRE Using DISM
Step 1. Find the Windows Installation Drive
1. Enter the Windows Recovery Environment, using the instructions on step-1 on method-1 above.
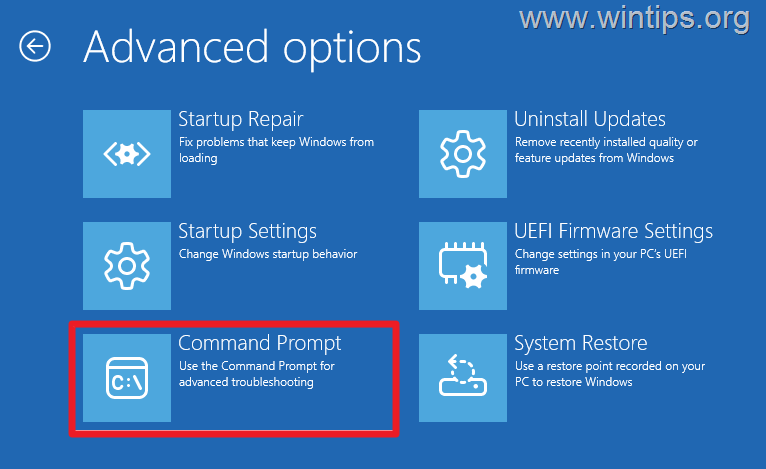
2. In WinRE, select Troubleshoot > Advanced options > Command Prompt.*
* Note: If your device is encrypted, you have to enter the 48 digit BitLocker recovery key to continue.
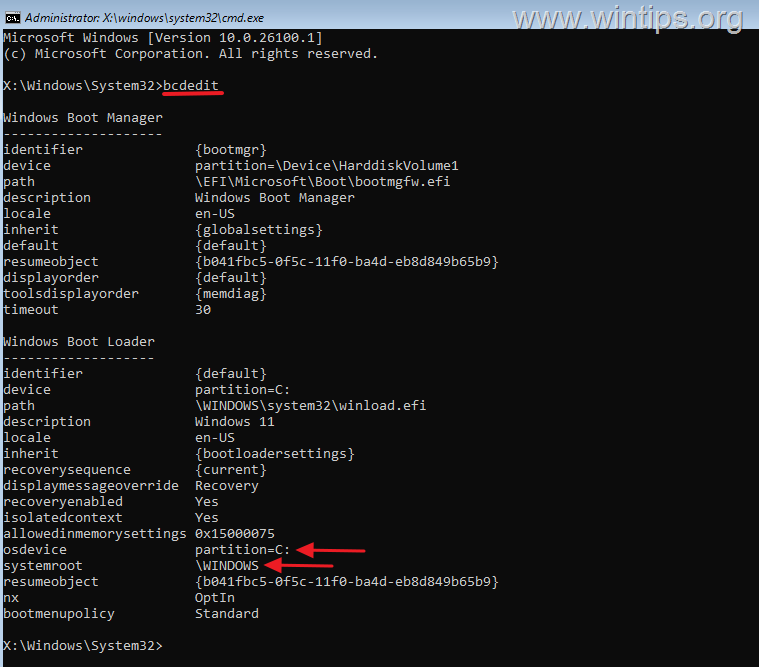
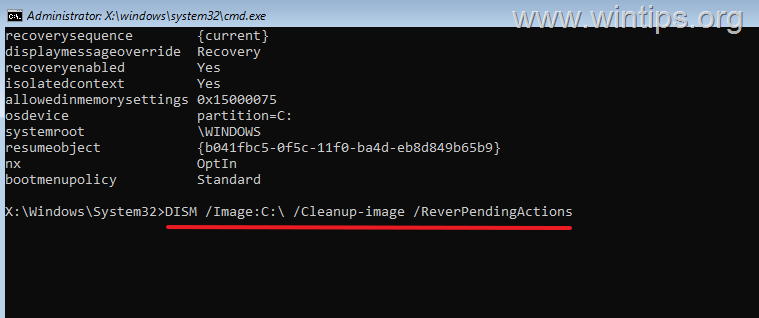
3. Type the following command and press Enter: bcdedit
4. Under Windows Boot Loader, check the osdevice value to identify the Windows installation drive letter (e.g. "C:" in this example) and continue to next step.
Step 2. Revert the Pending Actions
1. After identifying the Windows drive, run the following command by replacing "C" if needed with the actual Windows drive letter to revert pending actions and undo unfinished update changes.:
DISM /Image:C:\ /Cleanup-Image /RevertPendingActions2. Wait until DISM finishes, then close Command Prompt and restart your computer.
3. If Windows starts normally, follow the instructions in Method 1 above and install manually the Latest Cumulative Update.
Method 7. Temporarily Disable Intel TXT in BIOS/UEFI (DELL Computers)
Some users, particularly on Dell computers, have reported that temporarily disabling Intel Trusted Execution Technology (Intel TXT) in BIOS/UEFI allowed Windows 11 to boot again after installing KB5127648.
However, this workaround hasn't been officially confirmed by Microsoft or Dell, and it doesn't work consistently on all affected systems.
Important: Intel TXT is a hardware security feature. Before changing it, make sure you have your BitLocker recovery key and record the original BIOS settings. On company-managed devices, consult your IT administrator first.
1. Restart your computer and enter BIOS/UEFI Setup by pressing the appropriate key during startup (for example, F2 on many Dell computers).
2. Locate Intel Trusted Execution Technology (TXT). Its location and availability depend on the computer model and BIOS version. On some Dell models this setting is located at:
- Virtualization Support > Enable Intel Trusted Execution Technology
3. Set Intel TXT to Off (Disabled).
4. Save the changes and restart the computer.
5. If asked, enter the BitLocker recovery key and check whether Windows starts normally.
6. If Windows starts normally, reboot the computer, go to BIOS again and re-enable Intel TXT.
7. Finally, follow the instructions in Method 1 above and install manually the Latest Cumulative Update.
Summary
If KB5127648 fails to install with error 0x800f0845 but Windows starts normally, try installing a newer compatible cumulative update, resetting the Windows Update components, or repairing Windows with DISM and SFC. If necessary, use Fix problems using Windows Update to reinstall Windows while preserving your apps, files, and settings.
If Windows won't start or repeatedly enters Automatic Repair, use WinRE to uninstall the latest quality update. If unfinished update operations prevent startup, DISM RevertPendingActions may help.
That's it! Which method worked for you?
Let me know if this guide has helped you by leaving your comment about your experience. Please like and share this guide to help others.
Frequently Asked Questions
What should I do if the Windows 11 update KB5127648 fails to install with error 0x800f0845?
Try manually installing a newer cumulative update, such as KB5127936 for Windows 11 25H2 and 26H2. If this doesn't resolve the issue, reset Windows Update components and attempt to reinstall the update. You can also use DISM and SFC to repair Windows system files.
How can I manually install the KB5127936 update on Windows 11?
First, download all MSU files for update KB5127936 from the Microsoft Update catalog for your Windows version. For x64-based PCs on Windows 11 25H2 or 26H2, install 'windows11.0-kb5043080-x64' and then 'windows11.0-kb5127936-x64'. Restart your computer to ensure successful installation.
What can I do if Windows won't start after installing the KB5127648 update, showing errors like 0xc000000d?
If your computer enters Automatic Repair or displays a Recovery screen after the update, follow troubleshooting steps such as resetting Windows Update components, repairing with DISM and SFC, or even rolling back the update via safe mode if necessary.
Does KB5127648 cause Automatic Repair on all Windows 11 computers?
No. Startup failures have been reported after the update on some systems, but the number of affected computers and a common underlying cause haven't been established.
Still having trouble fixing this issue?
💬 Get WinTips Remote Support →

- KB5127648 Fails to Install (0x800f0845) or Causes Windows 11 to Loop in Recovery Mode (0xc000000d): How to Fix - November 4, 2026
- How to Set Microsoft Edge as the Default Browser on iOS Devices Using Intune. - November 2, 2026
- How to Fix SecurityHealthSystray.exe – Bad Image Error (0xc000012f) on Windows 11. - October 26, 2026