How to remove VideoScavenger toolbar (Adware Removal Guide)
VideoScavenger toolbar is a browser hijacker and adware software that changes the default homepage and search settings to “http://search.tb.ask.com/” in popular Web browsers, such as Internet Explorer, Google Chrome or Mozilla Firefox, without the user’s permission. In fact, VideoScavenger toolbar installer program modifies the browser settings in order to perform browsing redirects into advertisements and earn money from their publishers.
VideoScavenger toolbar hijacker is designed to modify your browser settings and may install additional plugins (toolbars, extensions or add-ons) in your Web browser in order to promote other links or products. Browser hijackers like this, may redirect the user's computer into malicious websites or may install malicious programs in order to compromise the user's computer to security risks.
Technically VideoScavenger toolbar is not a virus and is categorized as a malware program (“Potentially Unwanted Program (PUP)”) that may contain and install malicious programs on your computer, like adware, Trojans or viruses. If a computer is infected with “VideoScavenger” hijacker, then more pop-up ads, banners and sponsored links are displayed on the victim’s computer screen or inside the Internet browser and in some cases the computer speed may be slowed down due to malicious programs running on the background.
VideoScavenger adware program was probably installed without the user's notice because it is commonly bundled inside other freeware software which are downloaded -and installed- from known internet sites like “download.com (CNET)”, “Softonic.com”, etc. For that reason, you must always pay attention at the installations options for any program you install on your computer, because most software installers contain additional software that you never wanted to install. In simple words, DO NOT INSTALL ANY IRRELEVANT SOFTWARE that comes with the software installer of the program that you want to install. More specifically, when you install a program on your computer:
- DO NOT PRESS the “Next” button too fast at the installation screens.
- READ VERY CAREFULLY the Terms and Agreements before clicking ACCEPT.
- ALWAYS SELECT: “Custom” installation.
- DECLINE to install any offered additional software that you don’t want to install.
- UNCHECK any option that says that your homepage and search settings will be modified.
How to get rid of “VideoScavenger” Adware software.
Step 1: Start your computer in “Safe Mode with Networking”
Start your computer in Safe mode with network support. To do that:
Windows 7, Vista & XP users:
- Close all programs and reboot your computer.
- Press the "F8" key as your computer is booting up, before the appearance of the Windows logo.
- When the "Windows Advanced Options Menu" appears on your screen, use your keyboard arrows keys to highlight the “Safe Mode with Networking” option and then press "ENTER".
Windows 8 & 8.1 users:
- Press “Windows”
 + “R” keys to load the Run dialog box.
 - Type “msconfig” and press Enter.
- Click the Boot tab and check “Safe Boot” & “Network”.
- Click “OK” and restart your computer.
Note: In order to boot Windows in “Normal Mode” again, you have to uncheck the “Safe Boot” setting by using the same procedure.
Step 2. Uninstall "VideoScavenger” toolbar from your Control panel.
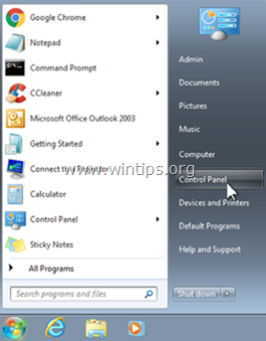
1. To do this, go to:
- Windows 8/7/Vista: Start > Control Panel.
- Windows XP: Start > Settings > Control Panel
2. Double click to open
- Add or Remove Programs if you have Windows XP
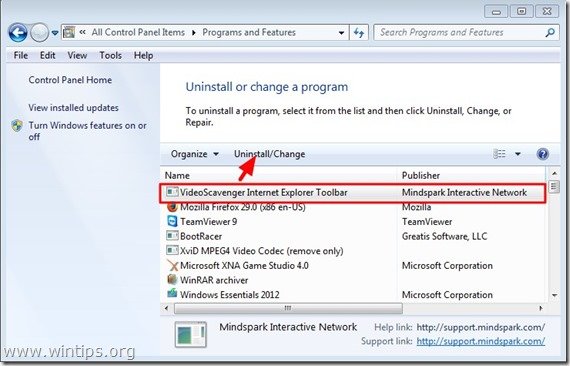
- Programs and Features if you have Windows 8, 7 or Vista.
3. In the program list, find and Remove (Uninstall) any program by “Mindspark Interactive Network” publisher:
- VideoScavenger Internet Explorer Toolbar*
* Also remove any other unknown or unwanted application.
Step 3: Remove Video Scavenger with “AdwCleaner”.
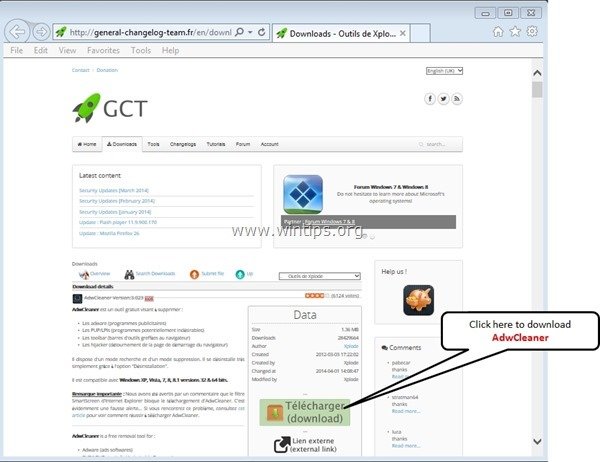
AdwCleaner is a free removal tool that can easily remove Adware software (ads software), PUPs (Potentially Unwanted Programs), Toolbars, Hijackers, etc.
1. Download and save “AdwCleaner” utility to your desktop.
2. Close all open programs and Double Click to open ”AdwCleaner” from your desktop.
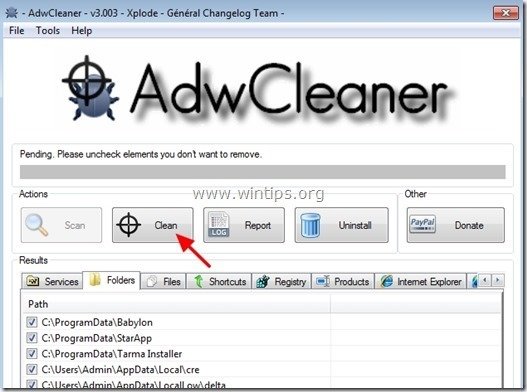
3. After accepting the “License Agreement” press the “Scan” button.
4. When the scan is completed, press “Clean” to remove all the unwanted malicious entries.
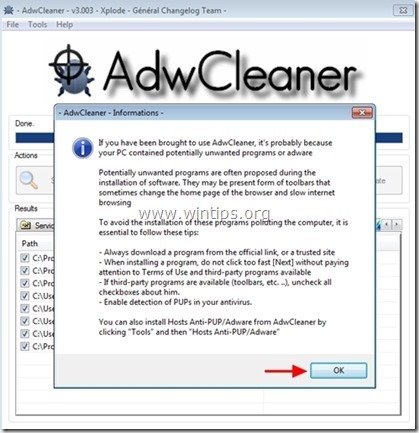
4. Press “OK” at “AdwCleaner – Information” and press “OK” again to restart your computer.
5. When your computer restarts, close "AdwCleaner" information (readme) window and continue to the next step
Step 4. Remove “VideoScavenger” entries from Windows Startup.
1. Download and run CCleaner.
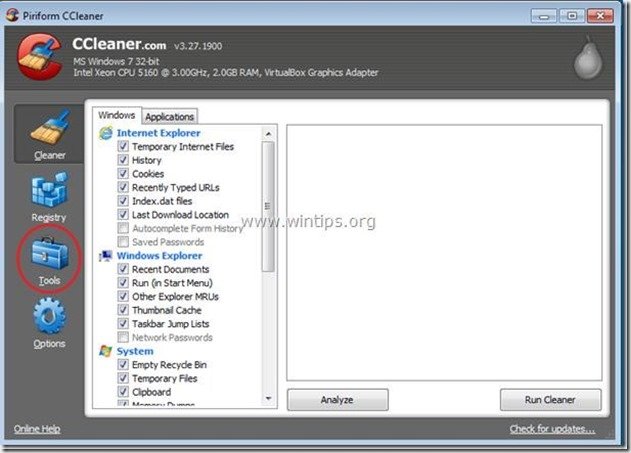
2. At “CCleaner” main window, choose "Tools" on the left pane.
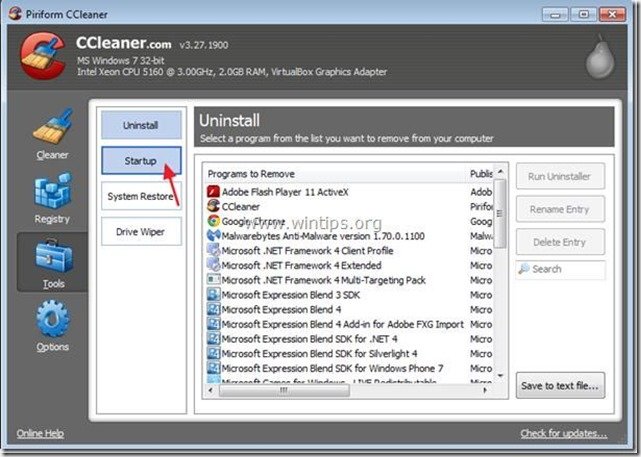
3. In "Tools" section, choose "Startup".
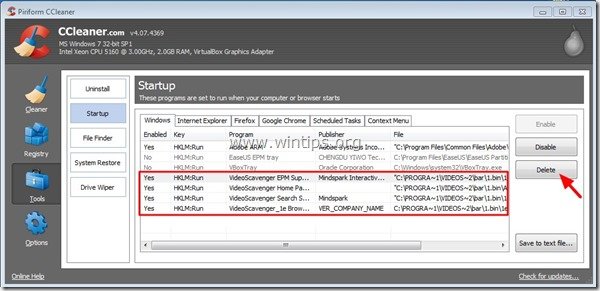
4. Choose "Windows” tab and then select and delete the following malicious entries:
- VideoScavenger EPM Support | Mindspark Interactive Network, Inc. | "C:\PROGRA~1\VIDEOS~2\bar\1.bin\1emedint.exe" T8EPMSUP.DLL,S
- VideoScavenger Home Page Guard 32 bit | "C:\PROGRA~1\VIDEOS~2\bar\1.bin\AppIntegrator.exe"
- VideoScavenger Search Scope Monitor | Mindspark "C:\PROGRA~1\VIDEOS~2\bar\1.bin\1esrchmn.exe" /m=2 /w /h
- VideoScavenger_1e Browser Plugin Loader | VER_COMPANY_NAME | C:\PROGRA~1\VIDEOS~2\bar\1.bin\1ebrmon.exe
5. Close CCleaner.
Step 5. Remove ‘VideoScavenger’ with Junkware Removal Tool.
1. Download and run JRT – Junkware Removal Tool.
2. Press any key to start scanning your computer with “JRT – Junkware Removal Tool”.
3. Be patient until JRT scans and cleans your system.
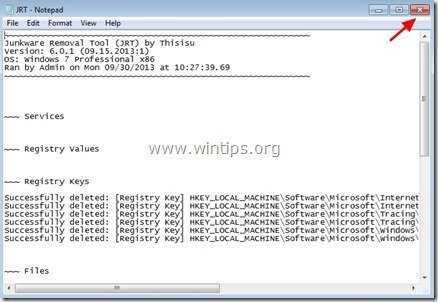
4. Close JRT log file and and then reboot your computer.
Step 6.Ensure that “VideoScavenger” toolbar & search settings are removed from your internet browser.
Internet Explorer, Google Chrome, Mozilla Firefox
Internet Explorer
How to remove “VideoScavenger” toolbar & search settings from Internet Explorer.
1. From Internet Explorer main menu, click: "Tools " ![]() and choose "Internet Options".
and choose "Internet Options".
2. At “General” tab, delete the unwanted homepage (http://search.tb.ask.com) from “Home page” box & type your preferred Home Page (e.g. www.google.com) and press “OK”.
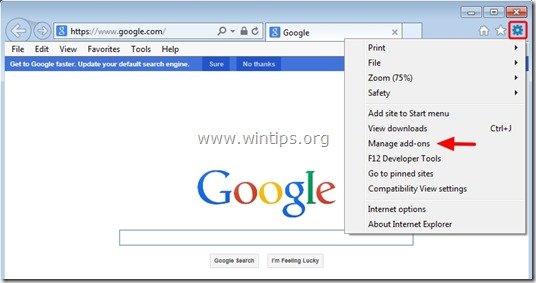
3. From“Tools” menu, choose “Manage Add-ons” .
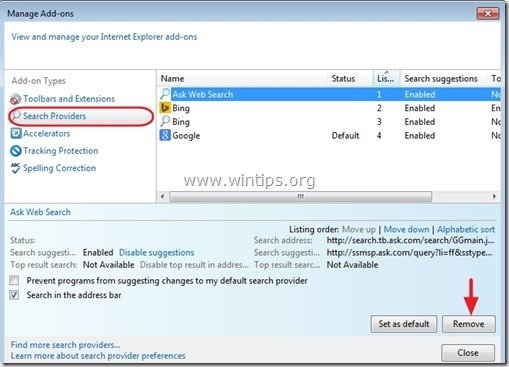
4. On "Search Providers" options, choose and "Set as default" a search provider other than the unwanted search provider “Ask Web Search”.
5. Then choose the unwanted search provider “ASK Web Search” & click Remove.
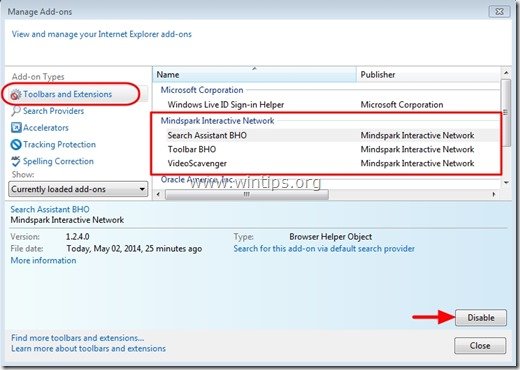
6. Choose “Toolbars and Extensions”on the left pane and then “Disable” any unwanted toolbar or extension from “MindSpark Interactive Network” publisher.
- Extensions to disable/remove in this case:
- Search Assistant BHO
- Toolbar BHO
- VideoScavenger
7. Close all Internet Explorer windows and restart Internet Explorer.
Google Chrome
How to remove “VideoScavenger Toolbar” from Google Chrome.
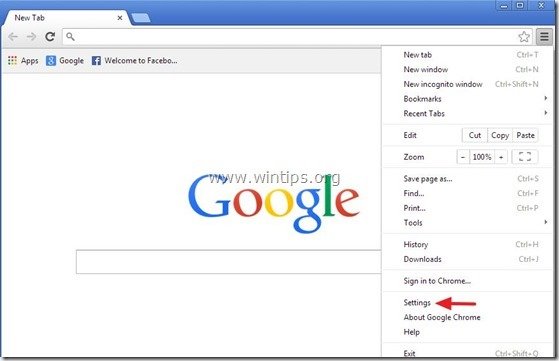
1. Open Google Chrome and go to chrome menu ![]() and choose "Settings".
and choose "Settings".
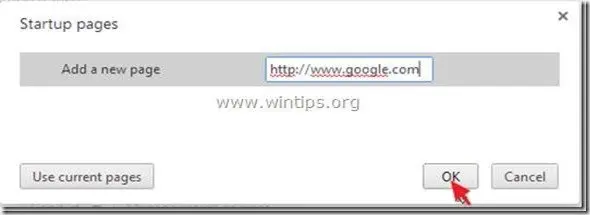
2. Find the "On startup" section and choose "Set Pages".
3. Delete the "home.tb.ask.com" from startup pages by pressing the "X" symbol on the right.
4. Set your preferred startup page (e.g. http://www.google.com) and press "OK".
5. Under “Appearance” section, check to enable the “Show Home button” option and choose “Change”.
6. Delete the “search.ask.com” entry from “Open this page” box.
7. Type (if you like) your preferred webpage to open when you press your “Home page” button (e.g. www.google.com) or leave this field blank and press “OK”.
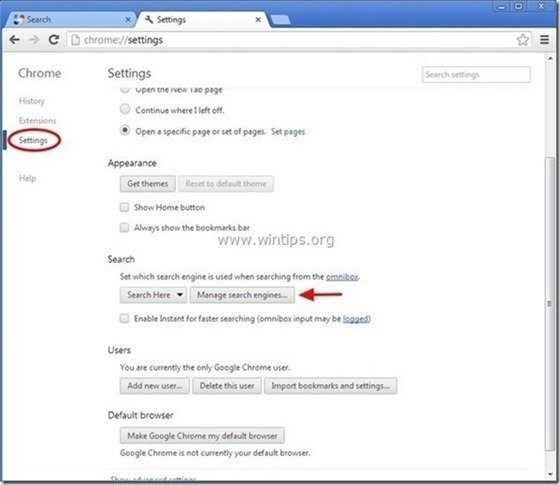
8. Go to "Search" section and choose "Manage search engines".
9. Choose your preferred default search engine (e.g. Google search) and press "Make default".
7. Then choose the Ask.com search engine “search.tb.ask.com" and remove it by pressing the "X" symbol at the right.
Choose "Done" to close "Search engines" window.
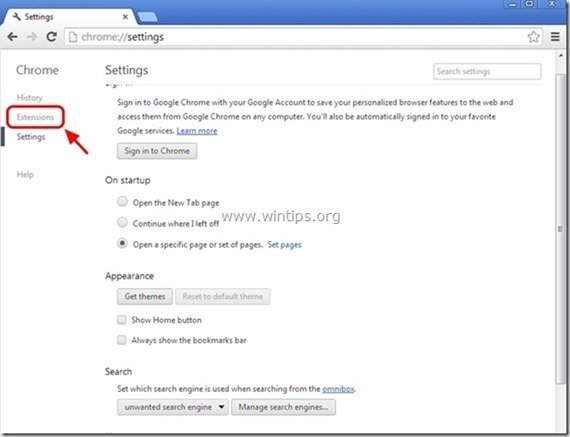
8. Choose "Extensions" on the left.
9. In “Extensions” options, remove the “VideoScavenger” unwanted extension by clicking the recycle icon on the right.
10. Close all Google Chrome windows and restart Chrome.
How to remove VideoScavenger toolbar & search settings from Mozilla Firefox.
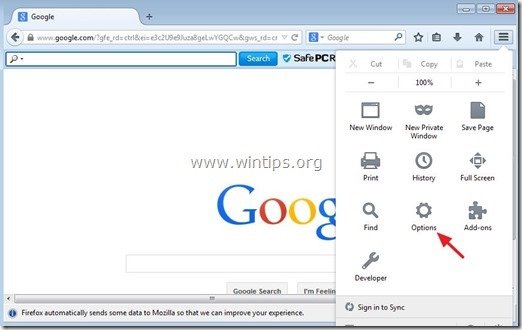
1. Click on “Firefox” menu button on the top left of Firefox window and go to “Options”.
2. In “General” tab, delete the unwanted homepage: “home.tb.ask.com” page from “Home Page” box & type your preferred homepage (e.g. http://www.google.com).
Press “OK” when finished.
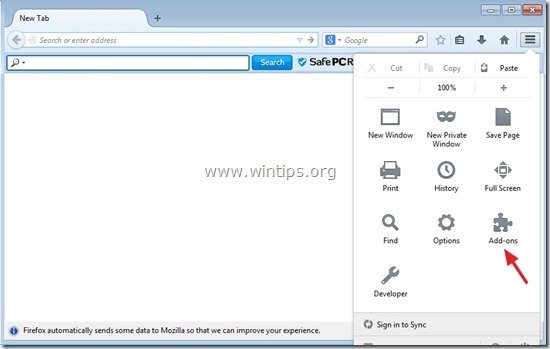
3. From Firefox menu, go to “Tools” > “Manage Add-ons”.
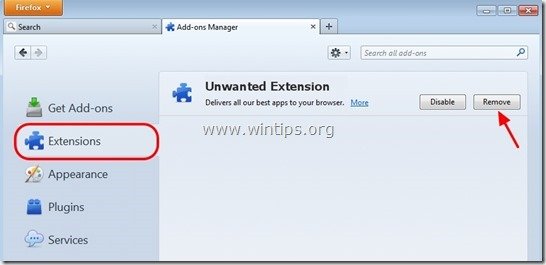
4. Choose “Extensions” on the left and then remove the unwanted “VideoScavenger” extension, by pressing the "Remove" button.
5. Close all Firefox windows and restart Firefox.
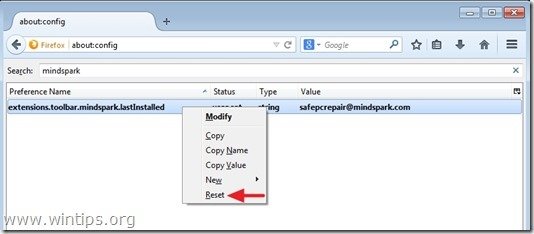
6. On Firefox URL box, type the following command: about:config & press Enter.
7. Click at “I’ll be careful, I promise” button.
8. In the search box, type: “mindspark” & press Enter.
9. Now right-click on every “mindspark” value found & select “Reset”.
10. Close all Firefox windows and restart Firefox.
Step 7. Remove VideoScavenger with MalwareBytes Anti-Malware Free.
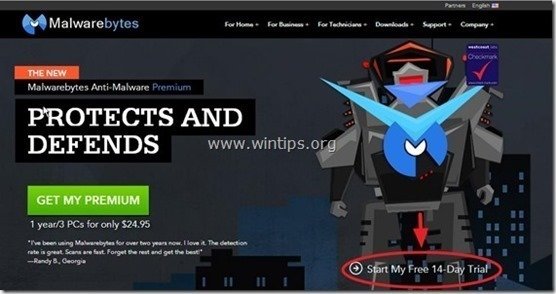
Download and install one of the most reliable FREE anti malware programs today to clean your computer from remaining malicious threats. If you want to stay constantly protected from malware threats, existing and future ones, we recommend that you install Malwarebytes Anti-Malware Premium:
Malwarebytes™ Protection
Removes Spyware, Adware & Malware.
Start Your Free Download Now!
Quick download & Installation instructions:
- After you click the above link, press at the “Start My Free 14-Trial” option to start your download.
- To install the FREE version of this amazing product, uncheck the “Enable free Trial of Malwarebytes Anti-Malware Premium” option at the last installation screen.
Scan & Clean your computer with Malwarebytes Anti-Malware.
1. Run "Malwarebytes Anti-Malware" and allow the program to update to its latest version and malicious database if needed.
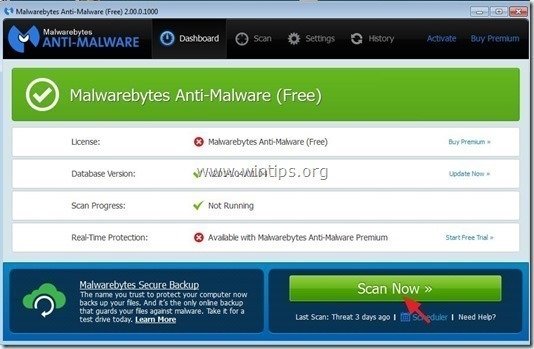
2. When the update process is completed, press the “Scan Now” button to start scanning your system for malware and unwanted programs.
3. Now wait until Malwarebytes Anti-Malware finishes scanning your computer for malware.
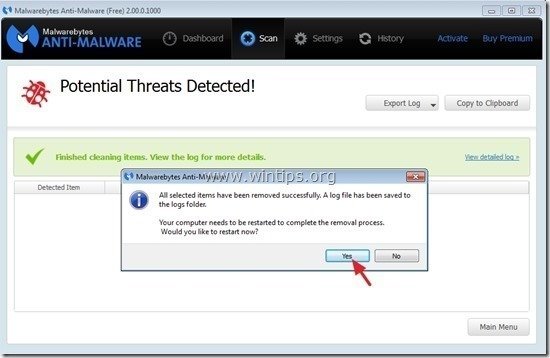
4. When the scan has completed, first press the “Quarantine All” button to remove all threats and then click “Apply Actions”.
5. Wait until Malwarebytes Anti-Malware removes all infections from your system and then restart your computer (if required from the program) to completely remove all active threats.
6. After the system restarts, run Malwarebytes' Anti-Malware again to verify that no other threats remain in your system.
Advice: To ensure that your computer is clean and safe, perform a Malwarebytes' Anti-Malware full scan in Windows "Safe mode". Detailed instructions on how to do that you can find here.
Step 8. Restart your computer & perform a full scan with your original antivirus program.
We're hiring
We're looking for part-time or full-time technical writers to join our team! It's about a remote position that qualified tech writers from anywhere in the world can apply. Click here for more details.
- FIX: Error 0x8007025d in Windows 10 Update. - April 22, 2024
- How to Disable Device Encryption in Windows 11/10. - April 17, 2024
- How to View Permissions on Shared Folders on Windows 10/11. - April 15, 2024

![videoscavenger[3] videoscavenger[3]](https://www.wintips.org/wp-content/uploads/2014/05/videoscavenger3_thumb.jpg)
![safe-mode-with-networking_thumb1_thu[2] safe-mode-with-networking_thumb1_thu[2]](https://www.wintips.org/wp-content/uploads/2014/05/safe-mode-with-networking_thumb1_thu2_thumb.jpg)
![windows-8-safe-mode-networking3_thum[2] windows-8-safe-mode-networking3_thum[2]](https://www.wintips.org/wp-content/uploads/2014/05/windows-8-safe-mode-networking3_thum2_thumb.jpg)
![add-remove-programs_thumb1_thumb1_th[2] add-remove-programs_thumb1_thumb1_th[2]](https://www.wintips.org/wp-content/uploads/2014/05/add-remove-programs_thumb1_thumb1_th2_thumb.jpg)




![change-internet-explorer-homepage_th[1] change-internet-explorer-homepage_th[1]](https://www.wintips.org/wp-content/uploads/2014/05/change-internet-explorer-homepage_th1_thumb1.jpg)
![sbjlgsje_thumb1_thumb1_thumb_thumb_t[2] sbjlgsje_thumb1_thumb1_thumb_thumb_t[2]](https://www.wintips.org/wp-content/uploads/2014/05/sbjlgsje_thumb1_thumb1_thumb_thumb_t2_thumb.jpg)
![guzoj5bj_thumb1_thumb1_thumb_thumb1_[2] guzoj5bj_thumb1_thumb1_thumb_thumb1_[2]](https://www.wintips.org/wp-content/uploads/2014/05/guzoj5bj_thumb1_thumb1_thumb_thumb1_2_thumb.jpg)
![remove-ask-startup-page-chrome_thumb[2] remove-ask-startup-page-chrome_thumb[2]](https://www.wintips.org/wp-content/uploads/2014/05/remove-ask-startup-page-chrome_thumb2_thumb.jpg)
![5da1byf3_thumb2_thumb2_thumb_thumb_t[1] 5da1byf3_thumb2_thumb2_thumb_thumb_t[1]](https://www.wintips.org/wp-content/uploads/2014/05/5da1byf3_thumb2_thumb2_thumb_thumb_t1_thumb.jpg)
![delete-ask-search-new-tab-chrome_thu[2] delete-ask-search-new-tab-chrome_thu[2]](https://www.wintips.org/wp-content/uploads/2014/05/delete-ask-search-new-tab-chrome_thu2_thumb.jpg)

![set-default-search-engine_thumb1_thu[2] set-default-search-engine_thumb1_thu[2]](https://www.wintips.org/wp-content/uploads/2014/05/set-default-search-engine_thumb1_thu2_thumb.jpg)


![firefox-general-options-homepage_thu[2] firefox-general-options-homepage_thu[2]](https://www.wintips.org/wp-content/uploads/2014/05/firefox-general-options-homepage_thu2_thumb1.jpg)

![g22bi4re_thumb1_thumb_thumb_thumb_th[2] g22bi4re_thumb1_thumb_thumb_thumb_th[2]](https://www.wintips.org/wp-content/uploads/2014/05/g22bi4re_thumb1_thumb_thumb_thumb_th2_thumb.jpg)

![malwarebytes-anti-malware-free-insta[1] malwarebytes-anti-malware-free-insta[1]](https://www.wintips.org/wp-content/uploads/2014/05/malwarebytes-anti-malware-free-insta1_thumb1.jpg)

![malwarebytes-scan_thumb1_thumb_thumb[1] malwarebytes-scan_thumb1_thumb_thumb[1]](https://www.wintips.org/wp-content/uploads/2014/05/malwarebytes-scan_thumb1_thumb_thumb1_thumb2.jpg)

