FIX: Cannot Boot from Secondary Mirror Drive in Windows 10 (Solved)
This tutorial contains instructions to fix the follow problem: On a Windows 10 based computer, where the boot drive was mirrored using the Windows Mirror feature (S/W RAID-1), the system cannot boot from the secondary mirror drive if the primary drive fails to boot or becomes damaged.
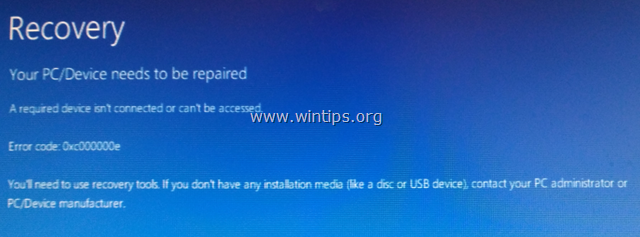
Problem description: Windows cannot boot from the secondary mirrored boot disk with BSOD Error code 0x000000e : "Your PC/Device needs to be repaired. A required device isn't connected or can be accessed."
In this guide you can find detailed instructions to resolve boot problems with a secondary mirrored drive, on Windows 10,8 or 7 OS.
How to fix: Windows 10 cannot boot from Secondary Mirror Boot Disk.
Method-1. Fix Secondary Mirror Cannot Boot using Disk Management from Windows Secondary Plex.
Method-2. Fix Secondary Mirror Cannot Boot using using Recovery Environment.
Method-1. Fix Secondary Mirror Cannot Boot using Disk Management from Windows Secondary Plex.
Note: The instructions below assumes you have only the secondary mirror boot drive connected on the system.
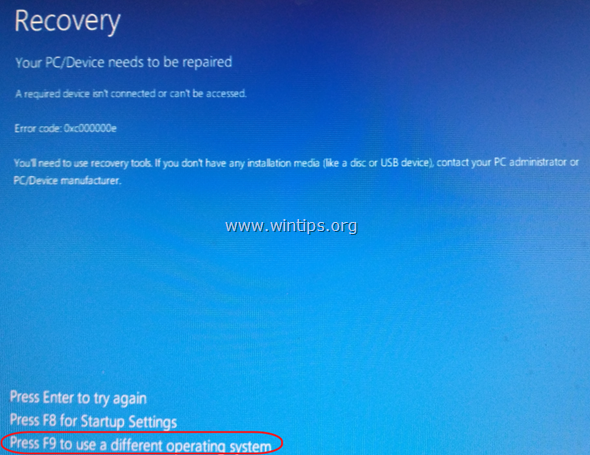
1. At the blue screen: Press F9 to use a different operating system.
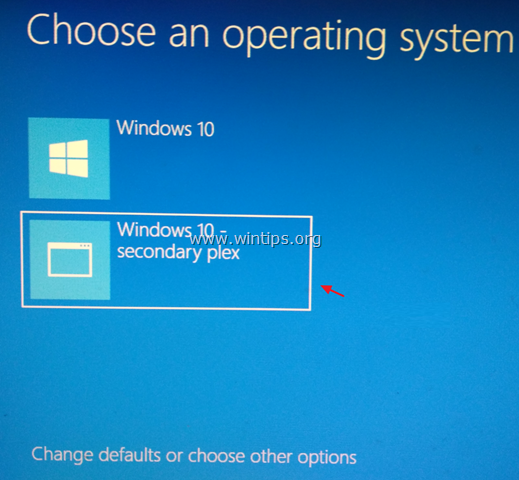
2. Using the down arrow key, highlight the "Windows 10 – secondary plex" option and press Enter.
3. The system should boot normally to Windows 10. If Windows doesn't boot, then skip the below steps and proceed to Method-2.
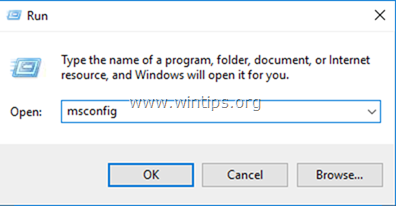
4. Open the "System Configuration" utility. To do that:
1. Press the “Windows”
+ “R” keys to load the Run dialog box.
2. Type msconfig and press Enter.
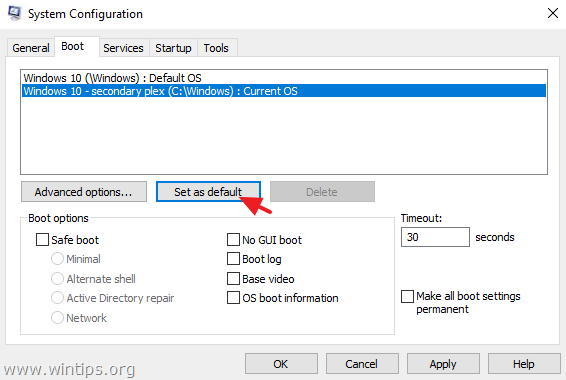
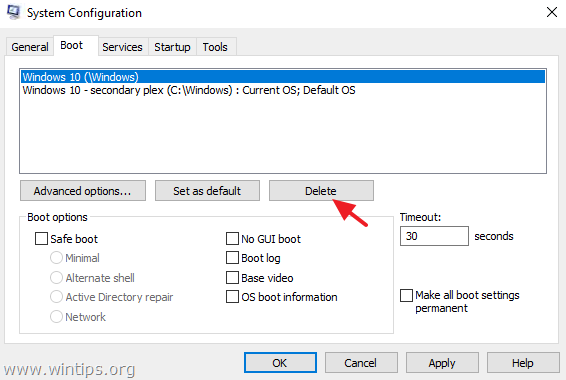
5. At Boot tab, perform the following actions:
a. Select the "Windows 10 – secondary plex (C:\Windows) : Current OS" entry and click Set at default.
b. Then select the "Windows 10 (Windows)" entry and click Delete.
6. Click OK to exit from the System Configuration utility and restart your computer.
7. After restart open Disk Management. To do that:
1. Press the “Windows”
+ “R” keys to load the Run dialog box.
2. Type diskmgmt.msc and press Enter.
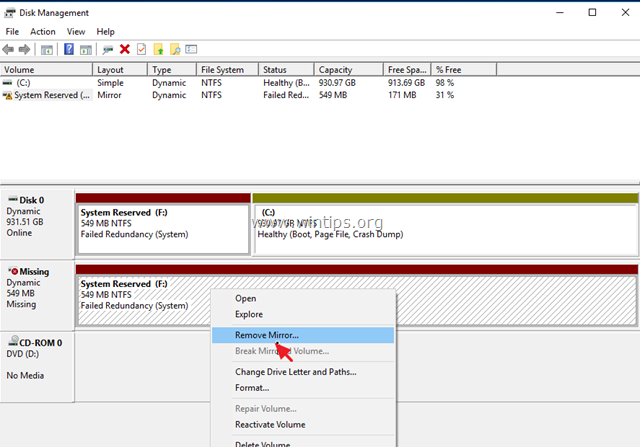
8. Right click on the Missing Volume(s) and select Remove Mirror.
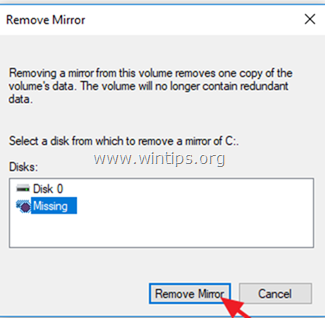
9. Highlight the Missing disk and click Remove Mirror.
10. Click Yes at the next screen to remove the Mirror.
11. Perform the same actions and remove the mirror on all other volume(s).
12. You 're done!
Method-2. Fix Secondary Mirror Cannot Boot using using the Recovery Environment.
Notes:
1. The instructions below assumes you have only the secondary mirror boot drive connected on the system.
2. This method requires to start you computer from a Windows Recovery media (USB or DVD). If you don’t own a Recovery Media then you can create one by using Microsoft’s Media Creation tool.
- Related articles:
Step-1. Break the Mirror from Recovery Environment.
1. Power on your PC and boot from a Windows 10 installation/recovery media.
2. At the Windows Setup screen press SHIFT + F10 to access command prompt, or choose Next –> Repair your computer –> Troubleshoot –> Advanced Options –> Command Prompt.
3. In command prompt type: diskpart and press enter.
4. Then find out which volumes are failed, by typing: *
- list volume
* e.g. Note which volumes are marked with Status: "Failed Rd". As you can see at the screen, two (2) Volumes are Failed: "Volume 0" & "Volume 1"
5. Select the first failed Volume:
- select volume 0
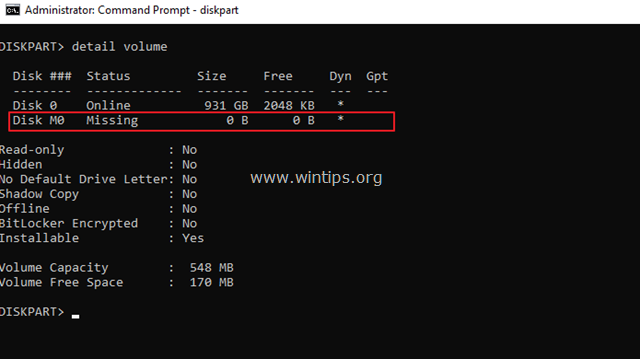
6. Now view the details of the selected volume and find out the identifier of the missing disk: *
- detail volume
* e.g. As you can see at the screenshot, the missing disk is the "Disk M0"
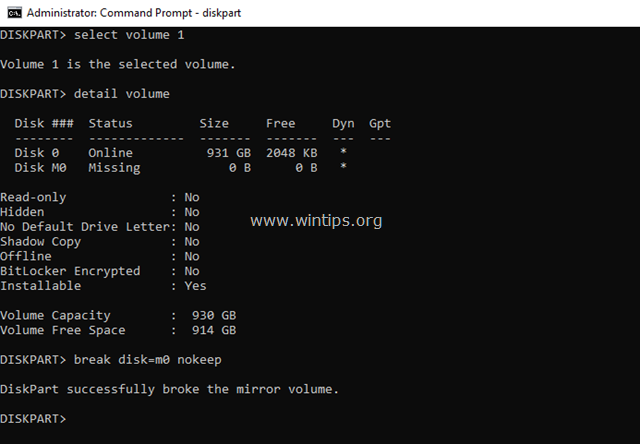
7. Once you know the identifier, break the mirror on the selected volume, by typing this command: *
- break disk=m0 nokeep
* Note: The "m0" is the identifier of the missing disk. According you case, change it ( if it is different).
8. If the disk contains more that one failed volume (see step-4 above), then proceed and remove them also. Otherwise continue to next step. *
* e.g. At this example the failed volumes are two ("Volume 0" & "Volume 1". So, we have to break also the mirror at "Volume 1":
-
- select volume 1
- detail volume
- break disk=m0 nokeep
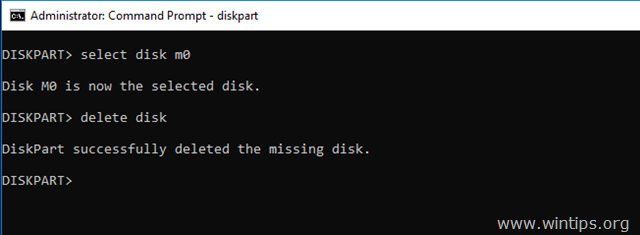
9. Then, remove the missing disk, by typing these commands in order:
- select disk m0
- delete disk
* Note: The "m0" is the identifier of the missing disk. According you case, change it ( if it is different).
10. When done, type exit to close DISKPART utility and continue to the next step.
Step 2. FIX the Boot Configuration Data (BCD).
In order to be able to start your system, from the secondary mirror drive, if the first primary drive fails, you have to repair the BCD (Boot Configuration Data) on the secondary disk. The instructions to repair the boot configuration data are different for Legacy (MBR) & UEFI (GPT) based systems. So, follow the corresponding instructions below, according your case.
How to FIX BCD on a Legacy Based System after Breaking the mirror (MBR). *
* Note: To apply the instructions below you have to enter command in recovery environment.
1. To repair the boot configuration data (BCD) give the following commands in order:
-
-
- bootrec /fixmbr
- bootrec /fixboot
- bootrec /scanos *
-
* Note: If after executing the "bootrec /scanos" command you receive that "Total identified Windows installations = 0" then give the following commands, before you continue to the next step:
-
-
- bcdedit /export C:\bcdbackup
- C:
- cd boot
- attrib bcd -s -h –r
- ren C:\boot\bcd bcd.old
-
2. Rebuild Boot Configuration Data:
- bootrec /rebuildbcd
3. Press "A" to Add installation to boot list and press Enter.
4. Continue to Step-3.
How to FIX BCD on a UEFI Based System after Breaking the mirror (GPT).
* Note: To apply the instructions below you have to enter command in recovery environment.
1. In command prompt type the following commands in order:
- diskpart
- select disk 0
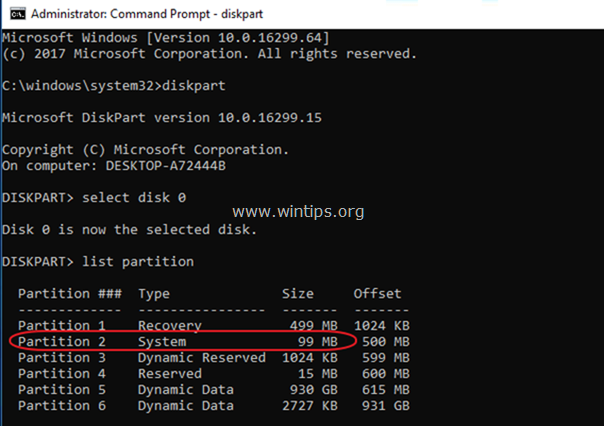
- list partition
2. Note the size in Megabytes at System Partition. *
* e.g. As you can see at the screenshot below, the partition size in System partition is 99 MB.
3. Find the volume number of the system partition, by typing this command: *
- list volume
* e.g. At the previous step we found that the system partition is 99 MB. So, at this example, we understand that the System partition is the Volume 2.
4. Assign a drive letter to the System Volume and exit DISKPART, by giving these commands in order:
- select volume 2 *
- assign letter=Z
- exit
* Note: Change the Volume number according your case.
5. Finally, type the following command, to fix the Boot Configuration Data (BCD) on the disk.
- bcdboot C:\windows /s Z: /f UEFI
6. Continue to Step-3 below.
Step-3. Set the Working Plex as Default and Delete the missing OS from BCD Entries.
1. In command prompt, type the following command to view the Boot menu entries:
- bcdedit /enum
2. At "Boot Loader" section, note the identifier "ID", of the working operating system (e.g. "Windows 10 – secondary plex") and set it as default, by using this command: *
- becedit /default {ID}
* Note: The "ID" is the GUID for the Windows boot loader boot entry that is associated with the operating system that you want to set as the default.
e.g. If the working mirror is the "Windows 10 – secondary plex" with GUID= {7a995fa6-cf2c-11e7-9da1-f1b4c61b71cc} then you have to type:
- becedit /default {7a995fa6-cf2c-11e7-9da1-f1b4c61b71cc}
3. Then note the identifier "ID" of the missing operating system and remove it from the boot list, using this command:
- bcdedit /delete {GUID}
Note: The "ID" is the GUID for the Windows boot loader boot entry that is associated with the operating system that you want to remove from the boot menu entries.
e.g. If the missing mirror is the "Windows 10" with GUID= {7a995fa6-cf2c-11e7-9da1-f1b4c61b71bb} then you have to type:
- bcdedit /delete {7a995fa6-cf2c-11e7-9da1-f1b4c61b71bb}
4. Close all windows, remove the recovery media and restart your computer.
That’s all folks! Did it work for you?
Please leave a comment in the comment section below or even better: like and share this blog post in the social networks to help spread the word about this solution.
We're hiring
We're looking for part-time or full-time technical writers to join our team! It's about a remote position that qualified tech writers from anywhere in the world can apply. Click here for more details.
- FIX: Numeric keypad Not Working on Windows 10/11 - July 24, 2024
- How to Share Files or Printers in Hyper-V? - July 22, 2024
- How to invoke Hyper-V Screen resolution prompt? - July 17, 2024









June 2, 2022 @ 1:27 pm
Thanks for this, vey detailed instruction and explanation.
March 9, 2021 @ 4:49 pm
Thanks for the tutorial helped me. Congratulations on organizing the topics and demonstration. Very good :)
November 12, 2019 @ 9:43 pm
Excellent guide! Thank you!
July 10, 2019 @ 5:46 am
it would be great if this tutorial was presented in the form of a video