FIX: System Interrupts High CPU Usage on Windows 10.
Is the System Interrupts process causing high CPU usage on Windows 10? If yes, then keep reading this step-by-step guide to fix this issue.
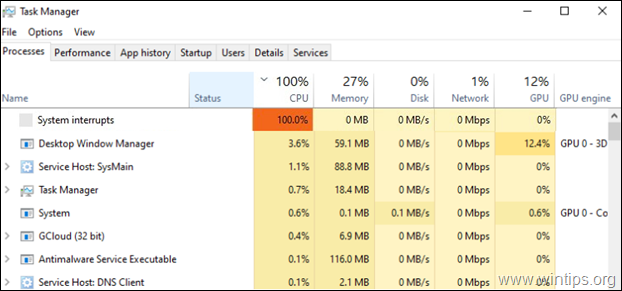
System Interrupts process, which are a component of Microsoft Windows, handle communications between your hardware and software. Typically, this process runs in the background and does not cause much CPU usage but several users reported that System Interrupts is causing 100% CPU usage on Windows 10.
If you experience the "System Interrupts 100% CPU Usage" problem on Windows 10, proceed to the steps below to figure out what causes it and to resolve the problem.
How to FIX: System Interrupts 100% CPU Usage on Windows 10.
Suggestion: Before you continue to the methods below, apply the following actions and see if the problems persists.
1. Restart your PC. Sometimes just restarting your computer can resolve issues.
2. Install Updates: It is possible that the problem you are experiencing is due to missing updates. So, proceed and install all the available updates on your PC:
1. Go to Start
-> Settings
-> Update & Security -> Windows Update.
2. Click on the Check for updates button in the right pane and wait for the scan to complete. If any pending updates are identified, install them and check if doing so resolves the issue.
- Method 1. Disconnect or Disable Hardware Devices.
- Method 2. Update Device Drivers.
- Method 3. Modify Power Management Settings & Disable "Wake on Magic Packet".
- Method 4. Check Hard Drive(s) for errors.
- Method 5. Disable Fast Startup.
- Method 6. Disable Audio Enhancements.
- Method 7. Repair System Files.
- Method 8. Repair Windows 10.
Method 1. Disconnect or Disable Hardware Devices.
As we mentioned earlier, the high CPU usage issue on Windows 10 can be caused by hardware problems. If this is the case, there are two ways to resolve the issue.
A. Unplug External Devices.
First, try to disconnect one-by-one, any external devices that are not needed to operate your computer (e.g. any USB storage devices, printer, etc.), and check if doing so resolves the issue.
1. Press Ctrl + SHIFT + ESC keys to open Task Manager and locate the System Interrupts process.
2. Unplug one external device at time.
3. Keep your eye on the "System Interrupts and check if removing the devices drops the CPU usage of System Interrupts.
4. If you identify the problematic device by doing so, try to update its driver as discussed in Method 2.
B. Disable Internal Devices.
If the problem persists after disconnecting the external devices, go ahead and disable one-by-one all the hardware devices that cannot be disconnected and are not needed to operate your system.
1. Navigate to Device Manager. To do that:
2. In Device Manager, right-click on any non-critical device* and select Disable.
* For example you can securely disable the following devices:
- Network Adapters (Ethernet or/and Wi-Fi).
- Sound Video and Game Controllers.
- Imagine Devices (Scanners & Cameras)
3. After disabling a device, take a look on Task Manager and see if the CPU usage on System Interrupts process is reduced.* If not, continue to disable the next device, otherwise proceed and re-enable the problematic device and update its drivers as instructed in Method-2 below.
* Note: If the high CPU usage problem is solved after disabling the Network adapter(s), re-enable the adapter and proceed to modify the Power Management settings and to disable the "Wake on Magic Packet" feature, as instructed in Method-3.
Method 2. Update Device Drivers.
If you still cannot find the problematic device, go ahead and update the drivers on these devices:
-
- Video Adapters *
- Network Adapters
* Note: Especially for the Video adapter, completely uninstall video driver and any associated software with it and install the latest or a previous more stable version.
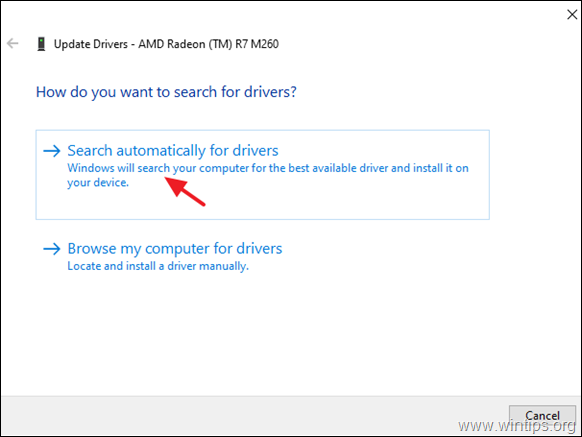
1. Right-click on the device that you want to update its driver and click Update Driver.
2. Click Search automatically for drivers.
3. Let Windows to search for an updated driver and install it. If Windows cannot find an updated driver, go to the device manufacturer's support site to see if there is an updated driver for the device. If so, download and install.
Method 3. Modify Power Management Settings & Disable "Wake on Magic Packet" on Network Adapters.
Magic packets are a standard way to wake up a network interface by sending a standard wake-up frame. Because this feature makes use of interrupts, it may causes high CPU usage.
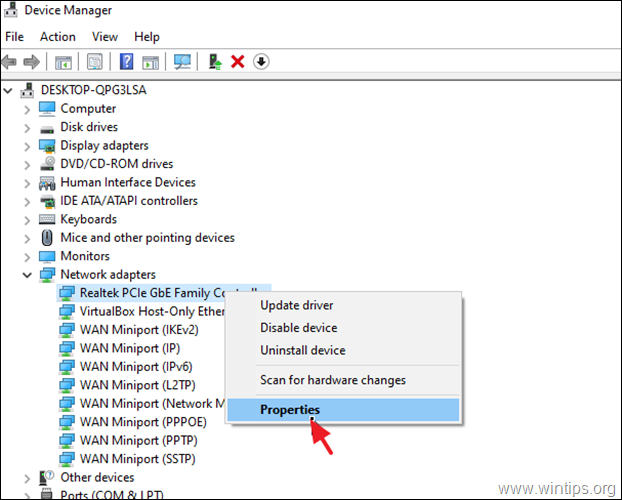
1. In Device Manager expand Network Adapters.
2. Right-click on each network adapter and select Properties.
3a. Go to the Advanced tab and under the Property pane, locate and click on Wake on Magic packet. *
3b. Expand the dropdown menu under Value and select Disabled.
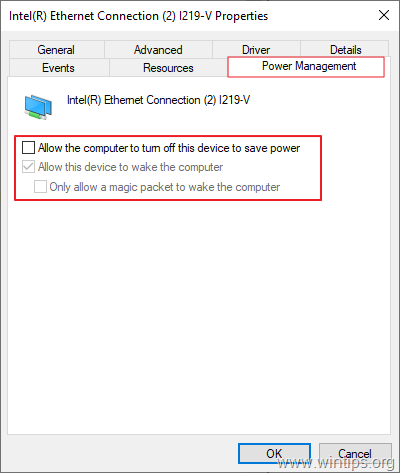
4. Finally go to Power Management tab and disable the option Allow this computer to turn off this device to save power. Click OK to apply changes.
Method 4. Check Hard Disk for errors.
In some cases, the high CPU usage in the System Interrupts process may be due to errors on your hard disk. So proceed and check you hard drive(s) from problems by following the instructions below:
1. Open Explorer and right-click on the disk that you want to check for problems and select Properties.
2. At Tools tab, click Check
3. Click Scan drive.
4. If Windows found errors on the drive, let Windows to repair them, otherwise continue to next method.*
* Note: If you own more than one drives on your PC check all of them for errors.
Method 5. Disable Fast Startup to FIX System Interrupts 100% CPU Usage.
Fast Startup enables your computer to boot up faster after it has been shut down. If you find that this state is enabled on your PC, we suggest that you disable it by following the steps listed below. It can sometimes cause issues within the OS.
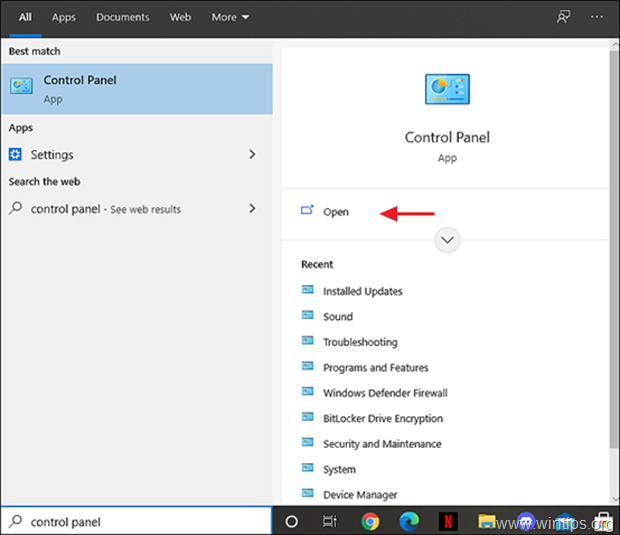
1. At the search box type control panel and press Enter.
2. Change the View By (at the up right) to Small icons and then click Power Options.
3. At the left pane, choose Choose what the power buttons do.
4. Click Change settings that are currently unavailable.
5. Scroll down and uncheck the Turn on fast startup (recommended) option and click Save changes. *
* Note: If the "Turn on fast startup (recommended)" option is missing from this window, then you have to enable Hibernation on your computer.
6. Restart the PC and check if the problem persists.
Method 6. Disable Audio Enhancements.
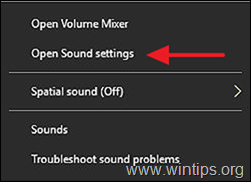
1. Right-click on the Sound icon ![]() on your taskbar and click on Open Sound settings.
on your taskbar and click on Open Sound settings.
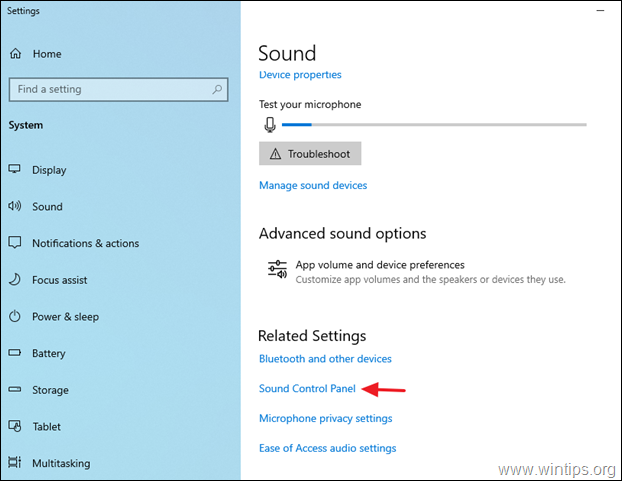
2. Click on Sound Control Panel in the next window.
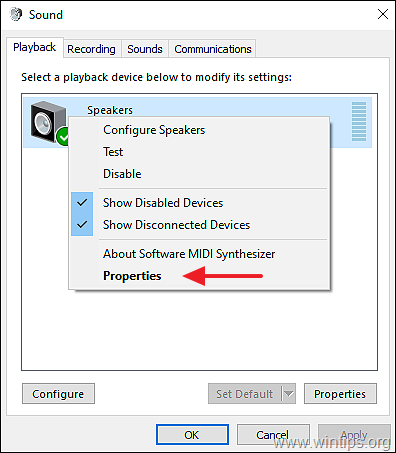
3. At Playback tab, right-click on your default playback device and select Properties.
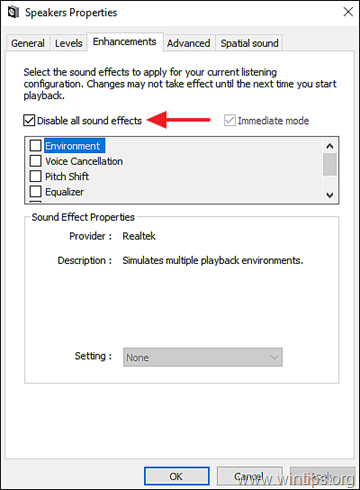
4. At Enhancements tab, check the Disable all sound effects (or Disable all enhancements) checkbox. Click OK to save the changes.
Method 7. FIX System Interrupts high CPU Usage by Repairing System Files.
1. Open command prompt as administrator. To do that:
1. In the Search box type: cmd or command prompt
2. Right click on the command prompt (result) and select Run as Administrator.
2. At the command prompt window, type the following command & press Enter:
- Dism.exe /Online /Cleanup-Image /Restorehealth
3. Be patient until DISM repairs component store. When the operation is completed, (you should be informed that the component store corruption was repaired), give this command and press Enter:
- SFC /SCANNOW
4. When SFC scan is completed, restart your computer.
5. After restart check if the high CPU usage issue is resolved.
Method 8. Repair Windows 10 with an in-place Upgrade.
Another method that usually works, to fix several problems, is to repair/upgrade Windows 10. For that task follow the detailed instructions on this article: How to repair Windows 10.
That's it! Which method worked for you?
Let me know if this guide has helped you by leaving your comment about your experience. Please like and share this guide to help others.
We're hiring
We're looking for part-time or full-time technical writers to join our team! It's about a remote position that qualified tech writers from anywhere in the world can apply. Click here for more details.
- How to Disable or Remove BitLocker from Windows RE. - April 24, 2024
- FIX: Error 0x8007025d in Windows 10 Update. - April 22, 2024
- How to Disable Device Encryption in Windows 11/10. - April 17, 2024


![image_thumb[22] image_thumb[22]](https://www.wintips.org/wp-content/uploads/2019/05/image_thumb22_thumb-2.png)


