How to Add an Entra User as Local Admin Account in Microsoft Entra Joined Devices.
This guide contains step-by-step instructions on how to add a Microsoft 365 Entra user as a local administrator account on any Microsoft Entra-joined device.
Microsoft Entra joined devices (formerly Azure AD joined devices) provide a cloud-management experience without on-premises domain dependency. However, managing local administrator privileges is still required for troubleshooting, software installation, and support tasks. For all these reasons, adding a Microsoft Entra ID user as a local administrator on managed Windows devices is a common requirement in the Microsoft 365 environment.
This guide shows how to add a Microsoft Entra (formerly Azure AD) user as a local admin in Entra Joined devices*, during or after device enrollment.
* Important Note: These instructions applies only for/to Microsoft Entra joined devices. If your devices are hybrid-joined, then you need to set the local admin account(s) via Group Policy on your on-premises Active Directory.
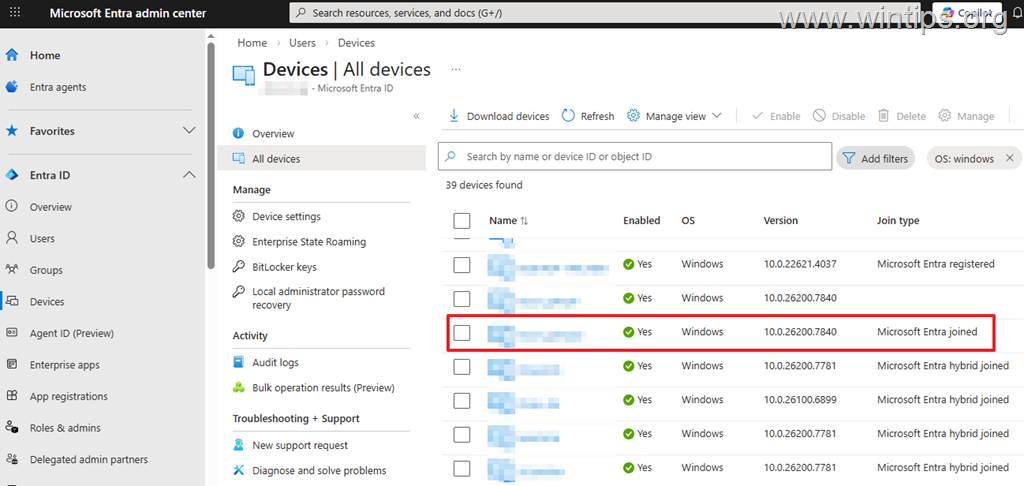
How to Add an Entra ID User as Local Administrator in Entra Joined Windows Devices.
1. How to Add Entra User(s) as Local Admin(s) During Device Enrollment.*
To add a Microsoft 365 user as a Local Administrator when a user enrolls (registers) a device in Microsoft Entra [eg. during the Out Of the Box (OOBE) setup]*
* Note: This method applies when a user registers a device in Microsoft Entra and is ideal for IT helpdesk and support.
1. Navigate to Microsoft Entra admin center > Devices > Device settings.
2. Scroll down and click on Manage Additional local administrators on all Microsoft Entra joined devices.
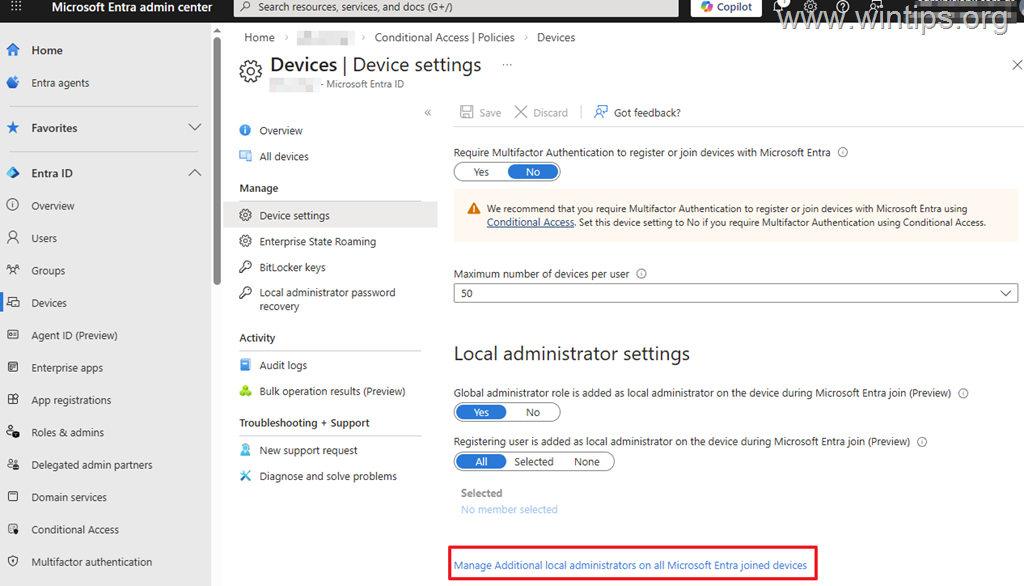
3. Select Add assignments.
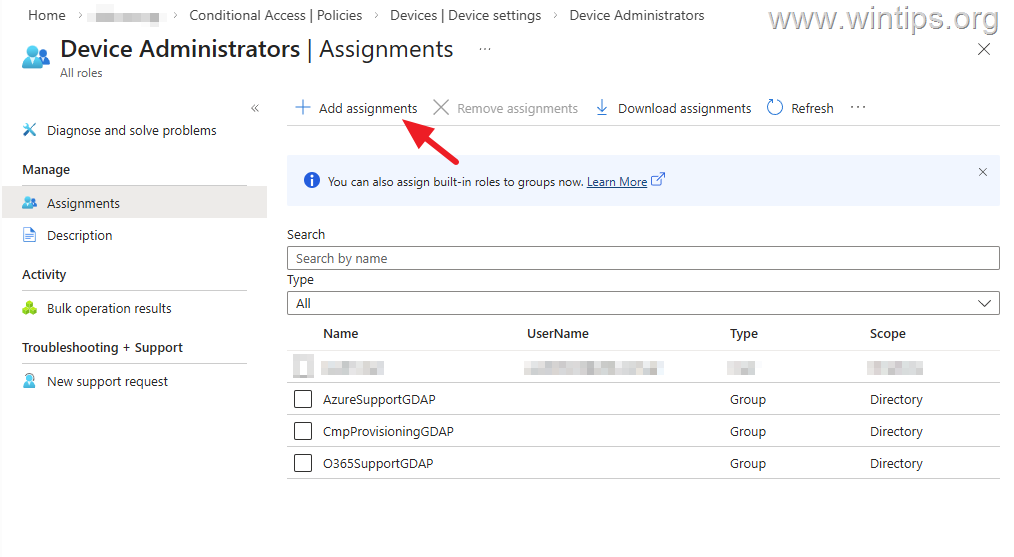
4. Search for the Entra ID user (or group*) you want to add in Local Administrators group. Then, select it and click Add.
* Note: For large IT departments, it is recommended to create a separate SECURITY group that includes all Microsoft 365 Entra users who will have local administrator rights.
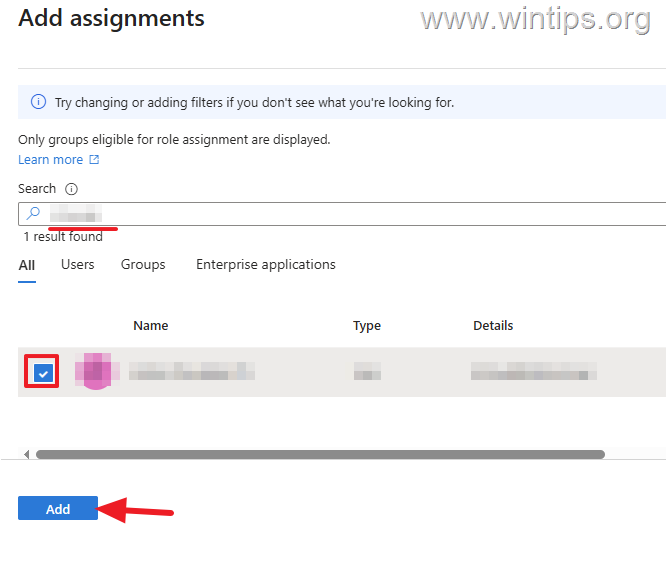
5. Now either restart an Entra Joined machine (or signs out and back in) or wait about ~4 hours for the setting to take effect.
6. Go ahead and verify which users have local administrator privileges by running the following PowerShell command on any target device:
-
net localgroup Administrators
Important Suggestion: Since every standard user who enrolls a device in Microsoft Entra is automatically added as a local administrator of the device, it is a good idea to prevent this, by adding the same user with the Entra ID you defined as a local administrator on the device during the enrollment process as well. This, will prevent the standard user who enrolls the device from becoming a local administrator on it. To do that:
1. Go to Entra admin center > Devices > Device settings and do the following:
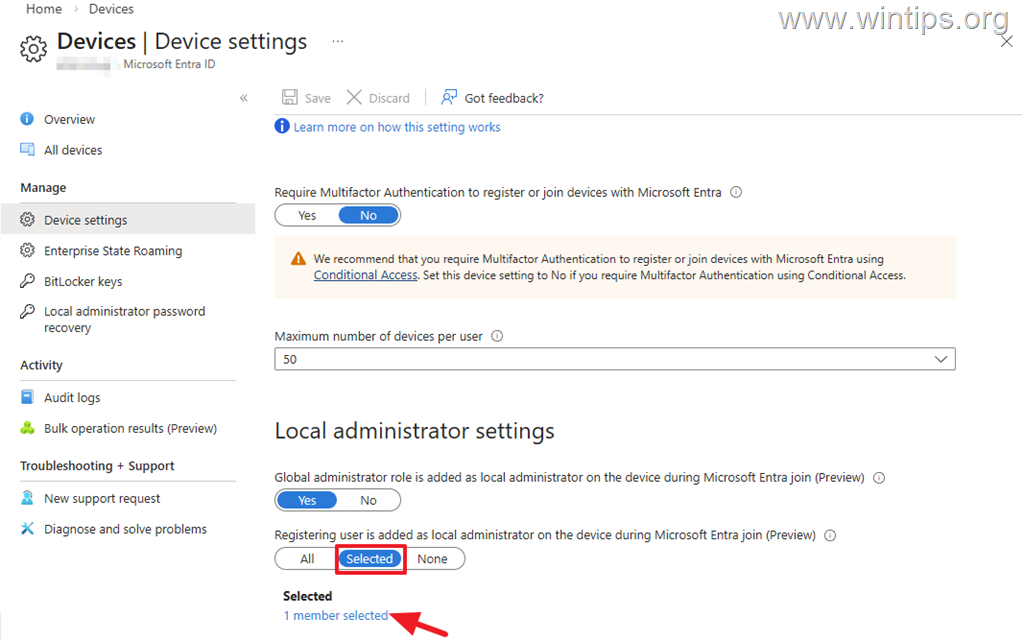
2. Set the Registering user is added as local administrator on the device during Microsoft Entra join (Preview) to Selected.
3. Then, select the same Entra ID user (or group*) that you want as a local administrator, so that it is automatically added to the Local Administrators group during the Microsoft Entra Join process.
2. How to Add Specific Entra User(s) or Group(s) as Local Administrators After Device Enrollment using an Intune Policy.
If you want to add a Microsoft 365 user/group as a Local Administrator on a specific Group of Microsoft Entra Joined Devices, follow these steps:
* Note: This method is ideal for environments with Microsoft Entra Joined devices and Microsoft Hybrid Joined devices, where hybrid device policies are managed on-premises (in local AD) and Entra Joined device policies are managed through Microsoft 365 (Entra/Intune).
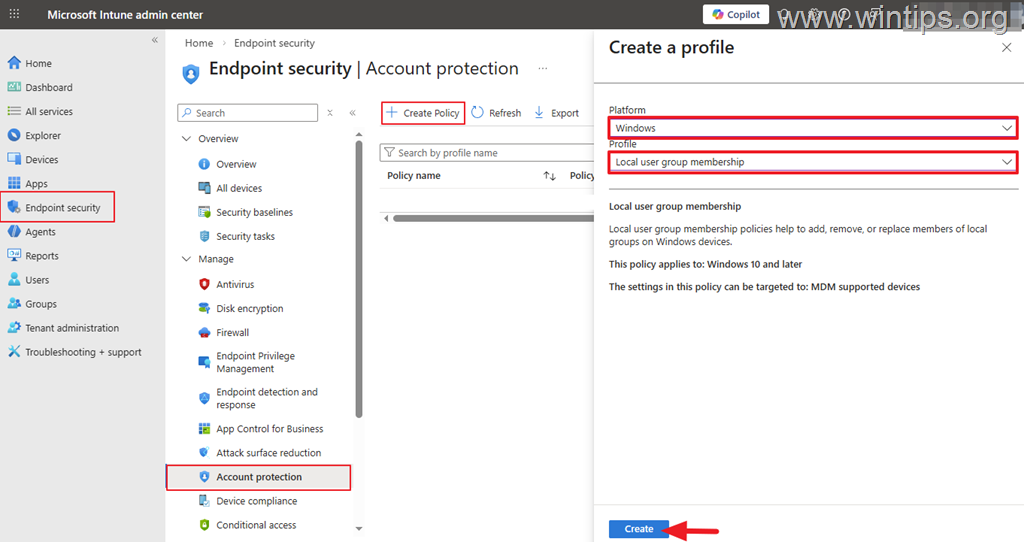
1. Navigate to Microsoft Intune admin center > Endpoint security > Account Protection and Create a new Policy
2. Select Platform: Windows & Profile: Local user group membership, and then click Create.
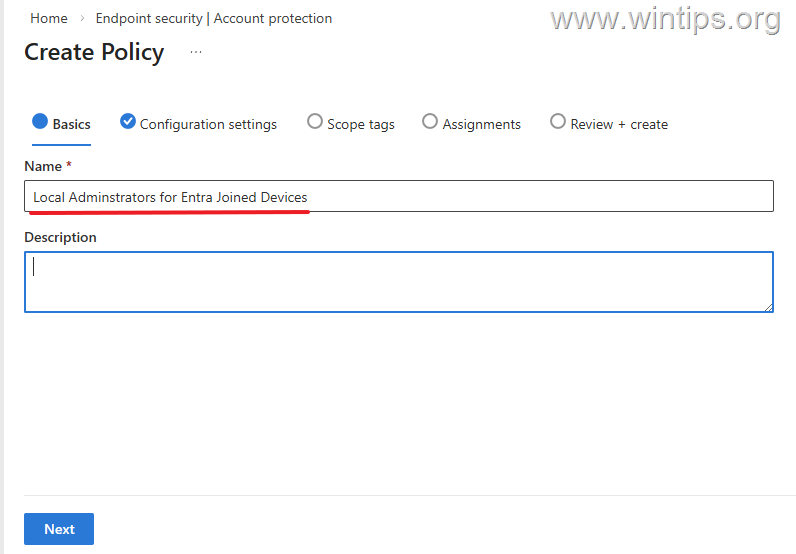
3. Type a name for the new policy (eg. "Local Administrators for Entra Joined Devices") and optional a description below, and click Next.
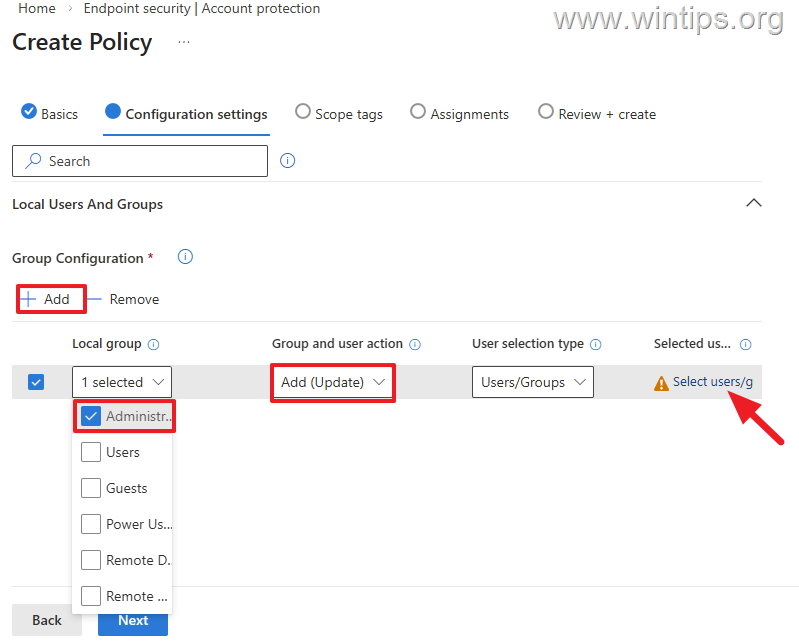
4. On the Configuration settings, click Add to create a Group Configuration. Now, do the following and then click Next:
a. Select Administrators under Local group
b Select Add (Update) under Group and user action.
c. Finally click Select users/group and then select the Microsoft Entra user(s) you want to add as a local administrator.
5. Click Next on the Scope tags.
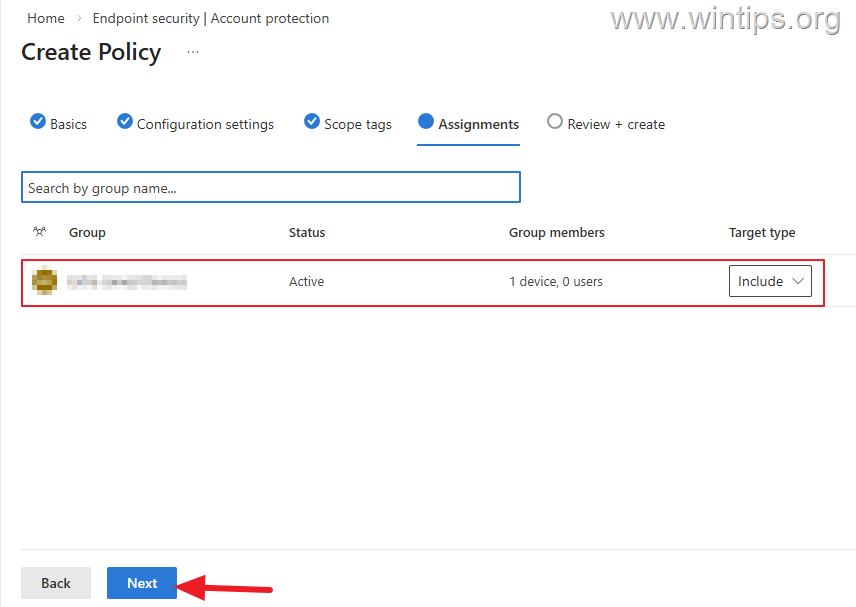
6. On the Assignments settings, search and add the group of Entra Joined devices you want to assign the policy to. When done, click Next.
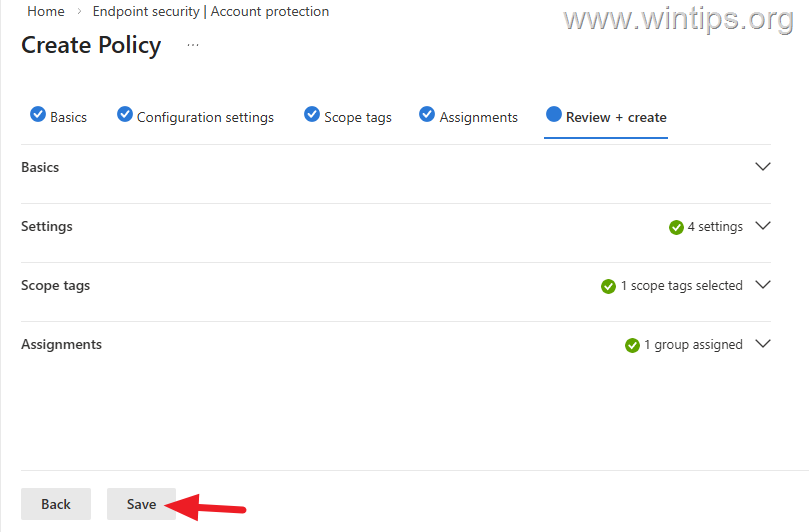
7. Finally, review and click Save to create and assign the new policy to the selected group of devices.
8. Now wait some time for the policy to be applied to the selected devices group. Then, click on the policy you created and view the report to see in which devices the policy has been applied to.
That's it! Let me know if this guide has helped you by leaving your comment about your experience. Please like and share this guide to help others.
Frequently Asked Questions
What are Microsoft Entra joined devices used for?
Microsoft Entra joined devices provide a cloud-management experience without on-premises domain dependency, making them suitable for environments relying on Microsoft 365 cloud services.
How can I add a Microsoft Entra ID user as a local administrator on all Entra joined devices during device registration?
Navigate to Microsoft Entra admin center > Devices > Device settings, click on Manage Additional local administrators on all Microsoft Entra joined devices, select Add assignments, search for the Entra ID user or group, add them, then either restart the device or wait for about 4 hours for the setting to take effect.
Can I add specific Microsoft Entra users or groups as local administrators using Intune policy after device registration?
Yes, you can add specific users or groups as local administrators by navigating to Microsoft Intune admin center > Endpoint security > Account Protection, creating a new policy, selecting Platform: Windows & Profile: Local user group membership, and following the setup instructions.


- Remote Desktop (RDP/RDS) Stops Working After September 2026 Windows Update: How to Fix - September 15, 2026
- Windows 11 KB5124008 Causes No Sound or USB Audio Code 10: How to Fix - September 14, 2026
- Copilot Missing or Grayed Out in Outlook: How to Fix - September 10, 2026