How to Disable Automatic Update in Adobe Reader DC
Adobe has updated his free "Acrobat Reader" for viewing, printing and annotating PDF's to "Adobe Reader DC", where "DC" means "Document Cloud". The Acrobat Reader DC gives you the ability to work with PDF documents in any desktop or mobile device
if you 're connected to free Adobe Document Cloud services.
Adobe Reader DC is set to be automatically updated (if your device is connected to the Internet), to ensure that cloud and desktop features and functionality remain synchronized and compatible. For that reason, Adobe, doesn't give the user the ability – through the program's interface – to choose how the new updates will be delivered to the computer or to totally disable the Adobe Reader DC automatic updates.
In this tutorial you 'll find detailed instructions on how to totally disable or turn off Adobe Reader DC Automatic Updates.
How to disable Adobe Acrobat Reader DC Automatic Updates.
Step 1. Disable Adobe Acrobat Update Task.
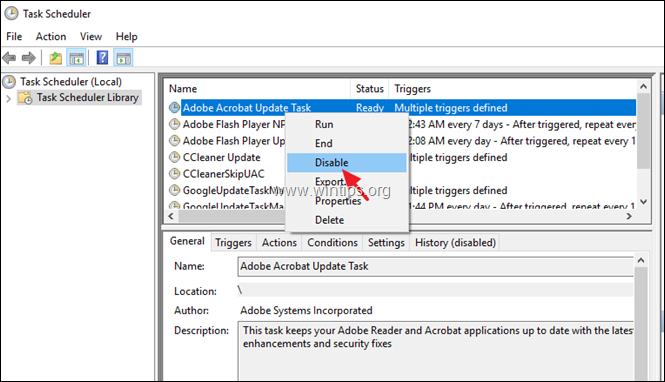
The first step to disable the Automatic Update in Adobe Reader is to disable the 'Adobe Acrobat Update Task' in Task Scheduler. To do that:
1. At the search box, type: task scheduler
2. Open Task scheduler
3. Click at Task Schedule Library at the left and then, at the right pane, right click at the Adobe Acrobat Update Task at select Disable.
4. Close Task Scheduler and continue to the next step.
Step 2. Disable Adobe Acrobat Update Service.
The next step is to disable the Acrobat Update service, by using one of the methods below:
- Method 1. Disable Adobe Acrobat Reader DC Automatic Update through Services.
- Method 2. Disable Adobe Reader DC Automatic Updates through Registry.
Method 1. Disable Adobe Acrobat Reader DC Automatic Update through Services.
1. Simultaneously press Windows + R keys to open run command box.
2. In run command box, type: services.msc and press Enter.
3. Double click to open "Adobe Acrobat Update Service" properties (AdobeARMservice).
4. Set the Startup type to Disabled.
5. Click OK and restart your computer.
– After following the above steps, Adobe Reader DC will not download and install updates automatically.
– If you want to download and install new updates manually, then, from Adobe Reader's DC menu, choose: Help > Check for Updates. *
* Note: If you want to also remove the Check for Updates option, from the Adobe Reader's DC menu, then follow the steps mentioned at the end of this article.
Method 2. Disable Adobe Reader DC Automatic Updates via Registry.
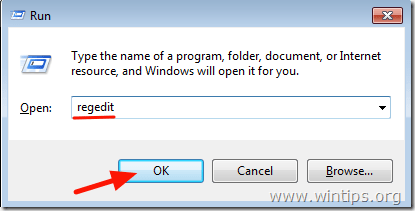
1. Open Windows Registry Editor. To do that:
1. Press the Windows + R keys to load the Run dialog box.
2. Type regedit and press Enter.
2. At the left pane, navigate to this key:
HKLM\SOFTWARE\Wow6432Node\Adobe\Adobe ARM\Legacy\(product name)\(product code)
e.g. HKEY_LOCAL_MACHINE\SOFTWARE\WOW6432Node\Adobe\Adobe ARM\Legacy\Reader\{AC76BA86-7AD7-1033-7B44-AC0F074E4100}
3. At the right pane double click at Mode value* and at the Value Data box, change the value data from 3 to 0 (zero).
Mode possible values:
0: Do not download or install updates automatically.
2: Automatically download updates but let the user choose when to install them.
3: Automatically download and install updates. (Default value)
4: Notify the user downloads are available but do not download them.
4. Close Registry Editor and restart your computer.
– From now on, Adobe Reader DC will not download and install updates automatically but you can always install the new updates manually, by choosing the Check for Updates option in Adobe Reader's DC main menu. (Help > Check for Updates) *
* Note: If you want to remove also the Check for Updates option, then follow the steps below.
Extra: Remove the "Check for Updates" option from Adobe Reader's menu.
– If you want to remove the "Check for Updates" option from the "Help" menu, then:
1. Launch Registry Editor again and navigate to this key:
HKEY_LOCAL_MACHINE\SOFTWARE\Policies\Adobe\Acrobat Reader\DC\FeatureLockDown
2. Right click at an empty space on the right pane and select New > DWORD (32-bit) Value.
3. Name the new value: bUpdater
4. Double click at the bUpdater value and set the Value Data to 0 (zero).
5. Close Registry Editor and Reboot your computer.
That's it! Let me know if this guide has helped you by leaving your comment about your experience. Please like and share this guide to help others.
We're hiring
We're looking for part-time or full-time technical writers to join our team! It's about a remote position that qualified tech writers from anywhere in the world can apply. Click here for more details.
- FIX: Numeric keypad Not Working on Windows 10/11 - July 24, 2024
- How to Share Files or Printers in Hyper-V? - July 22, 2024
- How to invoke Hyper-V Screen resolution prompt? - July 17, 2024


September 23, 2023 @ 3:19 am
The methods indicate above, (the task manager and the services) work for about a week, and then the tasks are re-established again automatically.
Please re-visit the methods indicated above and verify that the updates are still disabled after a week or two.
November 20, 2022 @ 4:44 pm
Thanks for this tip thats gold ;-)
May 30, 2022 @ 2:15 am
I tried it using Services more than once, but it always comes back, to me too. It has stolen almost all my data to last 5/20 to 6/20! Checked just now, and instead of "disabled" it said "started." Now will try the registry method, but want to back up the registry first. I have Reader DC and Windows 7.
September 8, 2021 @ 4:48 pm
thank you very much ! i was looking for this so long just now found and this solution works in addition to service disable the extra REGISTRY settings stops from adobe background updates !
i happy donated 10$ , thanks man good work.
if you can also find a solution for the win 10 taskbar fix…
September 9, 2021 @ 3:24 pm
Have you tried these instructions?: https://www.wintips.org/fix-start-menu-cortana-settings-taskbar-issues-windows-10/
September 14, 2021 @ 2:53 pm
Hi lakonst
only this helps :
"Get-AppXPackage | Foreach {Add-AppxPackage -DisableDevelopmentMode -Register "$($_.InstallLocation)\AppXManifest.xml"}"
BUT it will reinstall all windows defaults apps and restore settings !
i would like to know if there is a specific fix for the unresponsive taskbar ???
April 18, 2021 @ 6:39 pm
Pretty straight forward help. I appreciate that.
March 24, 2021 @ 7:51 am
Stupid automatic update caused loss of weeks of saved documents, rrrrrrrrr!
December 3, 2020 @ 10:24 am
Thank you, the automatic updates were sooo annoying!
November 22, 2020 @ 1:00 pm
Want to say thanks from Taiwan. It solved the issue.
December 12, 2019 @ 3:09 pm
thanks!!!
November 25, 2019 @ 3:57 pm
Yes very useful this worked. I wouldn't mind it updating automatically if it didn't want me to restart my computer. What, for a PDF document reader?
I can update Microsoft Office without restarting my computer.
October 21, 2019 @ 7:34 pm
Disabling ADOBE-ARM appears to have worked. I donated $2, hopefully not for naught. Thanks
April 30, 2019 @ 4:56 am
thank you very much admin for your important news to share with us. And more thanks for i get best idea read this article about this topics. many more days i was searched this topics, finally i got it.
March 29, 2019 @ 7:04 am
Thank!!!??!!?!?for your beautifull information
February 20, 2019 @ 11:33 pm
Do you remember that thing call ***personal*** computing that was a rejection of "the evil empire?"
And just *what* has Adobe become?
A wannabe empire? Or just evil?
October 7, 2018 @ 6:06 pm
It does not work to me… Tried both ways: at the beginning it looks ok, then after a couple of hours the automatic update starts.
February 14, 2018 @ 1:33 am
Thanks for having something that actually works with the CURRENT version of Acrobat Reader. And thanks for the clear instructions, too, but being CURRENT is far more important.
February 16, 2018 @ 10:28 am
Excellent instructions … I like to be current too, but since the 14/02, I don't really have a choice. All our workstations started saying "insufficient data for an image" when opening jpeg2000 compressed scanned documents. Downgrading to a previously downloaded version is the only choice for now.
December 1, 2017 @ 11:35 pm
Many thanks for the excellent job, clear and precise!
November 24, 2017 @ 5:49 am
Thank You…
May 25, 2017 @ 3:40 pm
Thanks, very useful.
Here's another method:
On Powershell (Start>All Programs>Powershell) run these commands:
Stop-Service -Name AdobeARMservice
Set-Service -Name AdobeARMservice -StartupType Disabled
August 30, 2017 @ 2:42 pm
You can do that in one PS line:
Set-Service -Name AdobeARMservice -Status Stopped -StartupType Disabled
One annoying thing, installing a MSP file (update) will re-enable the service and also recreate the Task Schedule.
Not sure if it will set the Mode to 3 again though. Just found this, and have to test that.
In a VDI Golden Image environment this automatic updating of Adobe products is bloody annoying!
May 11, 2017 @ 2:22 pm
Amazing! Thank you so very much for the clear and easy instructions!