How to Disable Automatic Updates on Windows 11.
In this guide you'll find several methods to disable the automatic updates in Windows 11 and how to permanently prevent Windows 11 from installing updates.
Windows 11 is the latest version of Microsoft's operating system that comes with many new features and improvements. One of the major changes in Windows 11 is the way updates are handled.
Microsoft automatically pushes updates to ensure that all devices are up to date with the latest security patches and bug fixes. However, it's common for some updates to be released with issues that can negatively impact the experience. Also, some users prefer to have more control over when and how updates are installed on their devices.
If you're one of those users, you'll be glad to know that you can prevent Windows 11 from automatically downloading and installing updates by following one of the methods below.
How to Temporarily or Permanently Stop Automatic Updates in Windows 11.
- Pause Windows 11 Updates.
- Stop Windows Updates Temporarily.
- Stop Windows Updates with Metered Connection.
- Disable Automatic Updates with Registry.
- Turn Off Automatic Updates with Group Policy.
- Permanently Disable Windows Updates.
Method 1: Pause Windows Updates for 1-5 weeks.
If you want to temporarily stop Windows 11 updates, you can do so by pausing them for 1-5 weeks.
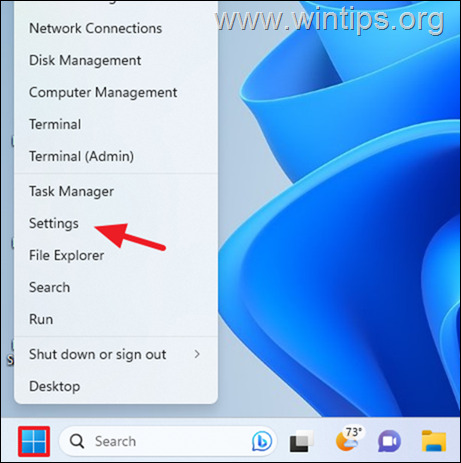
1. Right-click on the Start button and choose Settings.
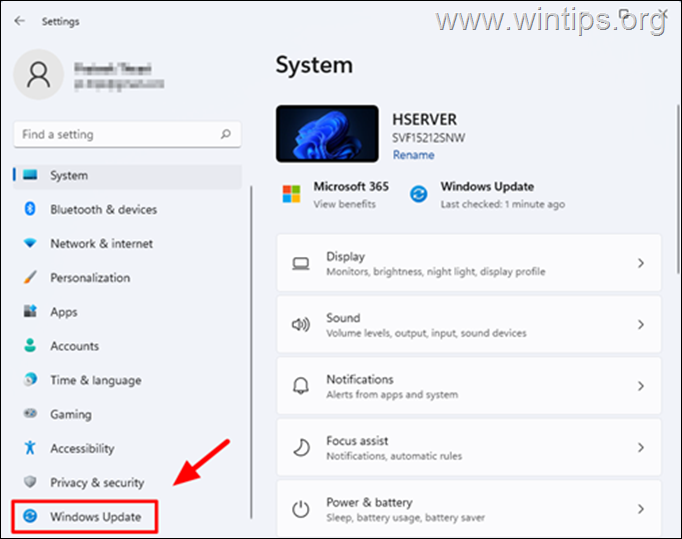
2. In Settings window, click Windows Update at the left
3. Under the "More options" area, click the Pause updates drop-down arrow and select for how long you want to stop the automatic updates. (You can stop automatic updates for 1-5 weeks) .*
* Note: When you pause updates, Windows 11 will stop downloading and installing updates for the selected period. Remember that stopping updates is only a temporary solution, and after the selected time period, updates will be automatic.
Method 2: Stop Windows 11 Auto Update Service.
Another temporary solution to stop Windows updates, is to disable the Windows Update Service. *
* Note: After completing the below steps, Windows updates will be temporarily disabled, because Windows periodically checks whether critical services (such as the "Windows Update" service) are disabled and automatically turns them on.
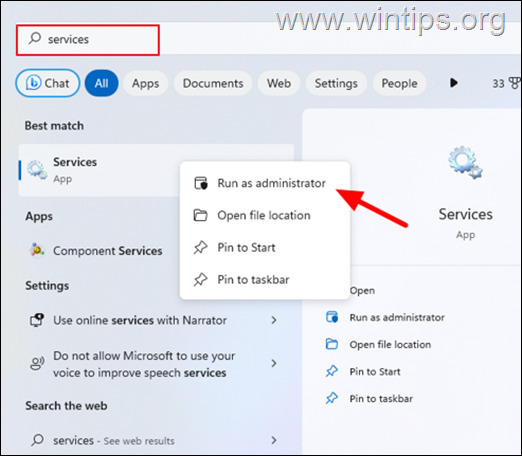
1. Type "services" in the Search box and then right-click "Services" app and click Run as administrator.
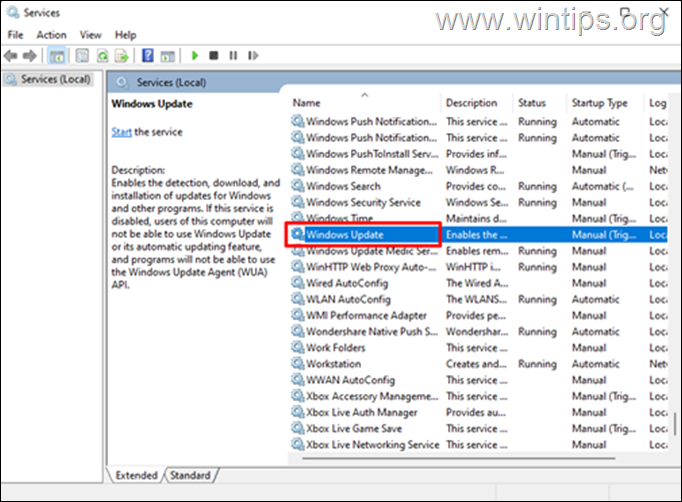
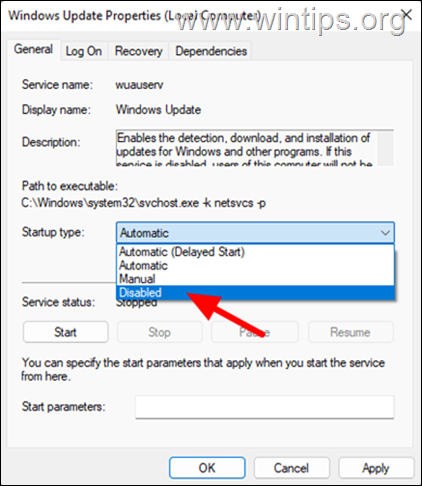
2. Scroll down to find the Windows Update service and double-click on it to open its properties.
3. Click the Stop button to stop the Windows Update service.
4. Then, at Startup type select Disabled from the dropdown menu and click Apply > OK to save the change.
* Note: To re-enable Windows Updates, change the Startup Type to Automatic.
Method 3: Prevent Automatic Updates by Setting your Connection as Metered.
The first way to permanently stop Windows 11 updates is to set up your network as metered connection. When you set up a metered connection, Windows 11 will treat it as a limited data connection and won't download or install updates automatically.
1. Right-click on the Start button and choose Settings.
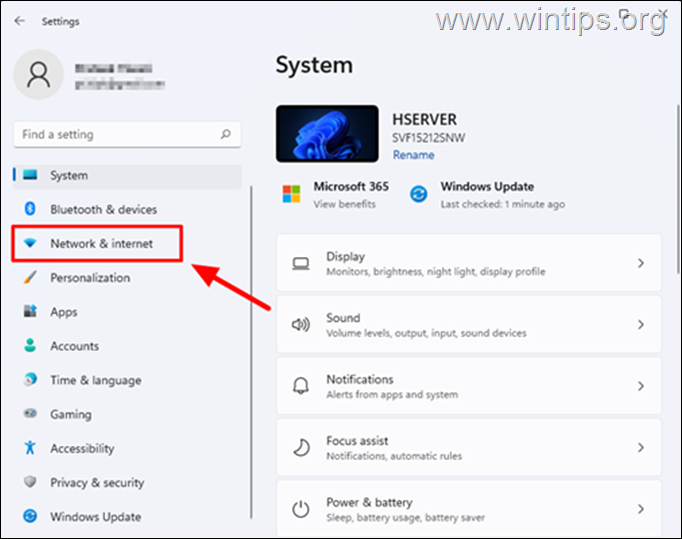
2. Click Network & Internet on the left side of the Settings window.
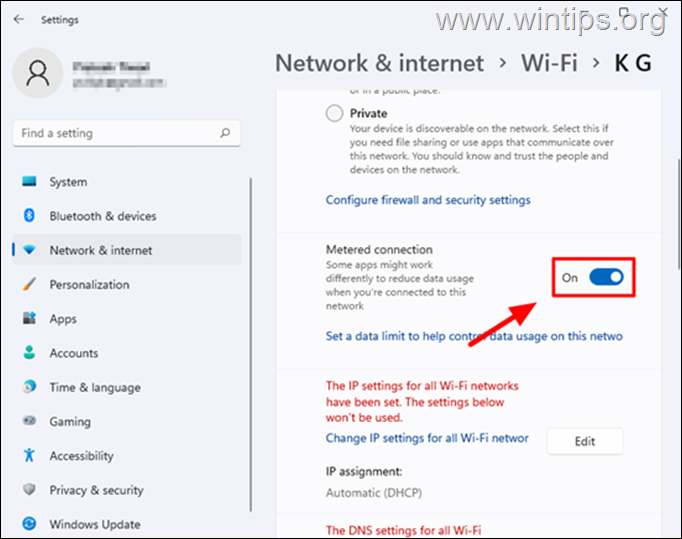
3. Now open the Properties of the network you are connected to.
4. Set the Metered connection switch to On. From now on, Windows 11 will consider your network connection limited and will not automatically download updates. *
* Note: Please note that this method may prevent some other services or applications from using the internet, so it is not recommended as a permanent solution.
Method 4: Turn Off Automatic Windows 11 Updates Using Registry Editor
Another method to disable automatic updates on Windows 11, is by using the Registry Editor. However, it's important to note that editing the registry can be risky, and you should only do it if you have experience with it.
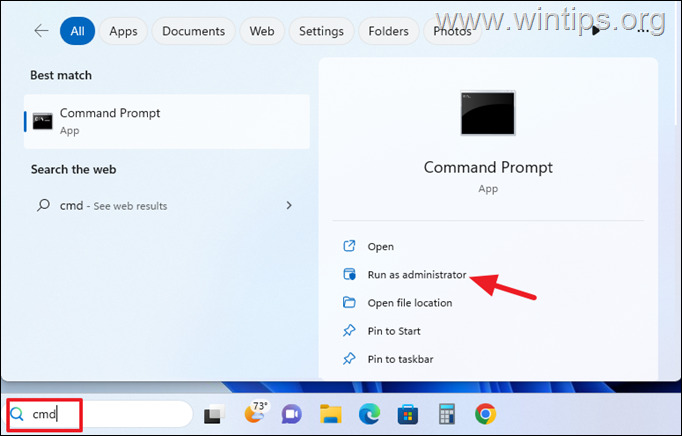
1. Type cmd in the search box, then click Run as administrator.
2. In command prompt windows copy and paste the below command and press Enter:
- REG ADD "HKLM\SOFTWARE\Policies\Microsoft\Windows\WindowsUpdate\AU" /f /v "NoAutoUpdate" /t REG_DWORD /d 1
3. Restart the computer to apply the change and you're done! No more automatic updates. Of course whenever you want you can download and install updates manually.
To re-Enable Automatic Updates:
1. Open Registry Editor. To do that:
1. Simultaneously press the Win
+ R keys to open the run command box.
2. Type regedit and press Enter to open Registry Editor.
2. At the left pane, navigate to this key:
- HKEY_LOCAL_MACHINE\SOFTWARE\Policies\Microsoft\Windows\WindowsUpdate\AU
3. In the right pane either delete the "NoAutoUpdate" REG DWORD, or open it and change its value data from "1" to "0".
Method 5: Disable Automatic Updates in Windows 11 with Group Policy Editor.
If you have Windows 11 Pro edition, you can use the Group Policy Editor to disable automatic updates.
1. Right-click on the Start button and choose Run
2. Type gpedit.msc and click OK to open the Group Policy Editor.
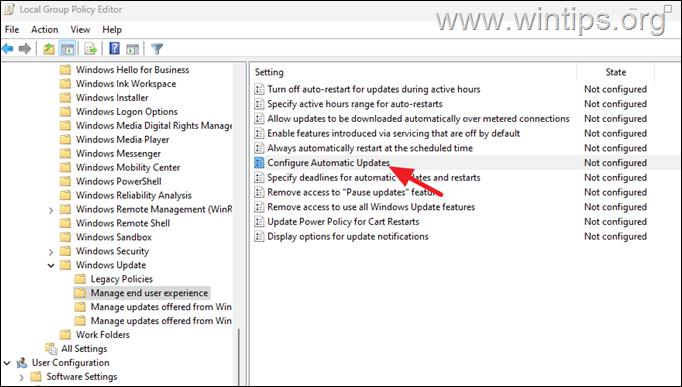
3. In the Group Policy Editor, navigate to:
- Computer Configuration > Administrative Templates > Windows Components > Windows Update > Manage end user experience.
4. In the right pane, double-click at Configure Automatic Updates policy.
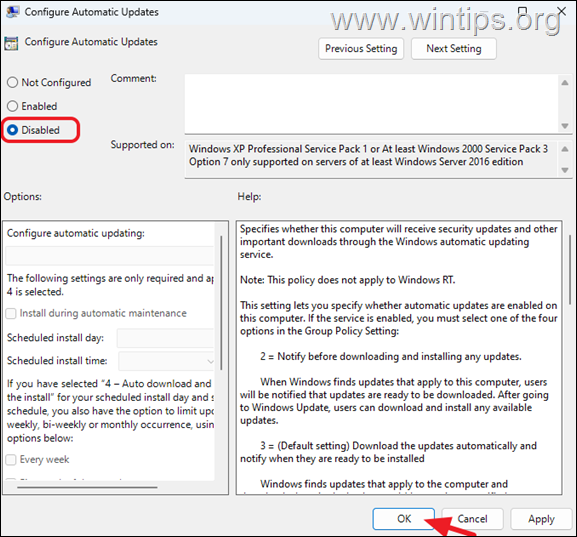
5. In the policy settings window, select the Disabled option to turn off automatic updates and click Apply > OK to save the changes. *
* Notes:
1. If the status for this policy is set to "Disabled, any updates that are available on Windows Update must be downloaded and installed manually.
2. To re-enable the Automatic updates, set this policy to Not Configured.
Method 6. Permanently Disable Windows Updates on Windows 11/10.
Using the above methods you'll temporarily stop Automatic Updates in Windows 11/10 and to update Windows manually when you want to. But if you want to stop Windows updates from being downloaded and installed either automatically or manually, follow the instructions below.
1. Open Registry Editor and navigate to the following path:
-
HKEY_LOCAL_MACHINE\SYSTEM\CurrentControlSet\Services\wuauserv
2. Right-click at "wuauserv" key on the left and click Export.
3. Type a name for the file (e.g. "WindowsUpdate") and Save it on your desktop.
4. Now, right-click again at "wuauserv" key and select Delete. Then click Yes to confirm the decision)
5. Restart your PC.
6. After restarting, the automatic updates will be disabled permanently and when you try to check and install updates manually you'll receive the error (0x80070424).
* Note: To re-enable the Windows Update again:
1.Navigate to your desktop and double-click to open the "WindowsUpdate.reg" file.
2. Click Yes to confirm your decision.
3. Restart your computer.
That's it! Which method worked for you?
Let me know if this guide has helped you by leaving your comment about your experience. Please like and share this guide to help others.
We're hiring
We're looking for part-time or full-time technical writers to join our team! It's about a remote position that qualified tech writers from anywhere in the world can apply. Click here for more details.
- FIX: Can't Select Windows Edition during installation. - September 18, 2024
- How to Enable Teams Recording in Video Calls (Microsoft Teams). - September 16, 2024
- FIX: Outlook or Word closes or crashes when typing. (Solved) - September 9, 2024









May 4, 2024 @ 4:12 pm
I used method 6 to disable windows 11 updates on a personal laptop (not on a group network).
It worked for about 4 months until Apr-28 2024 when I logged in (the machine was previously shutdown). A screen appeared to force an update, so I reluctantly accepted it with a restart.
The update caused problems on my OBS studio program, which is why I disabled it.
How is MSFT able to force a manual update right after login? Can this be blocked or disabled in the future?