How to Disable Defender Antivirus & Firewall in Windows 10
This tutorial shows the way to completely disable Defender Security Center and all the Defender protection services (Antivirus, Firewall, Threat protection) in Windows 10. Before you continue to apply the steps mentioned below, you must know that Windows 10, enables by default the Defender Antivirus and the Defender Firewall, if no any other security program has installed on the computer.
That means that if you install another security program to protect your PC, Windows Defender will be disabled automatically by Windows 10 and there is no need to perform any other action to disable Defender. So, follow the steps in this tutorial only if you face problems with Windows Defender protection or if you want to permanently remove the Windows Defender antivirus and/or firewall for other reasons.
How to Disable Windows Defender Security Center (Antivirus, Firewall, etc.)
Method 1. Disable Windows Defender Antivirus from Windows GUI.
Method 2. Disable Windows Defender Antivirus by editing the registry Offline.
Method 1. Disable Windows Defender Antivirus from Windows GUI.
Step 1. Turn OFF Windows Defender Antivirus Real Time Protection.
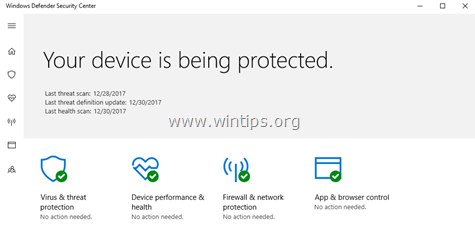
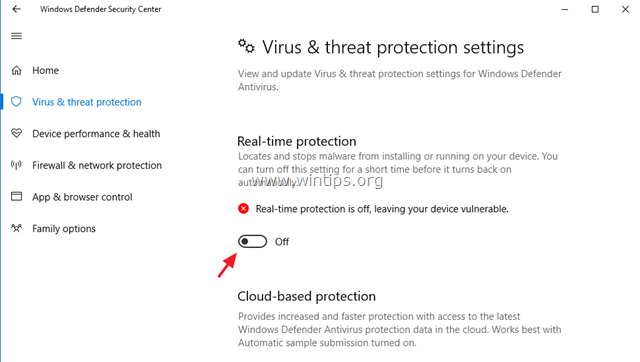
To turn off Real-time Protection, double click at Windows Defender icon ![]() in the taskbar, click Virus & threat protection
in the taskbar, click Virus & threat protection![]() and then at Virus & threat Protection settings set to OFF the Real-time Protection and the Cloud-delivered protection.
and then at Virus & threat Protection settings set to OFF the Real-time Protection and the Cloud-delivered protection.
Step 2. Modify Registry Permissions and Disable Defender Antispyware & Antivirus Protection.
1. Open Registry editor. To do that:
1. Simultaneously press the “Win”
+ “R” keys to load the Run dialog box.
2. Type regedit and press Enter to open Registry Editor.

2. Navigate (from the left pane) to this registry location/key:
- HKEY_LOCAL_MACHINE\SOFTWARE\Microsoft\Windows Defender
3. (IMPORTANT): Before you continue, first take a backup of the "Windows Defender" registry key settings, and then use the backup file if something goes wrong. To take a backup of 'Windows Defender' key:
1. Right click on "Windows Defender" key and select Export.
2. Type a filename for the registry backup file (e.g. "Windows Defender") and Save the file at your Desktop. *
* Note: If needed, double click at the exported .reg file, to restore your registry back!
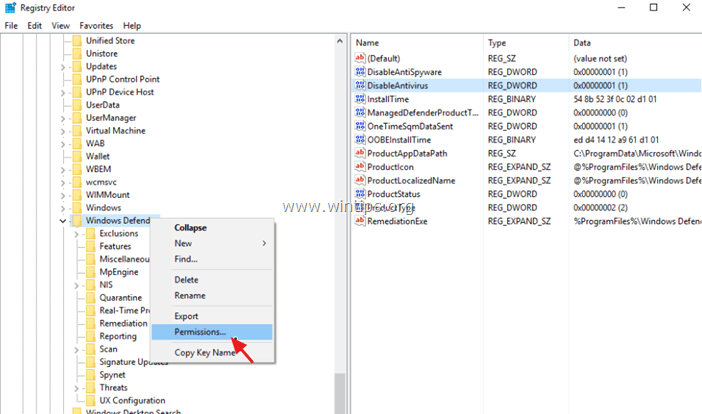
4. Right click at the Windows Defender key and select Permissions.
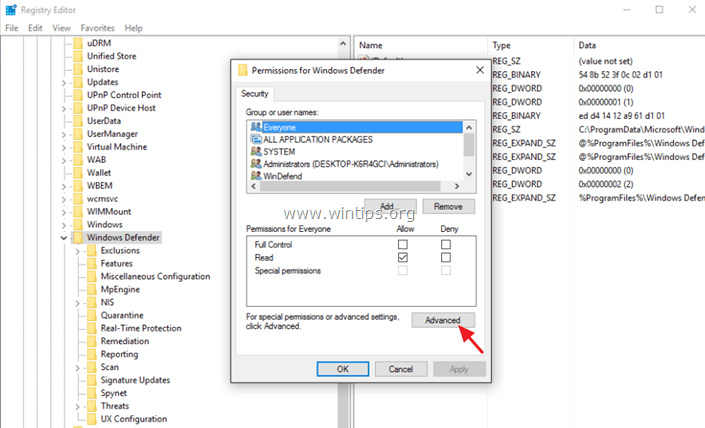
5. At 'Permissions for Windows Defender' window, click Advanced.
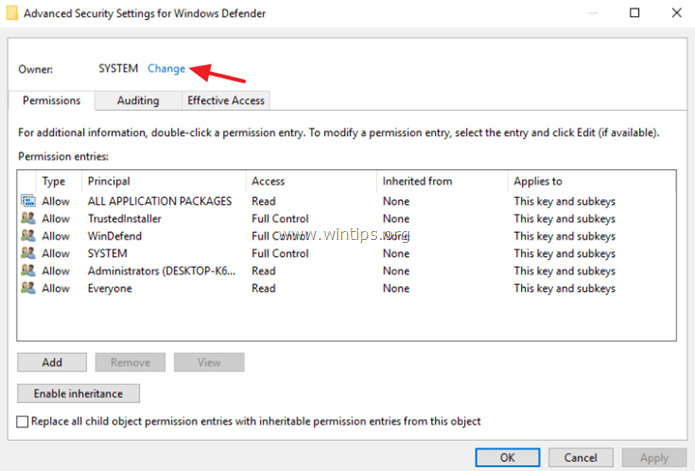
6. Click Change Owner.
7. Type Administrators and press OK.
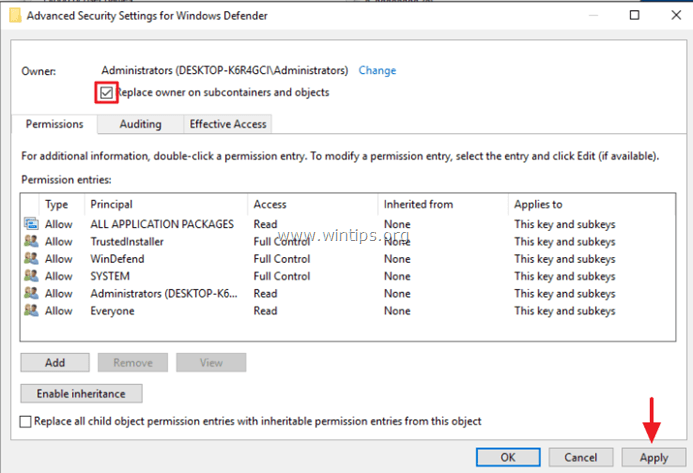
8. Check the "Replace owner on subcontainers and objects" checkbox and click Apply.
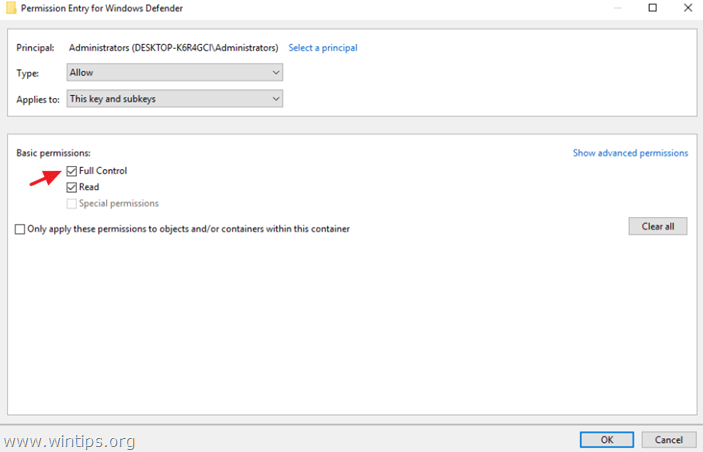
9. Then double-click to open Administrators entry.
10. Select the Full Control checkbox and press OK three (3) times. *
* Update (October 2019): After the latest Windows 10 system update, Microsoft doesn't allow to modify the permissions on the 'Windows Defender' key with error "Unable to save permission changes on Windows Defender. Access is denied". If you face this error, then skip the rest instructions of this step (press OK -> Cancel and OK to close the permissions window), and continue to Step-3 below.
11. At the right-pane of Windows Defender key:
11a. Open the DisableAntiSpyware REG_DWORD value and change the Value data from 0 to 1 disable Windows Defender Antispyware protection. Click OK when done. *
* Note: If you cannot edit (modify) the value data, then close and re-open Registry Editor or make sure that the "Real Time Protection' remains off (step-1).
11b. Then open the DisableAntiVirus REG_DWORD value and change the Value data from 0 to 1 disable Windows Defender Antivirus protection. Click OK when done.
12. Proceed to the the next step to disable Windows Defender Services.
Step 3. Disable Defender Security Center, Antivirus & Firewall Services.
The final step is to disable the Defender's services, as described below: *
* Note: If you cannot modify one (or more) of the mentioned registry values with error "Cannot Edit Start: Error writing the value's contents", then proceed and modify the registry offline, by following the steps at method-2 below.
1. To Disable the Windows Defender Security Center Service, modify the Start REG_DWORD value, from 2 to 4 at the following registry key:
- HKEY_LOCAL_MACHINE\SYSTEM\CurrentControlSet\Services\SecurityHealthService
2. To Disable the Windows Defender Antivirus Service,modify the Start REG_DWORD value, from 3 to 4 at the following registry key:
- HKEY_LOCAL_MACHINE\SYSTEM\CurrentControlSet\Services\WinDefend
3. To Disable the Windows Defender Antivirus Network Inspection Service, modify the Start REG_DWORD value, from 3 to 4 at the following registry key:
- HKEY_LOCAL_MACHINE\SYSTEM\CurrentControlSet\Services\WdNisSvc
4. To Disable the Windows Defender Firewall Service, modify the Start REG_DWORD value, from 2 to 4 at the following registry key:
- HKEY_LOCAL_MACHINE\SYSTEM\CurrentControlSet\Services\MpsSvc
5. Close registry editor and restart your computer.
Method 2. How to Disable the Windows Defender by Editing the Registry Offline.
Step 1. Create a System Restore Point. *
* Note: This step is optional, but, for precautionary reasons I suggest to create a restore point of your system current state in order to restore your PC if something goes wrong.
To Create a restore point:
1. Open Windows Explorer.
2. At the left pane, right-click on "This PC" icon and select Properties.
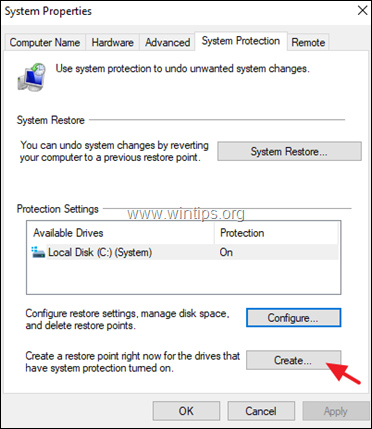
3. Click System Protection.
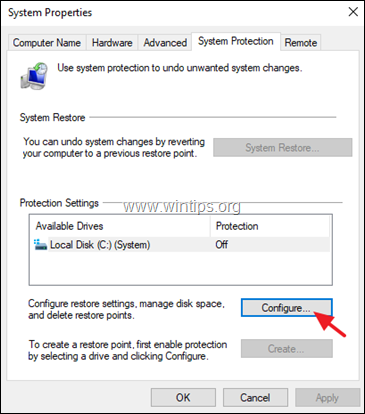
4. At System Protection settings, click Configure.
5. At Restore Settings window:
a. Check the Turn on system protection.
b. Adjust the maximum disk space used for system protection, to (about) 10-15% of the maximum disk space.
c. Click OK.
6. Now click Create to create a restore point of the current state.
7. Type a recognizable name for the restore point and click Create.
8. When the operation is completed, continue to next step.
Step 2. Disable Windows Defender services Offline.
1. Proceed and start Windows 10 in recovery mode. To do that use one of the following ways:
A. From Windows GUI: Right click on Start menu and then press the Restart button while pressing the SHIFT key on your keyboard.
B. From Windows Sign-in screen: Click on the Power button and then choose Restart while pressing the SHIFT key on your keyboard.
2. At Recovery options, go to Troubleshoot -> Advanced Options -> Command Prompt. (Your computer will restart)
3. After restart, select an account with administrative privileges, type the password (if any) and click Continue.
4. In command prompt window type regedit and press Enter.
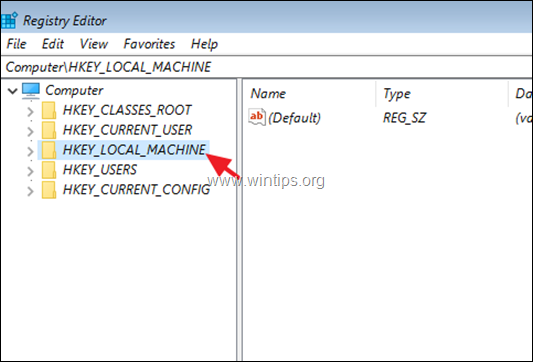
5. In Registry Editor, highlight the HKEY_LOCAL_MACHINE key.
6. From File menu, select Load Hive.
7. At 'Look in' select the disk where Windows are installed on (commonly is listed as disk "D:").
8. Now navigate to the following path on the OS disk:
- Windows\system32\config\
9. Highlight the SYSTEM file and click Open.
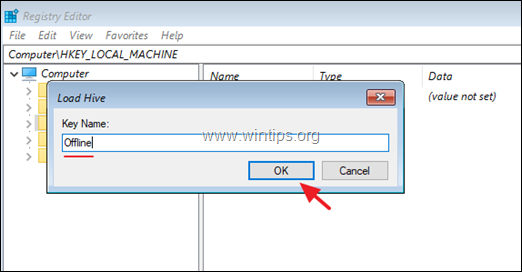
10. Type a Key Name for the offline registry database (e.g. "Offline") and press OK.
11. Now navigate at the following registry keys and set the Start value to 4 :
- HKEY_LOCAL_MACHINE\Offline\SYSTEM\ControlSet001\Services\MpsSvc
- HKEY_LOCAL_MACHINE\Offline\SYSTEM\ControlSet001\Services\SecurityHealthService
- HKEY_LOCAL_MACHINE\Offline\SYSTEM\ControlSet001\Services\WdNisSvc
- HKEY_LOCAL_MACHINE\Offline\SYSTEM\ControlSet001\Services\WinDefend
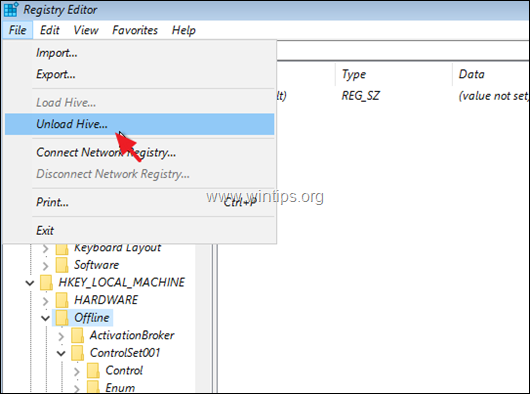
12. When done, highlight the key you previously created (e.g. the "Offline" key ) and from the File menu, choose Unload Hive to write back the changes you made to the Registry.
13. Select Yes when asked to unload the current key,
14. Close the 'Registry Editor' and the 'Command Prompt' windows.
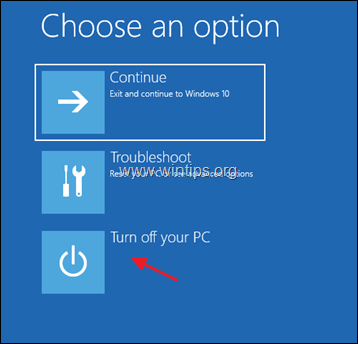
15. Click Turn off your PC.
16. Power On you PC and boot to Windows normally.
You 're done! Let me know if this guide has helped you by leaving your comment about your experience. Please like and share this guide to help others.
We're hiring
We're looking for part-time or full-time technical writers to join our team! It's about a remote position that qualified tech writers from anywhere in the world can apply. Click here for more details.
- How to Disable or Remove BitLocker from Windows RE. - April 24, 2024
- FIX: Error 0x8007025d in Windows 10 Update. - April 22, 2024
- How to Disable Device Encryption in Windows 11/10. - April 17, 2024















February 19, 2022 @ 1:45 am
I tried all these things but none work, I'm unable to make any changes to the values in regedit, it always says I can't, even tho I gave myself permission as Admin. My computer must be all messed up. It's frustrating.
February 19, 2022 @ 8:26 am
Disable Real-Time protection first and then open the registry editor to make the changes.
June 17, 2020 @ 12:26 am
Thanks A lot, You are Good!
March 1, 2020 @ 3:07 pm
Thank you so much! Method 2 worked fine for me.
October 30, 2019 @ 1:10 am
Hello. Unfortunately it didn't work out.
Last week there was a new Windows 10 system update. Maybe it's related to the issue.
When I access (hklm\software\microsoft\windows defender) on register editor, and create a new key labeled "DisableAntiSpyware", the system issues an error and it´s not possible to create this key.
I gave all the full control permissions as you described, but it doesn't work.
I still have Antimalware Service Executable, Windows Defender Antivirus Service always running in my PC.
Could you please check it again and give me some feedback ?
Thank you in advance!
October 30, 2019 @ 1:11 pm
You have right. But proceed and apply the instructions on step-3 and you 'll be OK.
October 30, 2019 @ 8:56 pm
Thank you for reply. Unfortunately I can´t do that either.
The system do not allow me to change the Start value from 3 (for me) to 4, for the entry "HKEY_LOCAL_MACHINE\SYSTEM\CurrentControlSet\Services\WdNisSvc" on regedit. Even with all permissions.
I tried all the steps you wrote. It seems like nothing work with this new uptade of Windows 10 O.S.
November 1, 2019 @ 11:46 am
Turn Off the Real-Time protection and then close and re-open the Registry Editor.
November 1, 2019 @ 7:58 pm
Hi. Thank you for help me out!
There is no option to disable Windows Defender real time protection by Windows 10 standard configurations (made by users on console).
It seems like there is no Windows Defender active when you look into Windows configurations. Only in the background like I could find in services and even in process on task manager.
One reason is that I am using another antivirus software (Avast). So Windows 10 only display configurations to the user about the anti-virus chosen by him.
Even turning off Avast antivirus, Windows 10 still does not allow to change any registry entry related with Windows Defender.
September 17, 2019 @ 4:07 am
THANK YOU! THANK YOU! THANK YOU!
I absolutely hate these worthless Microshaft Winblows services that do nothing but waste resources!
THANK YOU! For helping me kill off this garbage!!!
November 10, 2019 @ 5:19 pm
It seems like the only way to do that is using the software NSudo.
March 4, 2019 @ 6:56 am
Fantastic!!
Thanks very much.