How to Disable 'Use Windows Hello with your account' prompt (Error 0x801c044f).
In this tutorial you'll find instructions to disable the Windows Hello for Business prompt (aka: Windows Hello for Business provisioning), "Use Windows Hello with your account" after adding a PIN and to remove the message "Your organization requires Windows Hello” during OOBE.
When adding a Windows Hello PIN/Fingerprint/Face as sign-in option on a computer joined to Azure AD, or in a Active Directory Domain (on local premises), you must setup a Microsoft Account to access your Organization resources. This is required because, when a device is set up for use in an organization, Windows Hello for Business is automatically enabled.
If for any reason, you don't setup a Microsoft Account for Windows Hello for Business, you'll face the following symptoms and problems on your PC:
- In the Windows Hello PIN you'll face the error: "This option is currently unavailable" with description "Sorry, this PIN isn't working for your organization's resources. Tap or click here to fix it".
-
You'll prompted to "Use Windows Hello with your account", when you setup a PC for first time (Out of the box experience (OOBE)), or after clicking "Tap or click here to fix it" in the Windows Hello PIN options (see the above screenshot).
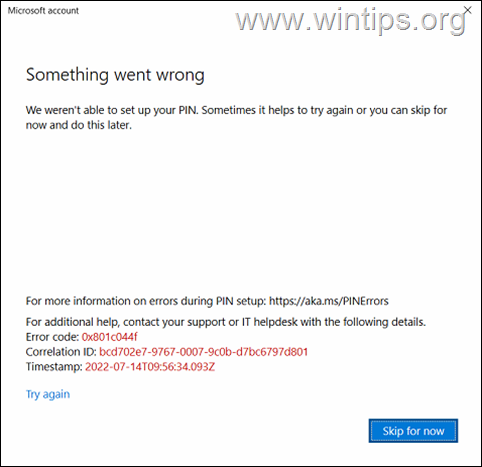
- You'll get the Windows Hello PIN error: "Something went wrong. We aren't able to setup your PIN. 0x801c044f" after trying to fix the problem without adding a MS account.
If you don't want to use a Microsoft Account in Windows Hello for Business (e.g. in case where a single device is used by several users or if you do not have Azure AD/Office365 accounts in your organization), then you can disable the Windows Hello Provisioning, by using the instructions below.
How to Disable the Windows Hello requirement to use a Microsoft Account in Windows Hello PIN or during OOBE. (FIX:Windows Hello PIN error 0x801c044f).
To force Windows to not ask for a Microsoft Account in Windows Hello PIN/Fingerprint/Face, proceed and disable the Windows Hello for Business provisioning. This will remove both the "Use Windows Hello with your account" prompt in Windows Hello PIN, and will disable the "Your organization requires Windows Hello” prompt during OOBE.
Windows Hello for Business provisioning can be disabled using Group Policy, either locally or in an Active Directory domain, or in Microsoft Intune. According your situation proceed to the corresponding part below.
- Part 1. Disable Windows Hello Provisioning in Windows 10/11 Pro.
- Part 2. Disable Windows Hello Provisioning in Active Directory.
- Part 3. Disable Windows Hello Provisioning in Microsoft Endpoint Manager (INTUNE).
Part 1. How to Disable Windows Hello prompt "Use Windows Hello with your account", in Local Group Policy (Windows 10/11 Pro).
If you want to remove the "Use Windows Hello with your account" prompt, on a standalone computer (not joined to a domain), or to specific domain PCs, proceed as follows:*
* Note: If you want to disable the Windows Hello provision to entire AD domain, follow the instructions on part-2.
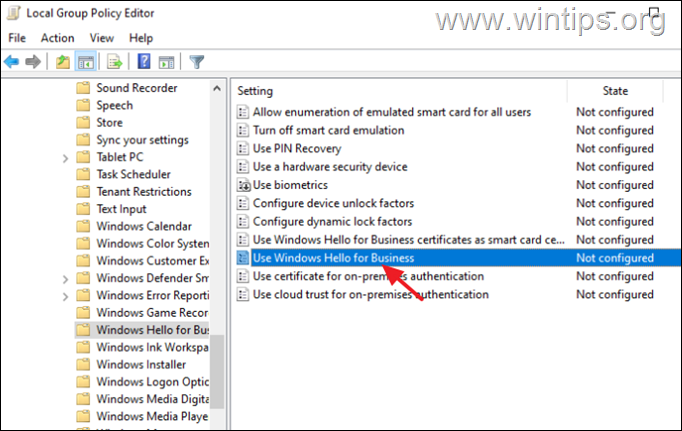
1. Run gpedit.msc to open the Local Group Policy Editor.
2. In Local Group Policy, navigate to:
- Computer Configuration\Administrative Templates\Windows Components\Windows Hello for Business
3. At the right open the Use Windows Hello for Business policy.
4. Set the policy to Enabled* and check the option Do not start Windows Hello provisioning after sign-in.
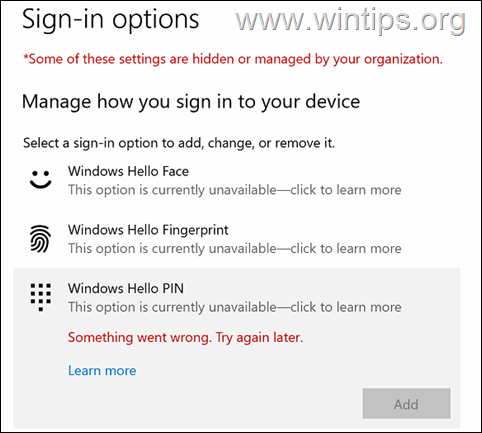
* Note: If you disable this policy, users won't be able to setup a Windows Hello for Business PIN and they will receive the following message in Windows Hello PIN options: "This option is currently unavailable. Something went wrong".
5. Restart the PC to apply the change.
Part 2. How to Disable Windows Hello prompt in Active Directory (On Premises).
To disable the Windows Hello for Business provisioning in entire AD domain, proceed as follows:
Step 1. Create a new Domain Policy for Hello for Business. *
* Note: In this guide I'll create a new Domain Policy for the Windows Hello for Business. If you don't want to create a new policy and you want to apply the changes to the Default Domain Policy, skip to step-2.
1. On your Domain Server, open the Server Manager and from Tools open the Group Policy Management.
2. Under the 'Domains' object, right-click on your domain and select Create a GPO in this domain and Link it here.
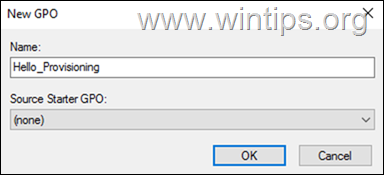
3. Type a name for the new GPO (e.g. "Hello_Provisioning") and click OK.
Step 2. Enable Windows Hello for Business.
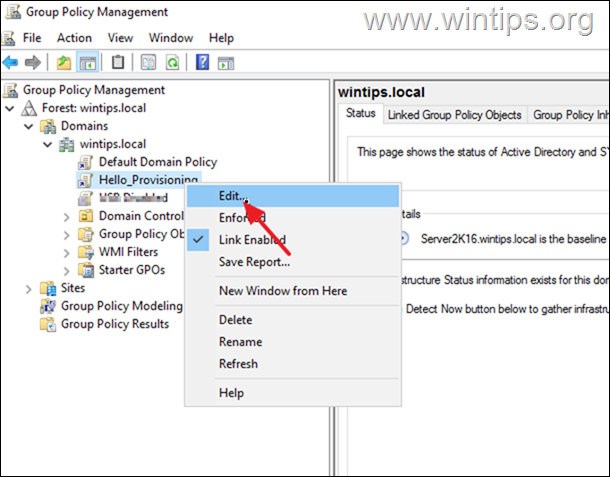
1. Right-click at the new GPO (or in Default Domain Policy), and click Edit.
2. At the left pane navigate to:
- Computer configuration\Policies\Administrative Templates\Windows Components\Windows Hello for Business
* Notes:
1. By setting this policy Enabled you'll allow users to sign-on with a Windows Hello PIN.
2. If you disable this policy, users won't be able to setup a Windows Hello PIN and they will receive the message in Windows Hello PIN options: "This option is currently unavailable. Something went wrong".
4. Proceed to next step to disable the Windows Hello for business provisioning.
Step 3. Disable "Use Windows Hello with your account" prompt.
Finally proceed and deploy the following registry change to all computers in Active Directory, in order to disable the Windows Hello provisioning:
1. On the "Hello_Provisioning" GPO (or in default domain policy), navigate to:
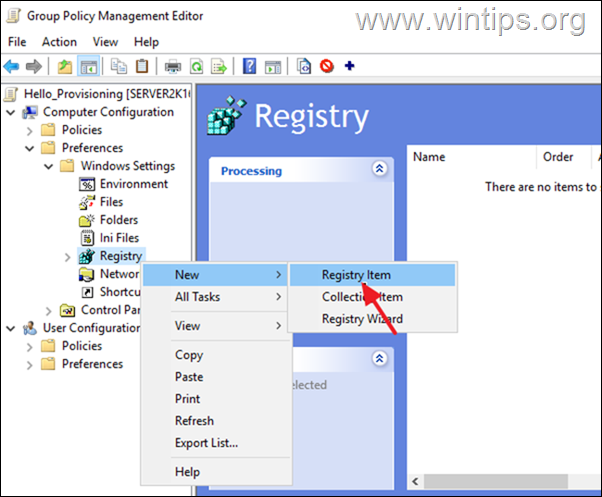
- Computer Configuration\Preferences\Windows Settings\Registry
2. Right-click at Registry and select New > Registry item.
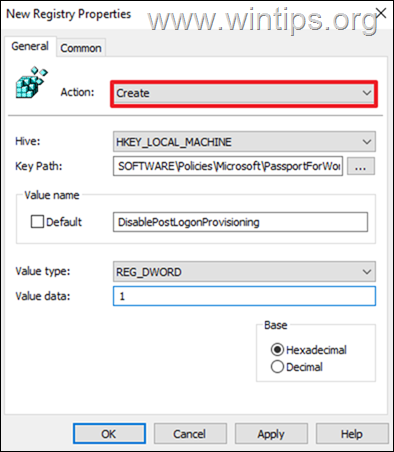
3. At the 'New Registry Properties' window, apply the following settings and click OK:
- At Action choose: Create
- At Hive select: HKEY_LOCAL_MACHINE
- At Key path type: SOFTWARE\Policies\Microsoft\PassportForWork
- At Value Name type: DisablePostLogonProvisioning
- Value type: REG_DWORD
- Value data: 1
4. Close the Group Policy Management Editor and restart any domain computer to see if the registry change has applied. *
* Note: To see if the registry change has been applied to the workstations:
1. Restart any AD computer (workstation) and login to the Domain.
2. Open Registry Editor and navigate to:
- HKEY_LOCAL_MACHINE\SOFTWARE\Policies\Microsoft\PassportForWork
3. See at right-pane if the DisablePostLogonProvisioning & Enabled REG_DWORD values exist and has Value Data 1. *
* Info: The "Enabled" DWORD value is created automatically when you enable the Windows Hello for Business (Step-1). If the value is not there, follow the same steps above and created it using GPO.
Part 3. How to Disable Windows Hello prompt in Microsoft Endpoint Manager (INTUNE).
To disable the Windows Hello Provisioning in Microsoft Intune:
1. Sign to Microsoft Endpoint Manager admin center with an Intune Administrator role.
2. Select Devices on the left and at the right go to Windows -> Windows enrollment.
3. Open Windows Hello for Business and under Configure Windows Hello for Business, select Enabled.
4. Now create the following PowerShell script and push to the clients the following Registry change via Intune: *
- Set-ItemProperty -Path "HKLM:\SOFTWARE\Policies\Microsoft\PassportForWork" -Name DisablePostLogonProvisioning -Value "1" -Type DWORD
* Note: Select 'YES' for "Run script in 64 bit PowerShell Host" when deploying it through Intune.
That's it! Which method worked for you?
Let me know if this guide has helped you by leaving your comment about your experience. Please like and share this guide to help others.
We're hiring
We're looking for part-time or full-time technical writers to join our team! It's about a remote position that qualified tech writers from anywhere in the world can apply. Click here for more details.
- How to Disable or Remove BitLocker from Windows RE. - April 24, 2024
- FIX: Error 0x8007025d in Windows 10 Update. - April 22, 2024
- How to Disable Device Encryption in Windows 11/10. - April 17, 2024








October 12, 2023 @ 3:31 pm
Hello
Thank for this post, if I understand correctly.
For removing this OOBE "Use Windows Hello with your account" to a computer enrolls in intuition, I have to push the GPO & activate "Configure Windows Hello for Business" in Intune to stop the error?
October 12, 2023 @ 6:03 pm
Yes.
March 29, 2023 @ 3:39 pm
Hello,
The registry key used for Step 3 (disable Windows Hello prompt) is incorrect. The article specifies:
HKLM:\SOFTWARE\SOFTWARE\Policies\Microsoft\PassportForWork
There are 2 \SOFTWARE\ folders listed when there should just be one.
HKLM:\SOFTWARE\Policies\Microsoft\PassportForWork
March 31, 2023 @ 9:48 am
Thanks for noticing this! The article has been corrected.