How to Hide a Local Drive in Windows 10.
If you share your computer with others, an easy way to protect your sensitive data from prying eyes is to hide specific folders or files. But how you can hide a local drive?
In Windows, you can hide any file or folder by checking the "Hidden" box in the file's properties. Since this method is not so reliable, and is also time consuming, especially if you have a ton of files or folders you want to hide, a better way is to move all those files/folders to another disk and then to hide the entire disk.
In Windows 10 you can hide an entire local drive on My Computer or in File Explorer using various ways such as Disk Management console, Registry Editor, Command Prompt or Group Policy.
In this article you will find detailed instructions on how to prevent a local drive to appear in Explorer on Windows. (The instructions applies to all Windows versions)
- Related article: How to Prevent Access to a Local Drive.
How to Hide a Local Disk in File Explorer & My Computer on Windows 10.
- Hide Drive in Disk Management.
- Hide Drive using Command Prompt.
- Hide Drive with Registry Editor.
- Hide Drive with Group Policy.
Method 1: How to Hide a Local Drive in Disk Management Console.
In the disk management console, we can partition drives, assign drive letters and hide storage drives with sensitive information. To hide a local drive, proceed and remove its drive letter using disk management:
1. Press the Windows key + R to launch the Run window, then type diskmgmt.msc and select OK.
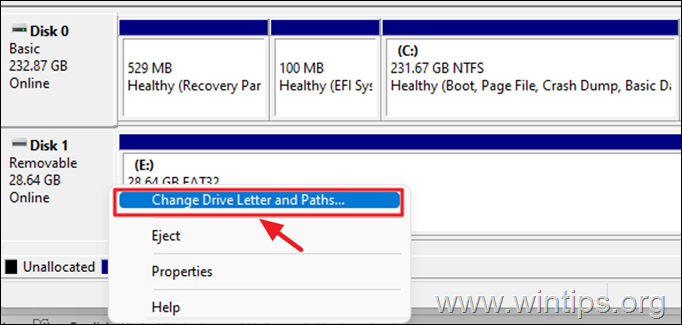
2. Right-click at the drive or partition you want to hide and select Change drive letter and paths.
3. Select the drive letter and click the Remove button.
4. A window with a warning message will appear, select Yes to confirm.
5. Once you navigate to File Explorer, you will notice that the drive is no longer there.
To Unhide a Drive in Disk Management:
1. When you will want to see the contents of the disc, navigate again at disk management again, right-click on the hidden disk and select Change Drive Letter and Paths.
2. On the window that pops up, select Add.
3. Ensure Assign the following drive letter is selected from the drop-down, select a preferred drive letter (e.g. "E") and click OK to continue.
Method 2: How to Hide a Local Disk or Partition using Command Prompt.
The next method to hide a specific local drive is by removing its drive letter by using DISKPART utility in command prompt (or PowerShell).
1. Press the Windows key + R to launch the Run window.
2. Type cmd and Press Ctrl + Shift + Enter to open Command prompt as Administrator.
3. At command prompt window, type the following commands in order:
- diskpart
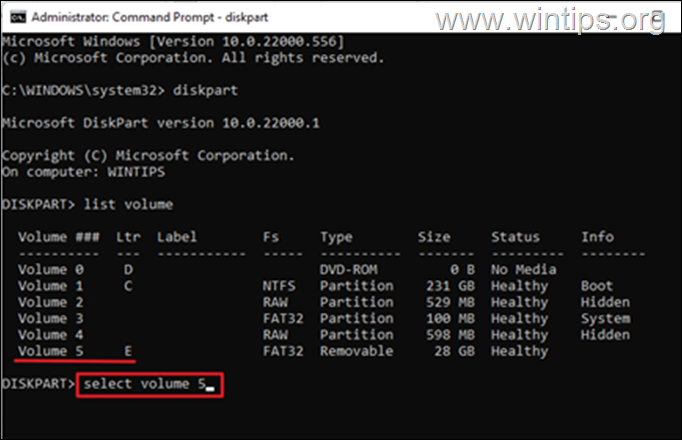
- list volume
4. Your screen will now display all the disks and partitions on your computer with the drive letter assigned to them.
5. Notice the Volume Number of disk/partition that you want to hide it's drive letter and give the following command to select that Volume. *
- select volume #
* Note: Where "#" represents the volume number of the drive you want to hide. e.g. To hide the drive "E" at Volume "5", type the following command:
- select volume 5
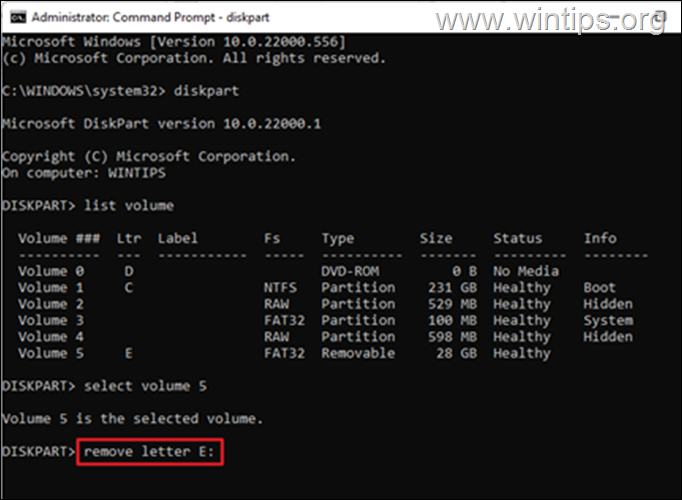
6. Now type the following command to remove the drive letter from the selected volume in order to hide it:*
- remove letter X:
* Note: Where "X:" represents the drive letter of the selected volume to be hidden. e.g. If you want to hide the drive "E:" on volume "5" type the following command:
- remove letter E:
7. Finally type exit to close DISKPART utility and you're done! The selected drive will not be displayed anymore in explorer.
To Unhide a Drive in DISKPART:
To unhide the disk/partition and view its contents, proceed and re-assign the drive letter as instructed below.
1. Open Command Prompt as Administrator.
2. Type the following commands is order:
- diskpart
- list volume
3. Notice the Volume number of the Disk/Partition that you wish to unhide.
4. Type the following command to select the hidden Volume and hit Enter. *
- select volume #
* Note: Where "#" represents the volume number of the disk/partition you want to unhide. (e.g. the Volume "5" in this example).
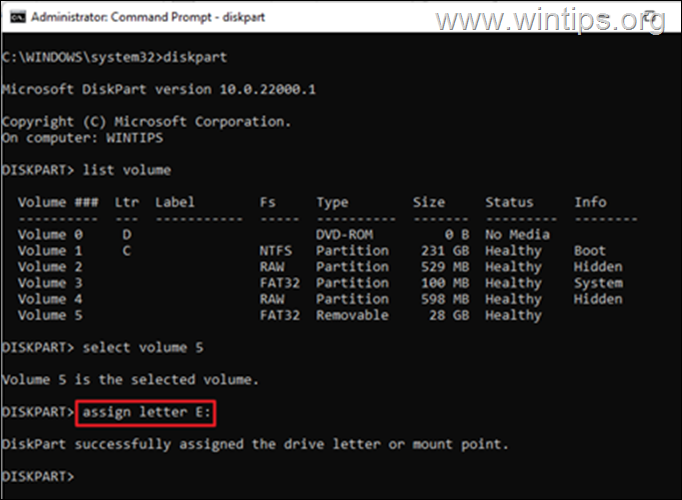
5. Finally give the following command to re-assign a drive letter:*
- assign letter X:
* Note: Where "X:" represents the drive letter that you wish to assign on the hidden volume. (e.g. the letter "E:" in this example).
6. At this point, the hidden drive will be displayed in File Explorer.
Method 3: How to Hide Local Drive in Registry.
Registry Editor is another effective tool for hiding your local drives from prying eyes.
Important: Making incorrect changes to the Registry can cause serious damage to your device and could require you to reinstall Windows. Therefore, be careful when making changes to the Registry Editor and always back up the Registry before making any changes.
1. Press the Windows ![]() and R keys to open the Run command box.
and R keys to open the Run command box.
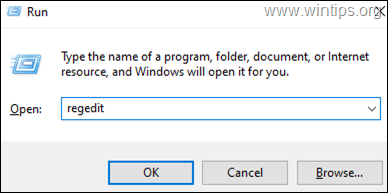
2. Type regedit and hit Enter: *
* Note: If you see a User Access Control (UAC) warning window asking for permission, click on Yes.
3. In Registry Editor, navigate to the following path:
- HKEY_LOCAL_MACHINE\Software\Microsoft\Windows\CurrentVersion\Policies\Explorer
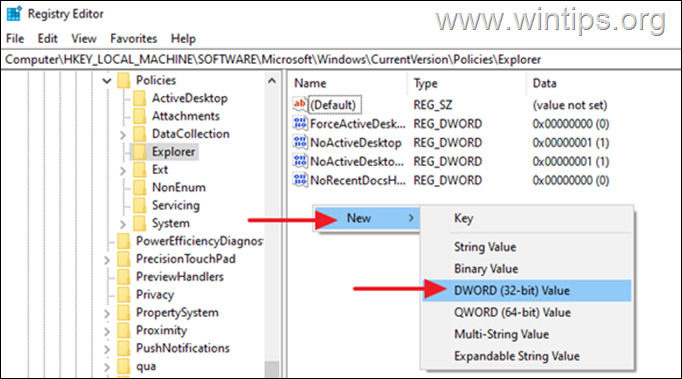
4. Right-click at the blank space on the right side and select New > DWORD (32-bit) Value.
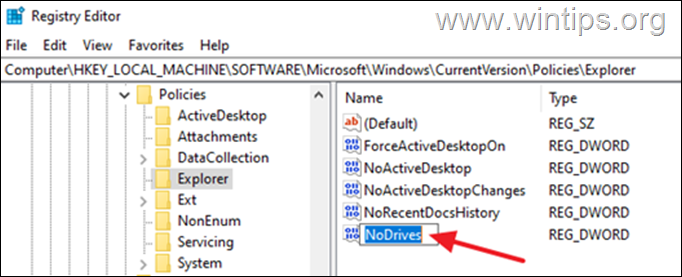
3. Give at the new value the name NoDrives and press Enter.
4a. Double-click at the newly created NoDrives value, and select Decimal at the Base options.
4b. Now change the value data to the number corresponding to the drive letter, according to the table below and press OK.*
e.g To hide the drive "E:" with have to type "16" in the Value Data box.
* Note: See the table below to find the value data for each drive letter.
|
Drive letter |
Value Data |
Drive Letter |
Value Data |
| A | 1 | N | 8192 |
| B | 2 | O | 16384 |
| C | 4 | P | 32768 |
| D | 8 | Q | 65536 |
| E | 16 | R | 131072 |
| F | 32 | S | 262144 |
| G | 64 | T | 524288 |
| H | 128 | U | 1048576 |
| I | 256 | V | 2097152 |
| J | 512 | W | 4194304 |
| K | 1024 | X | 8388608 |
| L | 2048 | Y | 16777216 |
| M | 4096 | Z | 33554432 |
5. When done, close the registry editor and restart your PC to apply the change. *
* Notes:
1. To undo the change and unhide the drive letter, open the registry editor again and delete the NoDrives DWORD Value from the above mentioned registry location and restart your PC.
2. Keep in mind that this method may not the best method to hide a local drive, because users can still gain access to drive contents by using other methods, such as by typing the hidden drive letter (if they know it) at File Explorer's address bar or in Run dialog box.
Method 4: How to Hide a Local Disk in Group Policy Editor. *
The final method to hide a local drive in Windows, is by using the Group Policy Editor.*
* Notes: This method applies only to Windows 10 Pro/Enterprise/Education & Windows Server versions.
1. Simultaneously press the Windows ![]() + R keys to open the Run command box.
+ R keys to open the Run command box.
2. In the text field of the dialog box, type gpedit.msc and hit Enter to open the Group Policy Editor.
3. Navigate to the following path in the Group Policy Editor.
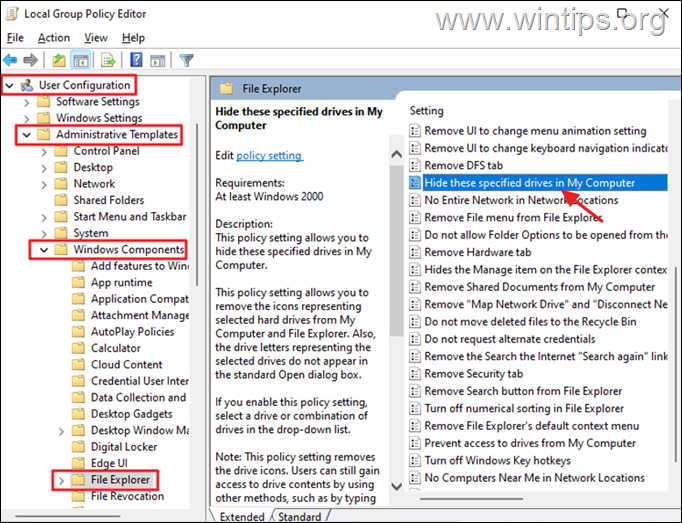
- User Configuration –> Administrative Templates–> Windows Components –> File Explorer
4. At the right side double-click to open the Hide these specified drives in My Computer policy.*
* Info: This policy setting allows you to remove the icons representing selected hard drives from My Computer and File Explorer. Also, the drive letters representing the selected drives do not appear in the standard Open dialog box.
4. At the new window that will pop up, select Enabled and from the dropdown menu below Options, select the drive letter* you want to hide. When done, click Apply and OK.
* Note: If you don't see the drive letter that you want to hide, then use one of the above methods, because group policy doesn't allow to hide all drives/letters. (Yes, this another good job from MS!)
5. Close the Group Policy Editor.
6. Now, check in File Explorer to verify that you no longer see the drive you hide. (if you don't see the change, close and re-open File Explorer) *
* Notes:
1. To unhide the drive just set the Hide these specified drives in My Computer policy to Not Configured.
2. Keep in mind that this method may not the best method to hide a local drive, because users can still gain access to drive contents by using other methods, such as by typing the hidden drive letter (if they know it), at File Explorer's address bar or in Run dialog box. Also, this policy setting does not prevent users from using other programs to access the drive and its contents.
That's it! Which method worked for you?
Let me know if this guide has helped you by leaving your comment about your experience. Please like and share this guide to help others.
We're hiring
We're looking for part-time or full-time technical writers to join our team! It's about a remote position that qualified tech writers from anywhere in the world can apply. Click here for more details.
- FIX: Numeric keypad Not Working on Windows 10/11 - July 24, 2024
- How to Share Files or Printers in Hyper-V? - July 22, 2024
- How to invoke Hyper-V Screen resolution prompt? - July 17, 2024



![clip_image008[4] clip_image008[4]](https://www.wintips.org/wp-content/uploads/2022/04/clip_image0084_thumb.jpg)


![clip_image014[4] clip_image014[4]](https://www.wintips.org/wp-content/uploads/2022/04/clip_image0144_thumb.jpg)
![clip_image016[4] clip_image016[4]](https://www.wintips.org/wp-content/uploads/2022/04/clip_image0164_thumb.jpg)
