How to Prevent Access to Local Drive for Specific Users in Windows 10.
If you own a Windows computer that you share with other people, you can prevent the access to local drives or to certain folders for a specific user account or for everyone.
Imagine the following scenario: You have all your important files on a secondary internal disk on your computer and you don't want other people to view or to delete them.
In this article, we will find detailed instructions on how to restrict the access to a local drive (or folder), for all or for specific users in Windows 10. (The instructions applies to all Windows versions).
- Related article: How to Hide a Local Drive in Windows 10.
How to Prevent Users to Access a Local Drive in Windows 10.
- Prevent access to Drive to Specific Users.
- Prevent access to Drive for All Users in Registry Editor .
- Prevent access to Drive for All Users using Group Policy
Method 1: How to Prevent Specific Users from Accessing a Drive or Folder.
The first and best method* to deny access to a drive/folder is to change the user permissions on the drive/folder properties.
* Note: This is the best method, because it allows you to prevent only specific users from accessing the contents of a disk unit or a folder. All other methods listed here prevent access to all users (including you).
To disallow certain users to access the contents of a folder/drive:
1. In File Explorer, right-click the drive on which you want to deny access to specific users, and then click Properties.
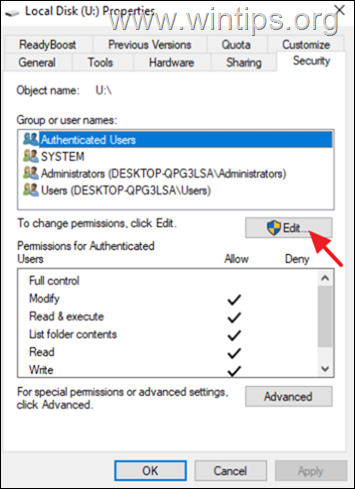
2. Select the Security tab, then click the Edit button.
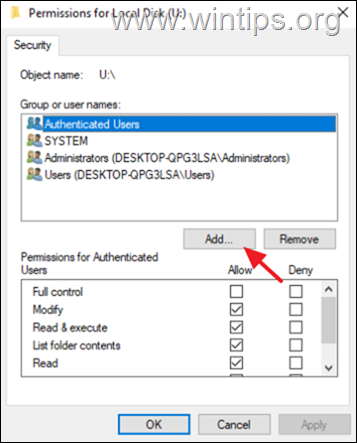
3. Click Add to select the user you want to prevent from accessing your drive.
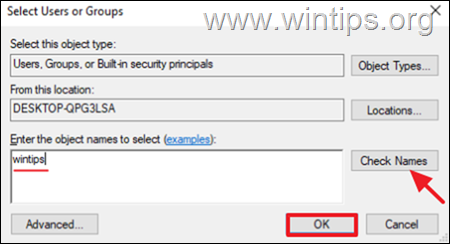
4. Type the username* of the user you want to restrict access to, and to confirm, click Check Names. Then select OK. *
* Note: You need to know the correct username of the account you want to restrict. An easy way to view the users on your pc, is to to view the names of the profile folders under the "C:\Users\" folder.
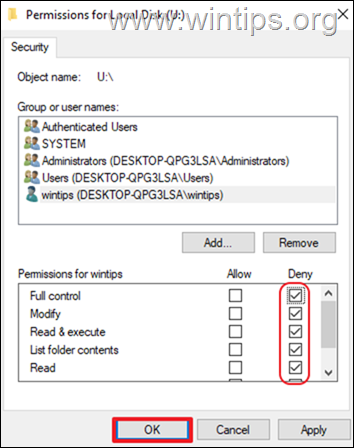
5. Now in Permissions for local disk window, select the user you just added and in the Permissions section, tick Deny, restricting access for Full control. Now select Apply >> OK.
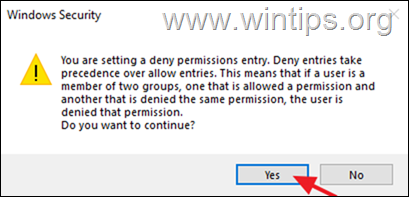
6. Click Yes when prompted to apply the permissions and then close all windows.
7. At this point, you have successfully prevented a specific user from accessing the selected drive. If you want to restrict access to more users, follow the same steps above.
Method 2. How to Prevent Access to Local Drive to All Users in Registry.
The next method to prevent users to access a local drive in Windows 10, is by using Registry. *
* Note: Use this method only if you want to prevent the access to all users (including you).
Important: Making incorrect changes to the Registry can cause serious damage to your device and could require you to reinstall Windows. Therefore, be careful when making changes to the Registry Editor and always back up the Registry before making any changes.
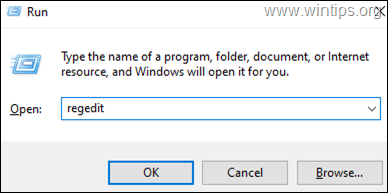
1. Press the Windows ![]() and R keys to open the Run command box.
and R keys to open the Run command box.
2. Type regedit and hit Enter: *
* Note: If you see a User Access Control (UAC) warning window asking for permission, click on Yes.
3. In Registry Editor, navigate to the following path:
1. Navigate to the following path on Registry Editor:
- HKEY_LOCAL_MACHINE\Software\Microsoft\Windows\CurrentVersion\Policies\Explorer
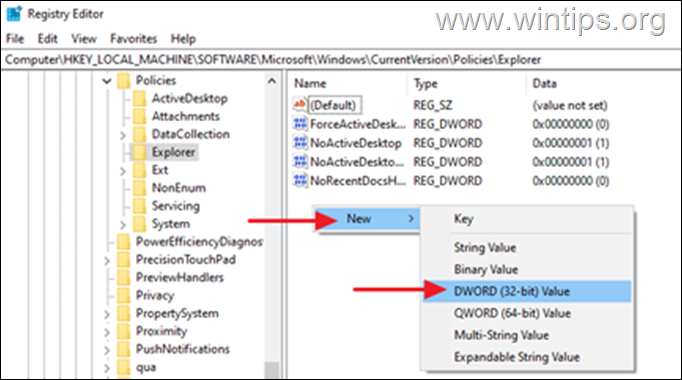
4. Right-click at the blank space on the right side and select New > DWORD (32-bit) Value.
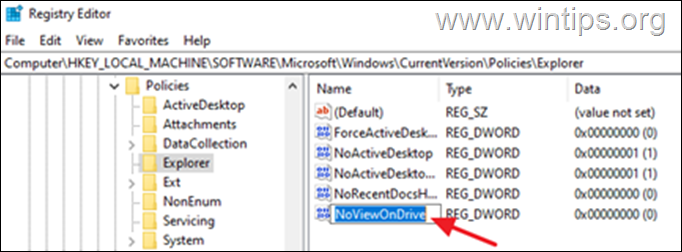
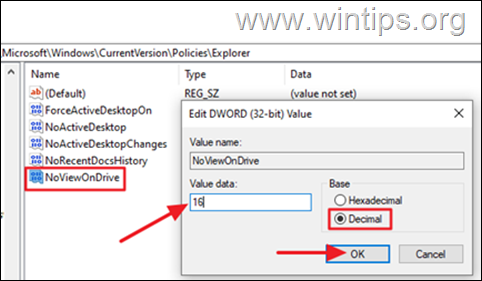
3. Type NoViewOnDrive as the name of the new DWORD, then press Enter.
4a. Double-click at the newly created NoViewOnDrive value, and select Decimal at the Base options.
4b. Now change the value data to the number corresponding to the drive letter, according to the table below and press OK.*
e.g To hide the drive "E:" with have to type "16" in the Value Data box.
* Note: See the table below to find the value data for each drive letter.
| Drive letter | Value Data | Drive Letter | Value Data |
| A | 1 | N | 8192 |
| B | 2 | O | 16384 |
| C | 4 | P | 32768 |
| D | 8 | Q | 65536 |
| E | 16 | R | 131072 |
| F | 32 | S | 262144 |
| G | 64 | T | 524288 |
| H | 128 | U | 1048576 |
| I | 256 | V | 2097152 |
| J | 512 | W | 4194304 |
| K | 1024 | X | 8388608 |
| L | 2048 | Y | 16777216 |
| M | 4096 | Z | 33554432 |
5. When done, close the registry editor and restart your PC to apply the change.
6. After restarting every user who tries to access the drive will receive the error:
“This operation has been canceled due to restrictions in effect on this computer. Please contact your system administrator.”
* Note: To remove the access restriction, open the registry editor again and delete the NoViewOnDrive DWORD Value from the above mentioned registry location and restart your PC.
Method 3: How to Deny Access to a local drive using Group Policy.
Alternatively, local group policy is also effective for restricting users to access a local drive. Compare to Registry Editor, group policy has a limited amount of drive letters that can be restricted.
* Notes:
1. To use Group Policy method, you must be running Windows 10 Pro/Enterprise/Education edition. Local group policy is not available on Windows 10 Home.
2. Use this method only if you want to prevent the access to all users (including you).
1. Simultaneously press the Windows ![]() + R keys to open the Run command box.
+ R keys to open the Run command box.
2. In the text field of the dialog box, type gpedit.msc and hit Enter to open the Group Policy Editor.
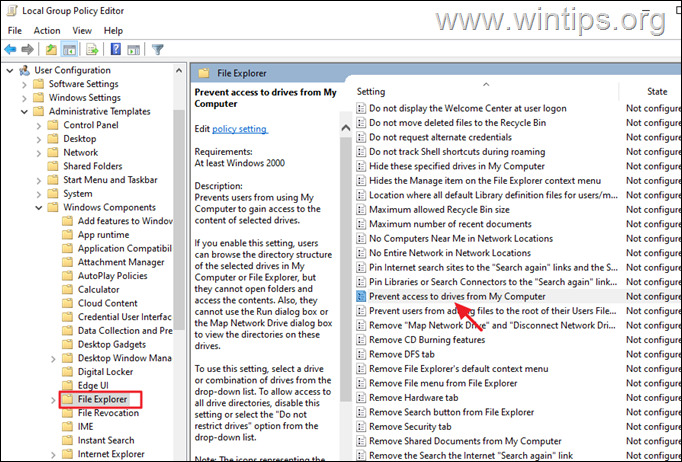
3. Navigate to the following path in the Group Policy Editor.
- User Configuration –> Administrative Templates–> Windows Components –> File Explorer
4. At the right side double-click to open the Prevent Access to drives from My Computer policy.*
* Info: This policy prevents users from using My Computer to gain access to the content of selected drives. If you enable this setting, users can browse the directory structure of the selected drives in My Computer or File Explorer, but they cannot open folders and access the contents. Also, they cannot use the Run dialog box or the Map Network Drive dialog box to view the directories on these drives.
4. At the new window that will pop up, select Enabled and from the dropdown menu below Options, select the drive letter* you want to hide. When done, click Apply and OK.
* Note: If you don't see the drive letter that you want to hide, then use one of the above methods, because group policy doesn't allow to hide all drives/letters. (Yes, this another good job from MS!)
5. Close the Group Policy Editor.
6. Now, check in File Explorer to verify that you no longer have access to the drive with error:*
“This operation has been canceled due to restrictions in effect on this computer. Please contact your system administrator.”
* Note: To regain access to the drive, open again the Group Policy Editor and set the policy Prevent Access to drives from My Computer to Not Configured.
That's it! Which method worked for you?
Let me know if this guide has helped you by leaving your comment about your experience. Please like and share this guide to help others.
We're hiring
We're looking for part-time or full-time technical writers to join our team! It's about a remote position that qualified tech writers from anywhere in the world can apply. Click here for more details.
- FIX: Numeric keypad Not Working on Windows 10/11 - July 24, 2024
- How to Share Files or Printers in Hyper-V? - July 22, 2024
- How to invoke Hyper-V Screen resolution prompt? - July 17, 2024





October 6, 2023 @ 7:07 pm
nice article found helpfull thank you
July 23, 2023 @ 12:23 pm
Hello,
I followed "Method 1: How to Prevent Specific Users from Accessing a Drive or Folder" to prevent access to guest accounts. Unfortunately, now I am not able to access all those drives and files from the admin account for myself. Please help me in this regard, I reversed all things and gave access back to the guest account and everything but still, it is not working. Even though I have deleted all those guests' accounts, still there is the same issue. Looking forward to hearing back from you soon. Thank you
July 24, 2023 @ 9:29 am
First of all, when making changes to privileges you should be careful and follow the instructions exactly.
To fix the problem: 1. Enable the hidden "admininstrator" account by giving the command: "net user administrator /active:yes" (without quotes) in admin command prompt. 2. Then, restart the PC and login with the "Administrator account" 3. Revert back the changes you made and give yourself access to drives/folders.
July 7, 2022 @ 5:24 pm
Excellent article…