How to install CAB files on Windows 11/10.
In this article, we will provide a step-by-step guide on how to install .CAB files on Windows 10/11. CAB files, also known as Cabinet files, are compressed files that are commonly used to distribute Windows Updates and device drivers.Installing CAB files on Windows 10 can be tricky, especially for users who are not familiar with the process. However, with some guidance, anyone can successfully install CAB files on their Windows machine.
Whether you are a novice or an experienced user, this guide will provide you with all the information you need to successfully install CAB files on your Windows 10 or 11 machine.
- Related Article: How to Uninstall Updates in Windows 11 (All Methods).
How to Install CAB files for Updates and Drivers on Windows 10/11.*
* Note: A CAB file may contain a Windows Update or the drivers for a hardware device. Use the instructions in Method-1 or Method-2 to install CAB files that contain Windows updates., or use the instructions in Method-3 to install CAB files that contain device drivers.
Method 1. Install CAB Files from Command Prompt using DISM.
DISM (Deployment Image Servicing and Management) is a command-line tool that allows you to manage and service Windows images and one of the features of DISM is the ability to install CAB files with Windows Updates on a Windows 10/11 operating system.
Here's how you can install a CAB file using the "DISM" command:
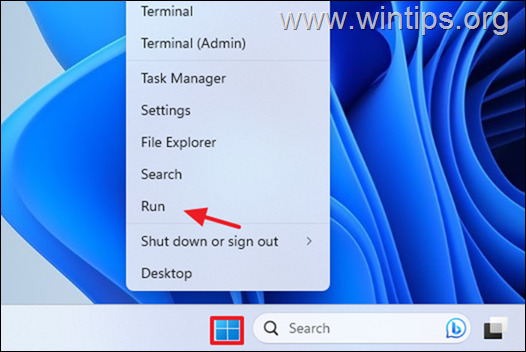
1. Right-click on your Start menu icon and then select Run from the list of options to open the Run dialog box.
2. In the run command box, type: cmd and press CTRL + SHIFT + ENTER to open Command Prompt as Administrator.
3. Now navigate to the location where you saved the .CAB file by typing the following command and then press Enter:*
- CD %Path_of_the .CAB file%
* Note: "Replace the "%Path_of_the .CAB file%" with the full path/folder you have downloaded the CAB file.
e.g.: If you have saved the CAB file into your "Downloads" folder and your username is "WUSER" type:
- cd C:\Users\WUSER\Downloads
4. Next give the following command to install the CAB file:*
- dism /online /add-package /packagepath:FILENAME.cab
* Note: Replace the "FILENAME.cab" with the name of the CAB file you want to install.
e.g: If the CAB's filename is "windows10.0-kb5025221.cab", type:
- dism /online /add-package /packagepath:windows10.0-kb5025221.cab
5. As the installation progresses, you will see a progress bar in the Command Prompt window. The installation process may take some time, depending on the size of the CAB file and the speed of your computer. When it is complete, click the "Y" button to restart your computer if prompted.
6. To verify that the CAB file was installed successfully, either check the Windows Update History (Windows Update > View Update history), or give the following command in command prompt to get a list of all installed updates:
- dism /online /get-packages
Method 2. Install a CAB File from PowerShell using DISM.
The second method to install a CAB file that contains a Windows Update on Window 10/11, is by using PowerShell.
1a. Click on the Start menu and type PowerShell in the search box.
1b. Right-click on Windows PowerShell app and select Run as Administrator.
.
2. Now navigate to the location where you saved the .CAB file by typing the following command and then press Enter:*
- CD %Path_of_the .CAB file%
* Note: "Replace the "%Path_of_the .CAB file%" with the full path/folder you have downloaded the CAB file.
e.g.: If you have saved the CAB file into your "Downloads" folder and your username is "John" type:
- cd C:\Users\John\Downloads
3. Then give the following command in the PowerShell window and press Enter to install the CAB file:
- Add-WindowsPackage -PackagePath "FILENAME.cab" -Online
* Note: Replace the "FILENAME.cab" with the name of the CAB file you want to install.
Example: If the CAB's filename is "windows10.0-kb5025221.cab", type:
- Add-WindowsPackage -PackagePath "windows10.0-kb5025221.cab" -Online
4. Depending on the size of the CAB file and how fast your computer is, the process may take a while.
5. Once the installation is completed, you can check that the CAB file is installed correctly by looking at the Windows Update history, or by running the following command in PowerShell to view a list of all installed updates.
- Get-WindowsPackage -Online
Method 3. How to install Device Drivers from a .CAB file.
If you have downloaded a CAB file containing drivers for a device on your computer, and you don't know how to install it, follow these steps:
1. Double-click to open on the CAB file.
2. Press Ctrl + A to select all the files and then right-click and click Extract.
3. Specify the location/folder to save the contents/files of the CAB file and click Extract.
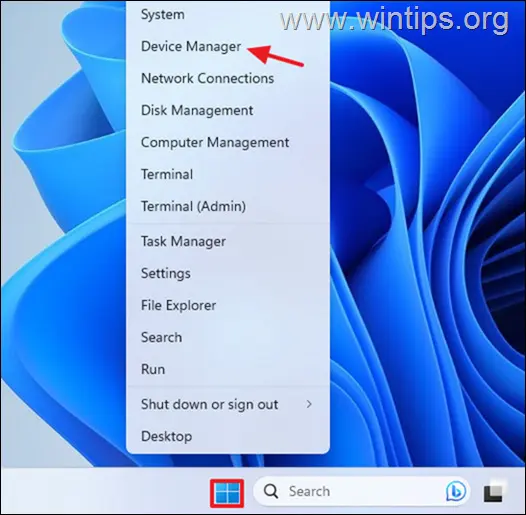
4. When done, navigate to Device Manager. (To do that, right-click on the Start button and then select Device Manager from the list).
5. In Device Manager, right-click on the device for which you have downloaded the drivers to a CAB file and select Update Driver from the menu.
6. Select the Browse my computer for drivers option.
7. Click the Browse button and select the folder containing the extracted contents/files of the CAB file, then click OK.
8. Then click Next to proceed. Allow Windows to install the device drivers for the selected device, and when the process is complete, click Close.
That's it! Let me know if this guide has helped you by leaving your comment about your experience. Please like and share this guide to help others.
We're hiring
We're looking for part-time or full-time technical writers to join our team! It's about a remote position that qualified tech writers from anywhere in the world can apply. Click here for more details.
- FIX: Numeric keypad Not Working on Windows 10/11 - July 24, 2024
- How to Share Files or Printers in Hyper-V? - July 22, 2024
- How to invoke Hyper-V Screen resolution prompt? - July 17, 2024


