FIX: A required device isn't connected or can't be accessed 0x000000E on Windows 10/8/8.1
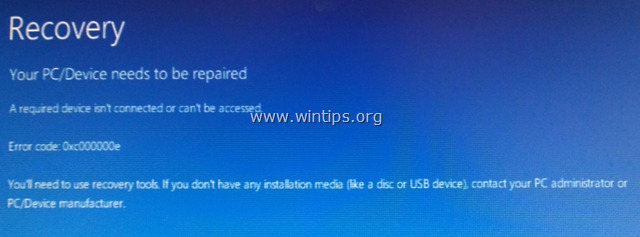
This tutorial contains instructions to fix the following blue screen problem on a Windows 10 or 8 based computer: "Your PC/Device needs to be repaired. A required device isn't connected or cannot be accessed. Error Code: 0x000000e".
The BSOD error 0xC000000E is occurred because the boot configuration data is invalid and commonly the error appear after an improperly computer shutdown (e.g. power outage) or because your OS disk becomes damaged, or because the one mirror disk has failed, if you 're using the Windows mirroring feature for fault tolerance in Windows 10/8/8.1 OS.
In this tutorial you 'll find instructions to resolve the Error 0x000000E: A required device isn't connected or can't be accessed, in Windows 8 or 10 OS.
How to fix "A required device isn't connected or can't be accessed" BSOD Error 0xC000000e on Windows 10/8/8.1
Suggestion: Before you continue to the methods below…
- Enter BIOS SETUP.
- Locate the SATA Configuration setting. (Commonly named as "SATA Mode" or "SATA Controller Mode" or "SATA Operation" or "Configure SATA as").
- If the SATA Mode is set to AHCI or RAID then change it to IDE. If the SATA Mode is set to IDE then change it to AHCI.
- Save Changes and Exit BIOS Settings.
- Try to boot in Windows. If Windows doesn't start, then revert the SATA setting back to what it was and proceed to apply the methods below.
Notes:
1. If you receive the 0x000000e, on a system that you have used software mirroring for fault tolerance, then break the mirror first, with the DISKPART tool in Recovery Environment. Detailed instructions to do that can be found in Method-2 in this tutorial.
2. In order to resolve the 0x000000E Boot error, you need to start your computer from a Windows installation/recovery media. If you don't own a Windows Installation Media, then you can create one (corresponding to your Windows Edition and Version) directly from Microsoft.
Method 1. Fix Boot Configuration Data using BOOTREC tool.
1. Power on your PC and boot from a Windows 10 installation/recovery media.
2. At the Windows Setup screen press SHIFT + F10 to access command prompt, or choose Next –> Repair your computer –> Troubleshoot –> Advanced Options –> Command Prompt.
3. In command prompt type the following commands in order:
- bootrec /fixmbr
- bootrec /fixboot
* Note: If after executing the above command you receive that "Access is denied" give this command "bootsect /nt60 sys" and continue below.
- bootrec /scanos *
* Note: If after executing the "bootrec /scanos" command you receive that "Total identified Windows installations = 0" then give the following commands, before you continue to next step:
-
- bcdedit /export C:\bcdbackup
- C:
- cd boot
- attrib bcd -s -h –r
- ren C:\boot\bcd bcd.old
4. Rebuild Boot Configuration Data:
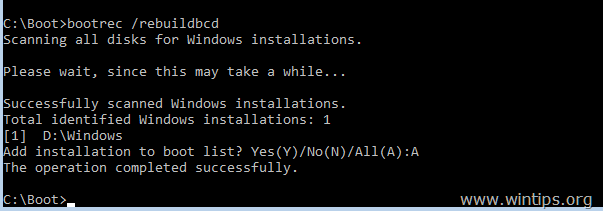
- bootrec /rebuildbcd
5. Press "A" to Add installation to boot list and press Enter.
6. Close all windows and restart your computer. If Windows still fails to boot, then try Method 2.
Method 2. Repair Boot Configuration Data using BCDBOOT tool.
1. Power on your PC and boot from a Windows 10 installation/recovery media.
2. At the Windows Setup screen press SHIFT + F10 to access command prompt, or choose Next –> Repair your computer –> Troubleshoot –> Advanced Options –> Command Prompt.
3. In command prompt type the following commands in order:
- diskpart
- select disk 0
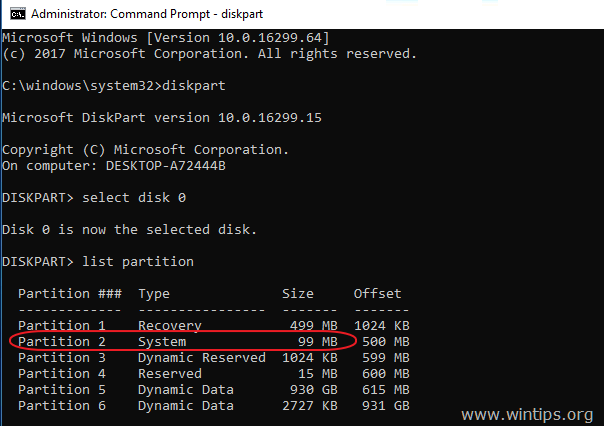
- list partition
4. Note the size in Megabytes of System Partition. *
* e.g. As you can see at the screenshot below, the partition size of System partition is 99 MB.
5. Find out the volume number of the system partition * and the drive letter of OS drive,** by typing this command:
- list volume
* At the previous step we found that the system partition is 99 MB. So, from the screenshot below, we understand that the System partition is the "Volume 2".
** The OS Drive, is the drive where the Windows installed. Commonly this is the "Volume 0", the largest volume on the list. At this example the OS drive is located at "C" drive letter.
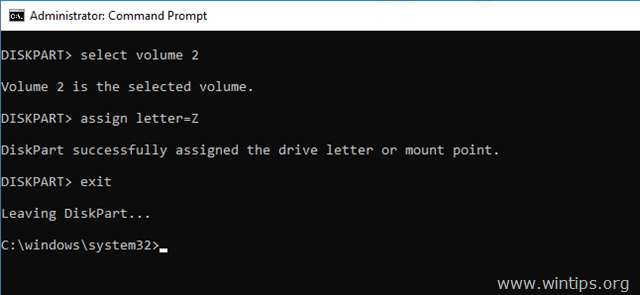
6. Select the System partition and assign a drive letter to it. Then exit DISKPART:
- select volume 2 *
- assign letter=Z
- exit
* Note: Change the Volume number according your case.
7. Finally, in command prompt give this command:
- bcdboot C:\windows /s Z: /f ALL
* Note: Replace the letter "C", according the drive letter of the OS volume at your case.
8. Close all windows, remove the Windows Recovery media and try to boot in Windows normally. If Windows doesn't boot, then follow the same steps, but at the end, type this command:
- bcdboot C:\windows /s Z: /f UEFI
That's it! Let me know if this guide has helped you by leaving your comment about your experience. Please like and share this guide to help others.
We're hiring
We're looking for part-time or full-time technical writers to join our team! It's about a remote position that qualified tech writers from anywhere in the world can apply. Click here for more details.
- FIX: Numeric keypad Not Working on Windows 10/11 - July 24, 2024
- How to Share Files or Printers in Hyper-V? - July 22, 2024
- How to invoke Hyper-V Screen resolution prompt? - July 17, 2024


October 31, 2023 @ 12:31 am
Exactly my situation.
Cloned OS from one SSD to another and ran into this issue upon deleting partitions on old drive.
Option 1 didn’t work for me but Option 2 saved the day.
Huge kudos to author.
October 23, 2023 @ 6:17 pm
Excelente, logré solucionarlo con el método 2. Gracias por compartir
October 8, 2022 @ 12:12 pm
Wow. Thank you. Incredible guide, covered every issue I had. Wow thanks really 🤯
August 17, 2022 @ 10:02 pm
YOU ARE THE CHAMPION OF THE WORLD.
Thank you so much, I had tried many other things that were unsuccessful, but the bcdboot commands did the trick!
March 23, 2022 @ 4:11 am
Thank you
March 8, 2022 @ 9:25 am
Also like some other posts here I did a clone from a SATA drive to an SSD drive using AOMEI and got the same BSOD
Ran the repair and:
bcdboot C:\windows /s Z: /f ALL
and it booted into win 10 ok but then on reboot same BSOD
repaired a second time using bcdboot C:\windows /s Z: /f UEFI and that didnt work so I knew something else was at play.
Went into Bios (Dell Inspiron 15) into boot sequence and checked UEFI boot settings.
It had 2 options Windows Boot Manager as top option and UEFI: SSD drive partition X etc
I flipped them around so that the top boot order showed UEFI: SSD drive Partition X
Presto that fixed my boot issue
Thanks heaps for this post !
February 19, 2022 @ 3:12 pm
Method 2 worked for setup like this:
NVMe SSD was replaced with SATA SSD, disk was cloned with AOMEI and refused to boot.
October 26, 2021 @ 10:45 pm
You saved me so much time!
Other guides gave me errors like Access Denied and No Specified Path when running the bootrec commands.
This worked first try.
Thank you so much!
November 20, 2021 @ 12:25 pm
Lenovo L340 laptop with Win10 on NVM.e then Ubuntu 20.04 LTS on second drive ssd- sata. Win 10 is UEFI boot and Ubuntu was installed as MBR. Could not boot in windows, same error. Added EFI bootable partition to Ubuntu, installed ok. Repaired Win10 boot, method 2 was necessary. Laptop Boot Mode is set to UEFI, was legacy support before. Funny, a boot splash screen was displayed for the first time when booting from ubuntu and it is the same Lenovo splash screen as in Windows.
Thank You.
September 20, 2021 @ 11:32 pm
I recently installed a new m.2 ssd and cloned an old drive onto it. I had the same issue but method #2 worked for me. Thank you so much!
August 31, 2021 @ 11:17 am
Method 2 worked perfectly well for me. Thanks for this detalied and effective explanation.
June 24, 2021 @ 7:29 pm
You're a life saver
May 22, 2021 @ 1:35 pm
Thank you soo much. It really helped me (:
April 26, 2021 @ 4:04 am
My computer system lost its boot drive partition information, and had to have the partition recovered using third party software on another computer. Reinstalled the hard drive in the computer and it wouldn't boot to Windows without an error 0x000e. Method two solved this problem, I used step 7.
April 4, 2021 @ 9:15 pm
Thanks you!!! Method 2 worked for me.
March 28, 2021 @ 10:58 pm
Thank you!
January 26, 2021 @ 6:09 pm
THANK YOU!
January 20, 2021 @ 3:42 pm
Method 2 worked perfectly. Thank you for this guide.
January 16, 2021 @ 2:39 pm
This did not help at all. I followed the steps to get into command line (before I found your website), but Windows then throws a hissy fit and says that I need an administrator account to do this and there is not admin account.
January 18, 2021 @ 12:17 pm
Boot your PC from a USB Windows 10 installation media and then follow the steps.
December 20, 2020 @ 3:29 pm
Thank you very much!!
Very informative and help a lot to get out from that error.
November 7, 2020 @ 3:05 pm
OMG!!! I life saver. Worked EXACTLY as described. THANK YOU, THANK YOU, THANK YOU!!! Saved me from having to rebuild my pc from scratch. Thank you SO much.
October 26, 2020 @ 5:24 pm
Thank you so much! This literally saved me.
October 23, 2020 @ 6:22 pm
I also cloned a hard drive to a ssd, method 2 worked for me. Thank you, much appreciated
September 29, 2020 @ 5:44 pm
Method 2 saved my life. Thank you so much!
February 25, 2020 @ 7:58 pm
Exactly the same scenario for me as Neale except I moved from SSD to M.2 NVMe and method 2 worked a charm. You saved me such a mess!! Thanks a lot.
December 28, 2019 @ 12:02 pm
Thanks the second method works for me
November 20, 2019 @ 3:35 am
You just saved me an OS reinstall. Had to combine several of the Shift+F10 steps and for the last one, had to exit DISKPART but the UEFI boot worked. Whoohoo
October 28, 2019 @ 10:36 am
Superb fix, i was in a trouble for 2 days completely. I used method 2 first, then method 1 and then method 2 at last, it magically worked.
October 13, 2019 @ 9:26 pm
Solution 1, step 5 gave me an error that it couldn't find the drive (or something similar. I know I should have written it down. I then went through solution 2 and it worked after step 7. HOwever, I then ran a 'error check' utility and when it rebooted and completed, i was back to the blue screen unable to boot. I booted back up and went back through all steps with same result and PC is back up again. I'm afraid now some utility might break it again. What does step 8 do? Should I specify /f UEFI? Is that why the scan "broke" the boot? Other than this, THANK YOU!! I've spent a week and all day sat making clones of my HDD going out to a new SSHD and minitool had the best options allowing me to add the uefi part to the disk, but it's 2nd and booting, the PC wasn't seeing it. Anyway, thanks so much!
September 12, 2019 @ 8:58 pm
ERES UN HEROE PARA MI, OPCION 2 FUNCIONO PARA MI
August 31, 2019 @ 10:56 pm
Method 1 failed. Method 2 worked perfectly. Thank you for this guide. Please donate as well if this helped.
August 20, 2019 @ 2:27 am
Option 2 perfect for me :)
Thanks
August 12, 2019 @ 6:53 pm
Actually, I've installed additional ssd in main slot and hdd in disk drive slot using caddy. I installed windows on ssd,but by default recovery partition got created on hdd only. In the first time my windows shows the same error, but after going into boot menu and exiting from it boots normally. Everytime I need to do the same thing.
I tried everything mentioned on this site and I also reinstalled windows, it also didn't solve the problem.
August 24, 2019 @ 6:58 pm
I have the same problem using a Dell Latitude E5530, booting up first time throws error "a required device bla bla" then i enter into bios just to press esc and then Windows is booting as normal, i have the ssd on the caddy and my hdd in the main slot, did you fix the problem somehow?
June 8, 2021 @ 5:18 pm
At the end of the method 2, it shows "Failure when attempting to copy boot files."
July 19, 2019 @ 6:25 pm
Guys this one worked for me, simply check the hdd connections, I have a laptop that uses one hdd and one ssd, the ssd with the windows installed on it was slightly out of its place, I just pushed it back in the socket and voila.
July 11, 2019 @ 11:35 pm
Tried to clone a hard drive over to SSD and got the error message listed in this article. Option 2 worked perfectly for me. Thanks for writing this guide!
June 14, 2019 @ 8:45 am
Method 2 has worked but, during boot, a screen to select OS is shown. How to get rid of it? Thanks in advance.
June 14, 2019 @ 11:31 am
@Alexandre:
1. Open the System Configuration utility (Press the Windows + R keys to open the run command box and then type "msconfig" and click OK).
2. At the 'Boot' Tab, highlight the OS that you want to be the default and click 'Set as default.
3. Then highlight the OS entry and click Delete.
May 29, 2019 @ 9:27 pm
Thanks a lot! Method 2 saved my day :)
May 12, 2019 @ 12:24 pm
Thanks, Option 2 worked a treat for me after a HDD to SSD ghost clone failed to boot