[FIX] INACCESSIBLE BOOT DEVICE, 0x0000007B STOP Error
INACCESSIBLE_BOOT_DEVICE issue is also know as Stop 0x0000007B error. This bug check indicates that Windows cannot access the system partition during startup. The BSOD INACCESSIBLE BOOT DEVICE problem often occurs after a Windows update or after refreshing or reinstalling Windows 10 (or Windows 8). In other cases the INACCESSIBLE BOOT DEVICE problem can occur after upgrading Windows 7 to Windows 10 or due to invalid BIOS settings, a corrupted file system or a damaged hard disk drive.
The INACCESSIBLE BOOT DEVICE blue screen of death, is displayed during Windows startup and for that reason the user has no option to troubleshoot the problem by using the classical methods, like Windows Repair, Safe Mode, System Restore, etc..
In this tutorial we will mention the most common methods to resolve the INACCESSIBLE BOOT DEVICE BSOD issue in Windows 10, 8.1, 8 and Vista.
How to fix: INACCESSIBLE_BOOT_DEVICE issue in Windows 10, 8, 7 & Vista
Notice. To apply the methods mentioned below, you need a Windows Installation media (USB or DVD) corresponding to your Windows Edition and Version. If you don't have a Windows installation media, then you can create one directly from Microsoft.
Method 1. Set SATA Mode to AHCI in BIOS Settings.
Method 2. Change SATA Mode values in registry (OFFLINE EDIT).
Method 3. Check and repair file system errors.
Method 4. Run SFC /SCANNOW Offline to Repair System Files.
Method 5. Perform a System Restore.
Other methods to resolve the "INACCESSIBLE_BOOT_DEVICE" problem
Method 1. Set SATA Mode to AHCI in BIOS Settings.
1. Power On your computer and press the appropriate key (DEL or F1 or F2 or F10) to enter BIOS settings. *
* Note: The way to enter into BIOS Settings depends on the computer manufacturer. To Enter into your BIOS Settings, pay attention at the first screen as your computer starts and try to find a message like this:
"DEL to enter setup"
"Press ESC to Enter Setup"
"BIOS Configuration: F2"
"F10 to Enter Setup"
2. Load Default Settings (Load Optimal Defaults)
3. Then look at all BIOS screens to locate the SATA Configuration setting.*
* Note: This setting is usually found under the Advanced section and can be named (depending on manufacturer) as: "SATA Mode" or "SATA Controller Mode" or "SATA Operation" or "Configure SATA as".
4. Make sure that the SATA Mode (Type) is set to AHCI or IDE and NOT in RAID.*
* Notes:
1. Caution: If you have configured two or more Hard Drives in RAID mode, then leave this setting as is, exit from BIOS setup without saving and continue to the next solution.
2. If the SATA Mode is set to AHCI then change it to IDE. If the SATA Mode is set to IDE then change it to AHCI.
5. Save Changes and Exit BIOS Settings and try to boot on Windows.
6. If your computer doesn't boot again, then revert the SATA setting back to what it was and proceed to the next method.
Method 2. Change SATA Mode values in registry (OFFLINE EDIT).
The next solution is to modify the Windows Registry offline as follows:
1. Boot your computer from the Windows Installation Media.
2. At Language options screen, click Next.
4. Select Repair your computer.
5. Then select Troubleshoot > Advanced Options > Command Prompt.
6. At command prompt type regedit to launch the registry editor.
7. Highlight the HKEY_LOCAL_MACHINE key.
8. From File menu select Load Hive (to load the offline registry).
9. Navigate to the disk where Windows are installed on (e.g. "C:").
10. Open the system file found in "%Windir%\system32\config\" directory. (e.g. "C:\Windows\system32\config\system")
11. Type a Key Name for the offline registry (e.g. "Offline") and press OK.
12. Double-click to expand the HKEY_LOCAL_MACHINE key and you should find a new key under it, named with the name you typed previously (e.g. 'Offline" in this example).
13. Expand this new key & navigate (from the left pane) to this subkey:
HKEY_LOCAL_MACHINE\Offline\ControlSet001\services\msahci
14. At the right pane double click at Start (DWORD) and change its value data to 0 (zero). Click OK when finished.
15. Perform the same steps and set the Start value to 0 modification to these sub keys:
- HKEY_LOCAL_MACHINE\Offline\ControlSet001\services\pciide
- HKEY_LOCAL_MACHINE\Offline\ControlSet001\services\iaStorV
16. When you finish with the modifications, highlight the key you created before (e.g. "Offline") and from the File menu choose Unload Hive to write back the changes you made to the offline Registry.
17. Close the Registry editor, the Command prompt window and Restart your computer.
18. Enter BIOS settings and specify the SATA mode (IDE-ATA, AHCI or RAID) according to your needs or leave the default settings.
19. Exit BIOS settings, remove the Windows Installation media and let Windows to start normally.
Method 3. Check and repair file system errors.
1. Boot your computer from the Windows Installation Media.
2. At Language options screen, click Next.
3. Select Repair your computer.
4. Then select Troubleshoot > Advanced Options > Command Prompt.
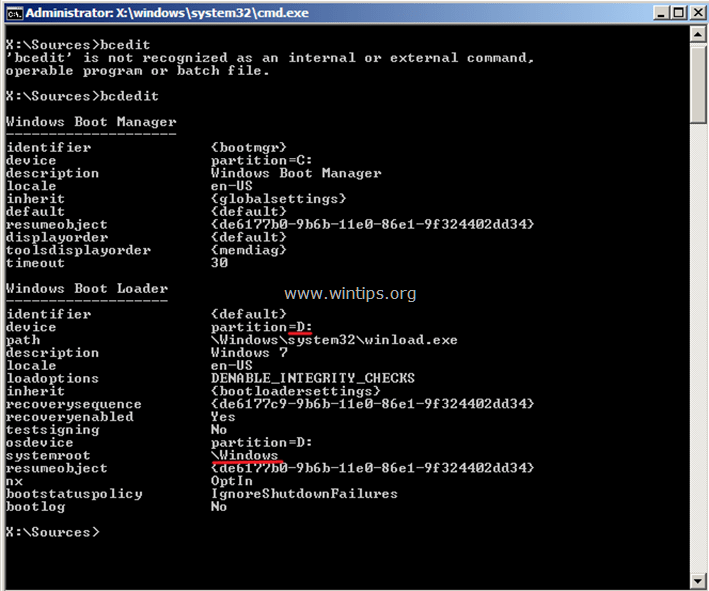
5. At command prompt window, type BCDEDIT and press Enter, in order to find out in which drive Windows are installed.*
* e.g. As you can see in the below screenshot Windows are installed on drive D:
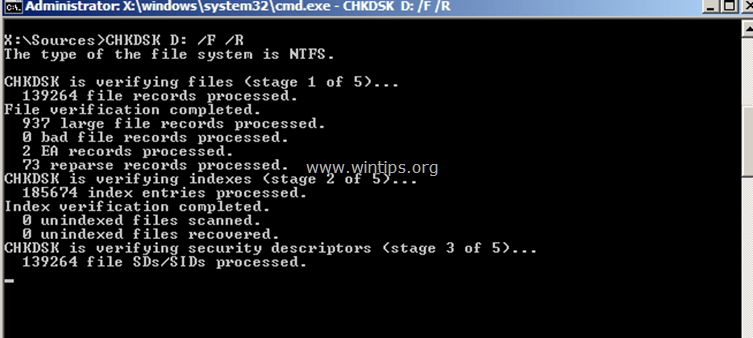
6. After locating in which drive letter Windows are installed, type the chkdsk command (to check and repair file system errors) with the following parameters: *
CHKDSK <Windows_Drive_Letter>: /F /R
* Replace the <Windows_Drive_Letter> with the drive letter where Windows are installed. **
** e.g. As you can see in the screenshot below Windows are installed in drive letter D: , so the command should be:
CHKDSK D: /F /R
7. Wait until the disk checking is completed.
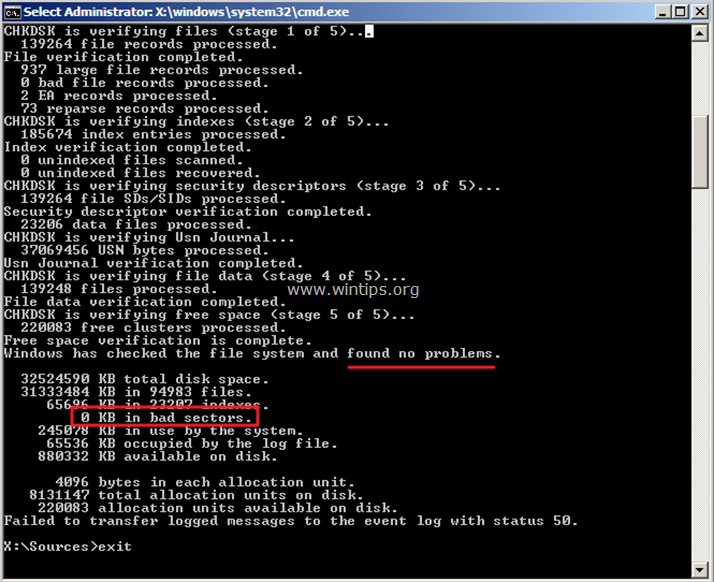
8. When the check and repair is done, look in the details and see if any problems are found and how many KB are reported in bad sectors. *
* Note: If the "chkdsk" command has reported no problems and you see 0KB in bad sectors, that means that your hard disk is in a good condition. In all other cases your hard disk is probably damaged and you have to replace it.
9. Type exit to close command prompt.
9. Restart your computer.
Method 4. Run SFC /SCANNOW Offline to Repair System Files.
1. Boot your computer from the Windows Installation Media.
2. At Language options screen, click Next.
3. Select Repair your computer.
4. Then select Troubleshoot > Advanced Options > Command Prompt.
5. Type BCDEDIT and press Enter.
6. Locate in which drive letter the Windows is installed.
5. At command prompt window, type the following command to scan and repair system files. *
sfc /SCANNOW /OFFBOOTDIR=<Windows_Drive_Letter>:\ /OFFWINDIR=<Windows_Drive_Letter>:\windows
*Replace the "<Windows_Drive_Letter>" with the drive letter where Windows are installed. **
** e.g. As you can see in the screenshot below Windows are installed in drive letter D: , so the command should be:
sfc /SCANNOW /OFFBOOTDIR=D:\ /OFFWINDIR=D:\windows
6. Now be patient. The sfc command takes hour(s) to complete.
Method 5. Perform a System Restore.
To restore your system to an earlier working state:
1. Boot your computer from the Windows Installation Media.
2. At Language options screen, click Next.
3. Select Repair your computer.
4. Then select Troubleshoot > Advanced Options > System Restore.
5. Select a previous working state (date) to restore your computer.
6. Wait until Windows restores your system and restart.
7. Boot to Windows Normally.
Other Methods to Resolve the "INACCESSIBLE_BOOT_DEVICE" problem
1. Check and repair file system errors.
2. Diagnose your hard disk for hardware problems.
3. Diagnose your Memory RAM for problems.
4. Try to disconnect any external device (e.g. Storage device, Printer, etc.).
Good luck! Let me know if this guide has helped you by leaving your comment about your experience. Please like and share this guide to help others.
We're hiring
We're looking for part-time or full-time technical writers to join our team! It's about a remote position that qualified tech writers from anywhere in the world can apply. Click here for more details.
- FIX: Numeric keypad Not Working on Windows 10/11 - July 24, 2024
- How to Share Files or Printers in Hyper-V? - July 22, 2024
- How to invoke Hyper-V Screen resolution prompt? - July 17, 2024


March 12, 2017 @ 12:03 pm
method 4 worked great- thanks!!
March 12, 2017 @ 12:01 pm
Thanks a lot. method 1 is very helpful.
March 12, 2017 @ 11:39 am
Thanks, method 2 worked for me.