FIX: Windows Cannot Boot After Installing Updates (Windows 7/8/10)
In this tutorial you 'll find detailed instructions to resolve the following Windows startup issues on Windows 10, 8 or 7 OS: Windows cannot boot after installing updates or stuck during the update(s) installation and revert changes.
Sometimes, during the installation of an update, Windows may fail to boot normally, because – for some reason – the installation of the update fails. The symptoms of an unsuccessful update installation, are crashing or freezing problems, BSOD issues that cannot be fixed by Windows and causing the system to loop at the "Startup Repair" screen, or to display the error message: "Failure configuring Windows updates. Reverting changes".
How to FIX: Windows Cannot Boot After Update (Windows 7/8/10)
To resolve the Windows startup issues after installing updates, you must enter into the Windows Recovery Environment by booting from a Windows installation media*, or by entering into the built-in WinRE environment if your system includes preinstalled recovery options.**
Notes:
* If you don't own a Windows USB installation media, then (from another working pc) you can create one by using the Media Creation tool.
** To access the preinstalled recovery options, follow the steps below:
- If you own Windows 7 OS (Desktop or Laptop):
1. Press the "F8" key before the Windows logo appears.
2. In the Advanced Boot Options screen, use the arrow keys to highlight the Repair your computer option, and then press Enter. (If the "Repair your computer" option isn't listed, then you have to boot your computer from a Windows Installation Media.)
- If you own a Windows 10, 8/8.1 or 7 OS (Laptop):
1. Power ON your laptop.
2. Press the corresponding FUNCTION key, (e.g. "F11", "F10", "F9", etc.), to access the Recovery options. (To find out which recovery key (function key) to press, look at your laptop's screen after Power On, or see the laptops' manual or find it from your laptop's manufacturer support page, or read this article: Laptops Recovery Instructions & Keys
In this tutorial, I 'll show to you three methods to resolve the startup problems after updating Windows, by entering into the Windows Recovery Environment from a Windows installation media.
Method 1. Revert Pending Actions by running the DISM tool in WinRE.
Method 2. Rename the "SoftwareDistribution" folder from the WinRE.
Method 3. System Restore.
Method 1. Revert Pending Actions by running the DISM tool in WinRE.
1. Boot your computer, from the Windows 10 installation media.
2. At the Windows Language Setup screen press SHIFT + F10 to access command prompt, or click Next –> Repair your computer –> Troubleshoot –> Advanced Options –> Command Prompt.
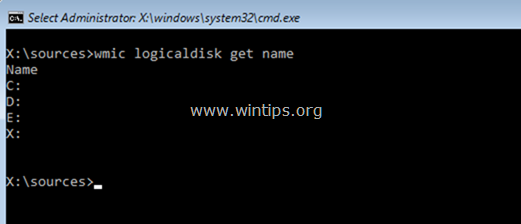
3. Inside the command prompt window, type the following command and press Enter, to view all the available drives on your system:
- wmic logicaldisk get name
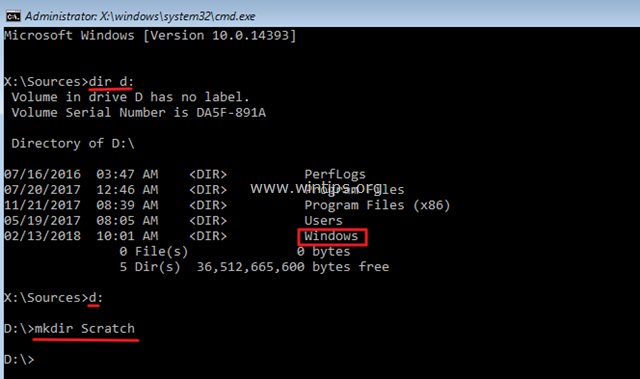
4. Now, by using the "DIR <Drive_Letter>" command, examine the contents of all listed drives (except the drive X:), to find out which drive contains the "Windows" folder. (e.g. "dir C:") *
- dir C:
* Note: The above command will display a list of the folders on the drive C:
– If you can see the "Windows" folder, then continue to the next step.
– If you cannot see the "Windows" folder on the C: drive, then move to the next drive on the list. (e.g. dir D:, dir E:, etc.), until you find out which drive contains the "Windows" folder.
5. When you locate the drive with the "Windows" folder, then navigate to that drive, by typing its drive letter. At this example, the "Windows" folder is located at "D:" drive, so we have to type:
- D:
6. Create a new folder and name it "Scratch", by typing this command:
- mkdir D:\Scratch
7. Finally type the following command, to rollback your system, after the unsuccessful Windows update:
- DISM /Image:D:\ /ScratchDir:D:\Scratch /Cleanup-Image /RevertPendingActions
* Note: Change the drive letter D according to your case.
8. Once the above command executed, you should receive the following message on screen:
"Reverting pending actions from the image….
The operation completed. Any revert of pending actions will be attempted after the reboot
The operation completed successfully."
9. Close the command prompt window and restart your computer normally.
10. After restarting, you 'll see a message that says "Reverting pending actions…" (in Windows 7) or "Getting Windows Ready" (in Windows 10). Just wait for the operation to complete and then you should be able to login to Windows normally.
Method 2. Delete the "SoftwareDistribution" folder & Pending actions from the WinRE.
The C:\Windows\SoftwareDistribution folder is the location where Windows stores the new updates after downloading them. If Windows could not complete the installation of an update, then, from WinRE proceed and delete the "SoftwareDistribution" folder, in order to force Windows to boot normally without installing any updates. To do that:
1. Boot your computer from the Windows installation media and then follow the steps 1-5 from the method 1 above.
2. Then give the following commands in order. *
- del D:\Windows\SoftwareDistribution
- del D:\Windows\WinSxS\cleanup.xml
- del D:\Windows\WinSxS\pending.xml
* Note: Change the drive letter D according your case.
3. Close Command Prompt and reboot your computer.
Method 3. Perform a System Restore.
The final method to resolve the boot problems after a Windows update, is to restore your system to a previous working state. ToO do that:
1. Boot your computer, from the Windows 10 installation media.
2. At the Windows Language Setup screen click Next –> Repair your computer –> Troubleshoot –> System Restore.
3. At System Restore (1st) screen click Next.
4. Select a previous restore point and then click Next.
5. Then click Finish (and Yes to confirm your decision) to restore your system at the selected date (restore point).
7. Now wait until the restore process is completed. During the restore process, your computer will restart several times and when it's done, you should enter in Windows without problems.
That's it! Let me know if this guide has helped you by leaving your comment about your experience. Please like and share this guide to help others.
We're hiring
We're looking for part-time or full-time technical writers to join our team! It's about a remote position that qualified tech writers from anywhere in the world can apply. Click here for more details.
- FIX: Numeric keypad Not Working on Windows 10/11 - July 24, 2024
- How to Share Files or Printers in Hyper-V? - July 22, 2024
- How to invoke Hyper-V Screen resolution prompt? - July 17, 2024


![windows cannot boot after update] fix windows cannot boot after update](https://www.wintips.org/wp-content/uploads/2018/02/image_thumb8_thumb.png)


March 19, 2018 @ 7:15 pm
Thank you for the feedback! 🙂
March 16, 2018 @ 7:42 pm
Thank you Bethany, love you too! 3
March 10, 2018 @ 1:16 pm
Windows Update failed to install this and also KB4074588. Tried installing via DISM command line tool. No luck. Deployment Image Servicing and Management tool Version: 10.0.16299.15 Image Version: 10.0.16299.214 Processing 1 of 1 Adding package Package_for_RollupFix~31bf3856ad364e35~amd64~~16299.251.1.4 ==========================100.0%========================== An error occurred Package_for_RollupFix Error: 0x8007371b Error: 14107 One or more required members of the transaction are not present. The DISM log file can be found at C:WindowsLogsDISMdism.log. Please somebody could help? Any idea about how to fix this? I do not want to run an in-place upgrade. I already tried SFC /ScanNow and DISM health commands. Thanks.