How to fix: Cannot Start Windows Defender on Windows 10 or Windows 8.
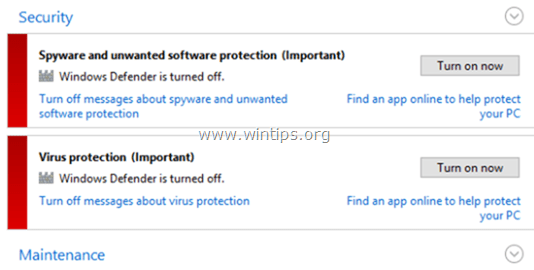
In a previous tutorial I had described the way to enable Windows Defender on your Windows 7, 8 or 10 based computer. But some users reported that when they click the Antivirus Protection – Turn ON button in Action Center (in Windows 10: Control Panel > Security and Maintenance), Windows Defender will not start but instead the system opens at "C:\Windows\System32" folder.
The above issue, commonly occurs if you have installed a different security product on your system, but you have decided to return back to the default Windows security protection ("Windows Defender" on Windows 10 & Windows 8 or "Security Essentials" on Windows 7). At this case the (previously) installed security product has modified the Windows Registry, so the default Windows protection cannot be enabled.
In other cases, the above issue, can occur if a malicious program has disabled the Windows default protection, in order to compromise your system.
In this tutorial you can find detailed instructions to resolve the following issues with Windows Defender or Security Essentials on Windows 10, 8 & 8.1:
1. Windows Defender (or Security Essentials) is disabled and cannot turn on.
2. Cannot Enable Windows Defender or Security Essentials.
3. When you try to Turn ON the Windows Defender (or the Security Essentials) the system opens at 'system32' folder.
4. Cannot Start the Windows Defender Service.
5. Windows Defender is turned off or not working.
How to fix: Cannot Enable Windows Defender on Windows 10 or Windows 8.
Note: Make sure that you have logged on your computer with an Administrator account, before you continue to the steps below.
Step 1. Scan your computer for viruses.
Many viruses or malicious programs compromise your protection by disabling the security product on your system. So, before you continue to troubleshoot the issues descripted in this guide, use this Malware Scan and Removal Guide to check and remove viruses or/and malicious programs that may be running on your computer.
Step 2: Uninstall any other Security Application from your computer.
Make sure that you have uninstalled any other security application from your computer. Also, if you have problems during uninstall process and to ensure that the security application is completely removed from your system, run the removal utility provided by antivirus manufacturer.
Step 3. Enable Windows Defender (Security Essentials) from Registry.
1. Open Registry editor. To do that:
1. Simultaneously press the “Win”
+ “R” keys to load the Run dialog box.
2. Type regedit and press Enter to open Registry Editor.

IMPORTANT: Before you continue, first take a backup of your registry. To do that:
- From the main menu, go to File & select Export.
- Specify a destination location (e.g. your Desktop), give a filename to the exported registry file (e.g. “RegistryUntouched”), select at Export range: All and press Save.
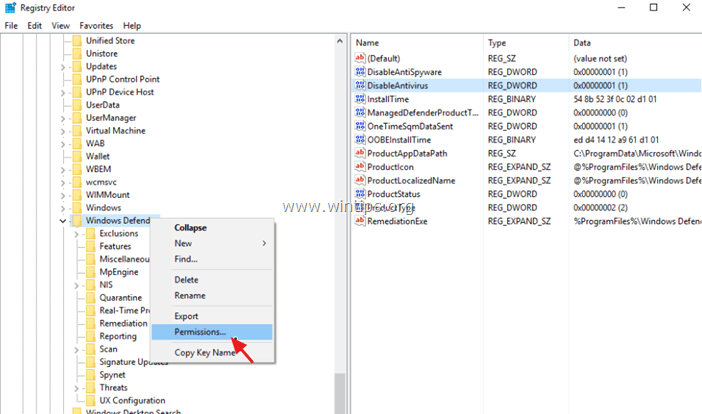
2. Navigate (from the left pane) to this key: *
- HKEY_LOCAL_MACHINE\SOFTWARE\Microsoft\Windows Defender
3. Right click at the Windows Defender key and select Permissions
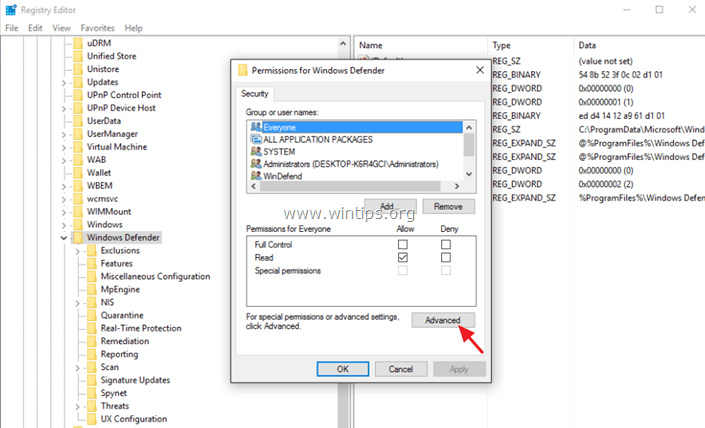
4. At 'Permissions for Windows Defender' window, click Advanced.
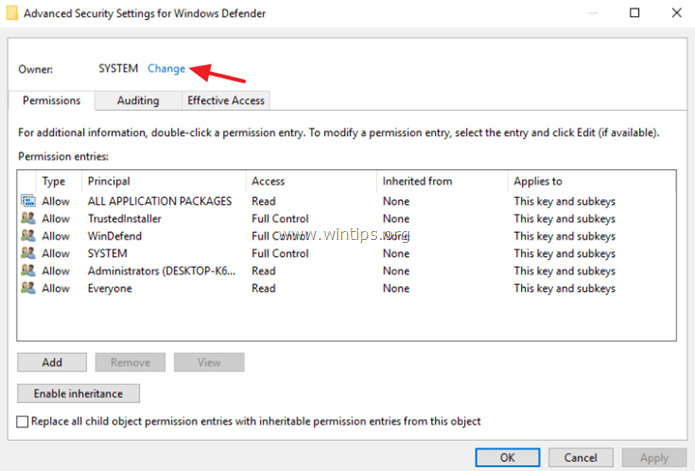
5. Click Change Owner.
6. Type Administrators and press OK.
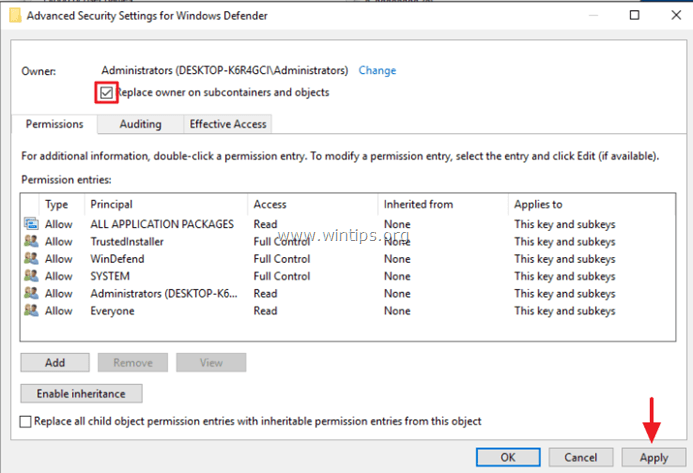
7. Select the "Replace owner on subcontainers and objects" checkbox and click Apply.
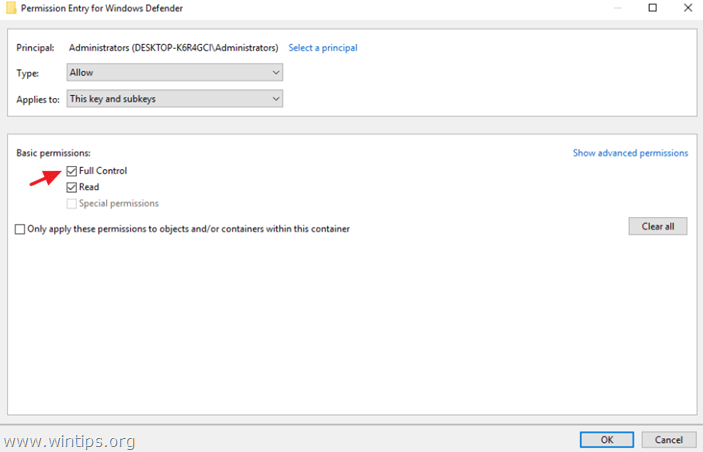
8. Then double-click to open Administrators entry.
9. Select the Full Control checkbox and press OK three (3) times.
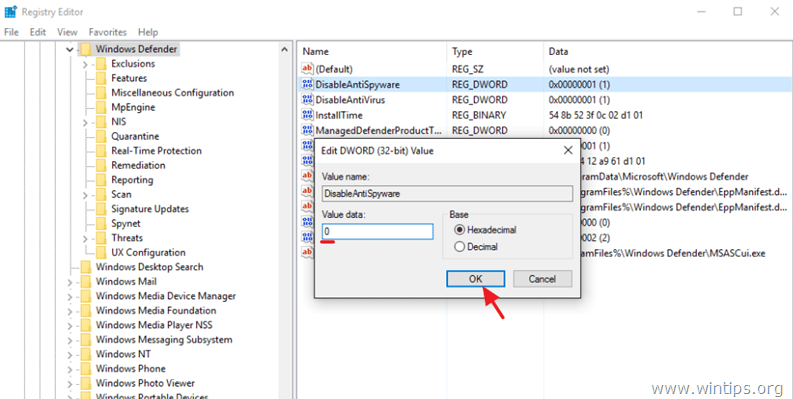
10. At the right-pane double to open the DisableAntiSpyware key.
- Change the Value data from 1 to 0 and click OK to enable Windows Defender.
* Note: If you cannot edit (modify) the value data, then close and re-open Registry Editor.
11. Then open the DisableAntiVirus key.
- Change the Value data from 1 to 0 and click OK.
12. Close registry editor and restart your computer. Normally, after the reboot, Windows Defender should run without issues. *
* Note: If Windows Defender is still Turned OFF, then enable it manually from the control panel. How to enable (Turn on) Windows Defender.
13. Important: To keep your PC safe from vulnerabilities, perform the same steps again, but this time change the owner back to SYSTEM account (6).
You 're done! Let me know if this guide has helped you by leaving your comment about your experience. Please like and share this guide to help others.
We're hiring
We're looking for part-time or full-time technical writers to join our team! It's about a remote position that qualified tech writers from anywhere in the world can apply. Click here for more details.
- FIX: Numeric keypad Not Working on Windows 10/11 - July 24, 2024
- How to Share Files or Printers in Hyper-V? - July 22, 2024
- How to invoke Hyper-V Screen resolution prompt? - July 17, 2024







January 2, 2022 @ 7:38 am
Thank you so much. I'm searching this solution for a few days after I uninstalled Avast which always make my PC slow.
July 21, 2019 @ 6:51 pm
Thanks, worked like a cool breeze.
March 23, 2019 @ 2:09 am
solution worked well.thank you
August 29, 2018 @ 12:31 pm
It Worked.
Thanks
June 25, 2018 @ 4:43 pm
Well done after spending long period looking for a solution. Your method actually work at a blow.
November 15, 2017 @ 1:49 am
This worked for me to .. when all other methods failed.
May 15, 2017 @ 2:08 am
Finally found a solution that worked!!! I spent all day trying to figure this out. Thank you!
April 29, 2017 @ 11:55 am
Thank you
Its work very well
November 29, 2016 @ 11:03 pm
Well this didn't work for me. Followed the steps faithfully, restarted computer, went to action centre to turn on defender – still sent me to system32.
Time to move on sifting through bogus solutions, 1 webpage at a time.