FIX: Desktop is unavailable in Windows 10. (Solved)
The following error may appear after updating Windows 10: "C:\Windows\system32\config\systemprofile\Desktop is unavailable. If the location is on this PC, make sure the device or drive is connected or the disc is inserted, and then try again. If the location is on a network, make sure you’re connected to the network or Internet, and then try again. If the location still can't be found, it might have been moved or deleted."
How to FIX Windows 10 Error: C:\Windows\system32\config\systemprofile\Desktop is unavailable.
Suggestion: The "C:\Windows\system32\config\systemprofile\Desktop is unavailable" error, commonly appears because the Windows update installation isn't completed yet, or it is not completed successfully. So, before troubleshooting the problem, make sure that all the available updates are installed and also restart your PC (2-3 times) to complete the installation.
Method 1. Perform a Full System Shutdown.
Method 2. Create the missing Desktop folder from the Windows GUI.
Method 3. Create the missing Desktop folder from Advanced Startup Options.
Method 4. Go Back to a Previous Windows Version (Build).
Method 5. Uninstall the latest update from Advanced Startup Options.
Method 6. Restore Windows 10 to a Previous Working State.
Method 7. Repair Windows 10 with an in-place Upgrade.
Method 1. Fully Shutdown your PC.
The first method to resolve the "C:\Windows\system32\config\systemprofile\Desktop is unavailable" error is to fully shutdown the PC in order to force Windows 10 to reinitialize the device drives and the system files from scratch.
1. Click the Start ![]() menu and then click the Power
menu and then click the Power ![]() button.
button.
2. Now press and HOLD DOWN the SHIFT key (on your keyboard) and then click Shutdown.
3. Power On your PC.
Method 2. Create the missing Desktop folder from the Windows GUI.
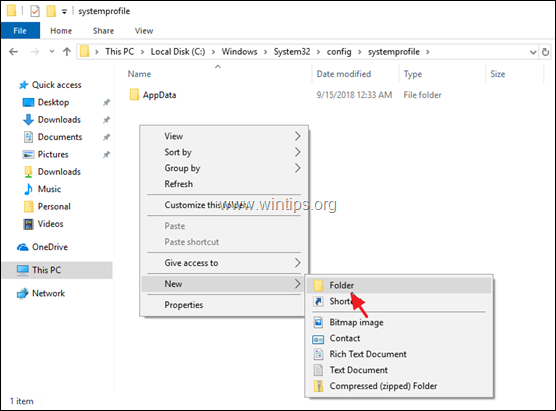
The second method to fix the "C:\Windows\system32\config\systemprofile\Desktop is unavailable " issue is to create the missing 'Desktop' folder manually and then to restart the PC. To do that:
1. Open Windows Explorer and navigate to: C:\Windows\System32\config\systemprofile
2. Right click at an empty space and select New -> Folder.
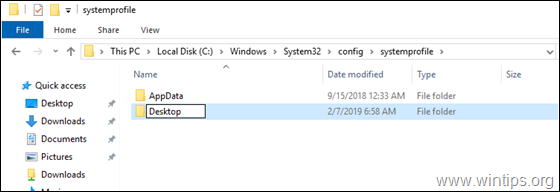
3. Name the new folder Desktop and click Enter. *
* Note: If you cannot create the folder because you receive an "access denied" error, then proceed to method-3 below.
4. Restart your PC.
Method 3. Create the missing Desktop folder from Advanced Startup Options.
1. Click the Start ![]() menu and then click the Power
menu and then click the Power ![]() button.
button.
2. Now press and HOLD DOWN the SHIFT key (on your keyboard) and then click Restart.
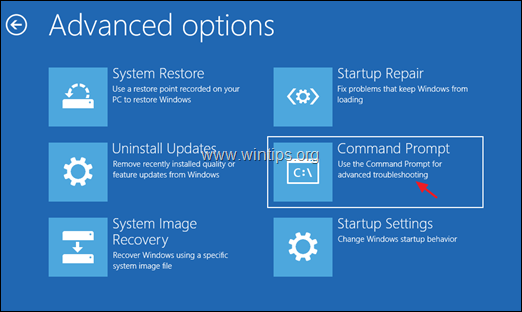
3. At Recovery options, go to: Troubleshoot > Advanced options > > Command Prompt.
4. The computer will restart. After restart, click on a user with (administrative privileges) and then type your password.
5. Now, find out on which disk Windows were installed. To do that, in the command prompt window, give the following command: *
- dir C:
* Note: If the Windows directory is displayed, then continue to the next step, otherwise continue by typing the next alphabet letter until you find which drive contains the Windows folder (e.g. dir d: , dir e:. dir f:, etc.).
(In this example the Windows folder is located at drive D:)
6. Then type the following command to create the missing folder and press Enter: *
- md X:\Windows\System32\config\systemprofile\Desktop
* Note: Where X = the Windows drive letter. (replace according your case)
(In this example the command will be: md D:\Windows\System32\config\systemprofile\Desktop )
7. Close the command prompt window.
8. Click Continue, to exit from the recovery options and boot to Windows 10.
Method 4. Go Back to a version Of Windows 10.
The next method to resolve the "desktop is unavailable" error in Windows 10, is to restore your system to the previous version of Windows (Build). To do that: *
* Suggestion: Backup your files, before restoring your system to the previous version.
1. From Start ![]() menu choose Settings > Update and security.
menu choose Settings > Update and security.
2. Select Recovery at the left and then click the Get Started button under the Go back to an earlier build section.
3. Choose a reason for going back (e.g. "For another reason") and press Next.
4. At 'Check for updates' options click No, thanks to continue.
5. Read all the information at the next screen and click Next.
6. If you have changed your password, after installing the latest build, make sure that you remember your old password and press Next.
7. Finally click Go back to earlier build and wait until the process is completed.
Method 5. Uninstall the latest update from Advanced Startup Options.
1. Click the Start ![]() menu and then click the Power
menu and then click the Power ![]() button.
button.
2. Now press and HOLD DOWN the SHIFT key (on your keyboard) and then click Restart.
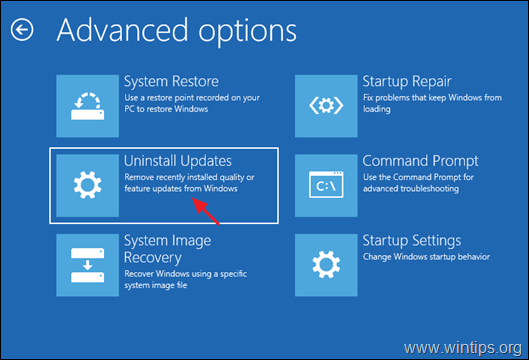
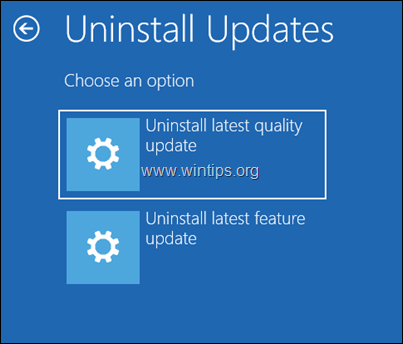
3. At Recovery options, go to: Troubleshoot > Advanced options > Uninstall Updates.
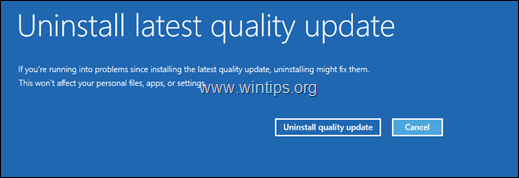
4. At 'Uninstall Updates' options, choose Uninstall latest quality update if you face the problem after installing a Cumulative monthly update, or select Uninstall latest feature update, if you facing the problem after updating Windows to its latest build. *
* Note: If you don't know which type of update to uninstall, then try first to uninstall the latest quality update. If you face the same error after booting to Windows, then perform the same steps to reach the 'Uninstall Updates' options and then Uninstall the latest feature update.
5. At the next screen click the Uninstall update button.
6. When the Uninstall is completed click Done
7. Finally, click Continue, to exit from the recovery options and boot to Windows 10.
Method 6. Restore Windows 10 to a Previous Working State.
To restore your system to a previous working state:
1. Click the Start ![]() menu and then click the Power
menu and then click the Power ![]() button.
button.
2. Now press and HOLD DOWN the SHIFT key (on your keyboard) and then click Restart.
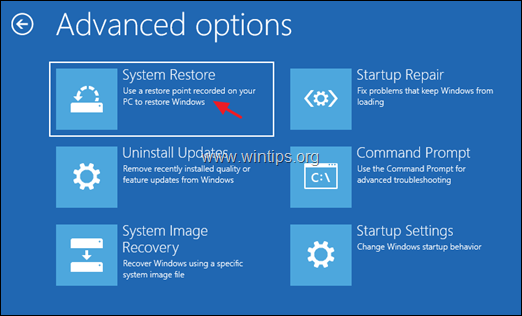
3. At Recovery options, go to: Troubleshoot > Advanced options > System Restore.
6. Select an account with administrative privileges, type a password for that account and click Continue.
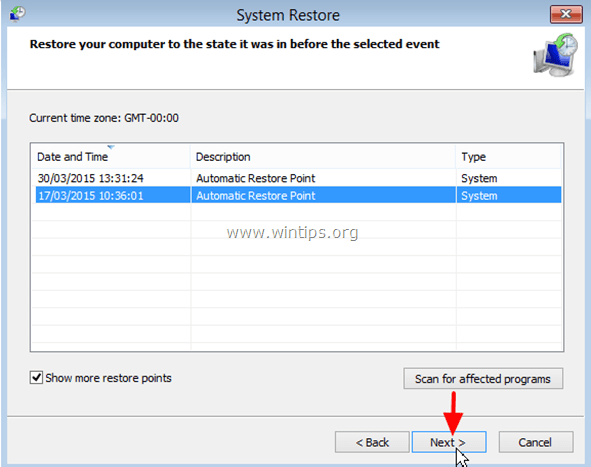
7. Click Next at the first screen and then check the Show more restore points checkbox, to select an earlier working state from the list and press Next.
8. Review your selection and if you agree, press Finish.
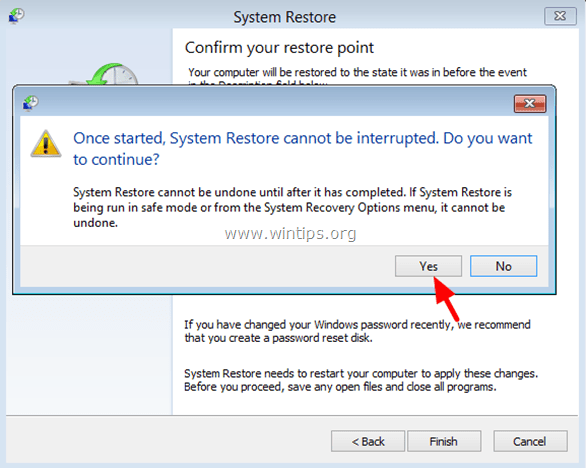
9. Finally press Yes to confirm your decision.
10. Now wait until the restore process is completed. During the restore process, your computer will restart several times and when it's done, you should enter in Windows without problems.
Method 7. Repair Windows 10 with an in-place Upgrade.
The final method to resolve Windows 10 problems, is to create a Windows 10 DVD or USB installation media, by using the Media Creation tool, and then to repair Windows 10. For that task follow the detailed instructions in this article: How to Repair Windows 10 with an in-place Upgrade.
That's it! Let me know if this guide has helped you by leaving your comment about your experience. Please like and share this guide to help others.
We're hiring
We're looking for part-time or full-time technical writers to join our team! It's about a remote position that qualified tech writers from anywhere in the world can apply. Click here for more details.
- FIX: Numeric keypad Not Working on Windows 10/11 - July 24, 2024
- How to Share Files or Printers in Hyper-V? - July 22, 2024
- How to invoke Hyper-V Screen resolution prompt? - July 17, 2024








November 19, 2022 @ 7:33 am
thank you
September 26, 2019 @ 3:41 pm
Hi. I've had this message since a Windows Security Update was installed 2 days ago (It's not on the list of available files to 'uninstall' though).
I manually created the file (Desktop) but now it's saying 'Access Denied' to that file. Any ideas please? thank you
September 26, 2019 @ 7:22 pm
Have you tried Methods 4 & 5?
September 5, 2019 @ 1:47 am
My computer screen is black and I cant click on anything is there any other way to resolve this?
September 5, 2019 @ 8:55 am
Follow the instructions on this post: https://www.wintips.org/fix-windows-10-black-screen-with-cursor-issue-after-update/
August 10, 2019 @ 6:06 pm
I had to.reset the system back to specs.
July 30, 2019 @ 4:59 pm
Full system shut down (1st in the list) worked for me – THANK YOU !