How to Setup VPN server in Windows 10, 8, 7 or Vista
A Virtual Private Network (VPN) server can allow you to securely access your private network from everywhere in the world. A VPN network consists of a VPN server that exists between the Internal and External network and authenticates external VPN client connections. When the VPN client incoming connection starts, then the VPN server first authenticates the client and if the authentication is successful, then it permits the client to access the internal network, otherwise it doesn't allow the incoming connection to be established.
Microsoft offers the Remote Access VPN Server installation in all Windows Servers editions, but if you own a personal computer with Windows 8, 7 or Vista computer(s) then you can easily setup a VPN server using the instructions below.
How to Setup a VPN Server on Windows 10, 8, 7 or Vista.
In order to setup your personal computer to act as a VPN Server then you have to create a new incoming network connection for a VPN access. To do that:
Step 1. Open Network Connections.
To open Network connections in Windows 10, 8, 7 or Vista OS:
1. Press “Windows” ![]() + “R” keys to load the Run dialog box.
+ “R” keys to load the Run dialog box.
2 Type “ncpa.cpl” and press Enter.
Step 2. Create a new incoming network connection for VPN access.
After you open Network Connections, create a new incoming network connection for VPN access.
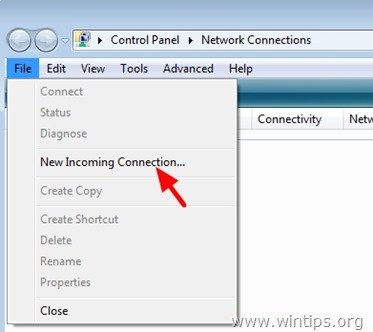
1. At Network Connections menu, click File > New Incoming Connection. *
- Note: If you cannot view the "File" menu, navigate at "Folder options" in Control Panel and at the "View": tab, select to "Always show menus".
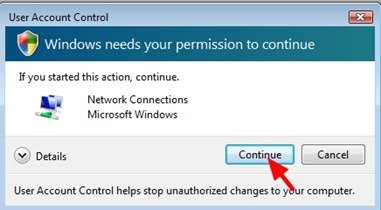
{Press “Continue” to “User Account Control” (UAC)” warning message if asked}.
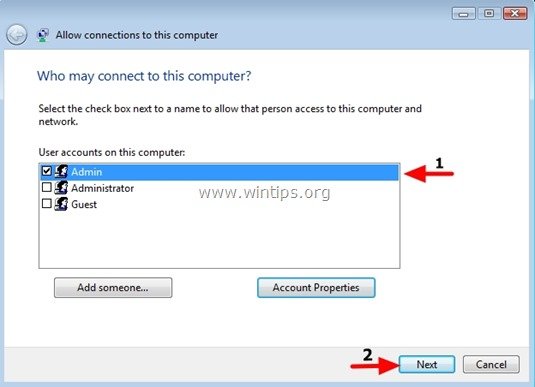
2. Select the user(s) in your computer that you want to have VPN access. *
*Note: You can create more user accounts to allow other users to VPN access.
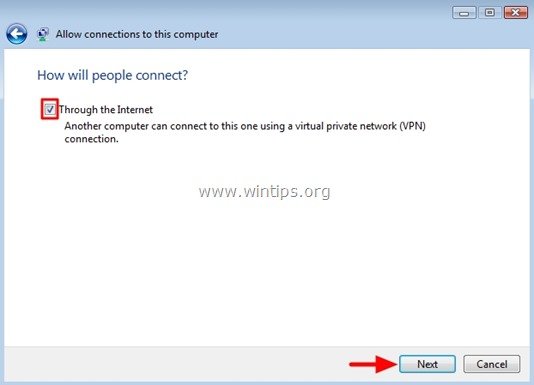
3. Check to enable the “Through the Internet” option and press “Next”.
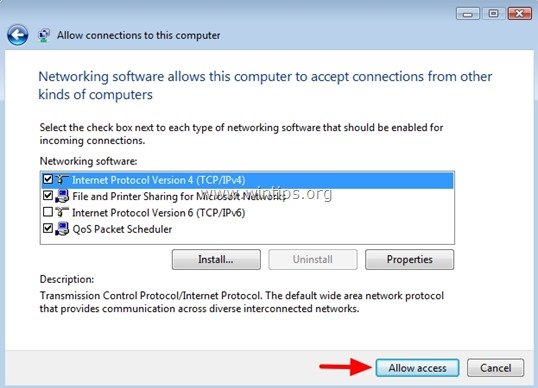
4. At Networking protocols specify which protocols will be available for the connected VPN client(s) or leave the default options and then press the “Allow Access” button for default installation.
Additional settings of Networking Protocols
The default installation of the VPN server allows the following protocols enabled for incoming VPN connections:
Internet Protocol Version 4 (TCP/IPv4). *
* By default, IP Addresses for connected VPN clients, are assigned automatically from your network DHCP server (e.g. your ADSL Modem/Router). If you don’t have a DHCP server on your network, or if you want to define which specific IP Addresses (IP Address Range) will be available for VPN client(s), then:
- Highlight the “Internet Protocol Version 4 (TCP/IPv4)” and click “Properties”
- At Incoming IP Properties, specify the available IP Addresses that will be given to VPN clients when connected. *
* Note: The available IP Addresses must be at the same network range as your network is.
File and Printer Sharing for Microsoft Networks. *
* By default, this setting is enabled. This means that all VPN connected users may have access to your network files and printers. If you want to prevent that, uncheck to disable the “File and Printer Sharing for Microsoft Networks” option. *
* Attention: I don’t suggest you disable this option because if you disable “File and Printer Sharing” feature any sharing folders or printer will be unavailable to all network users (even for the users on your local network).
QoS Packet Scheduler. *
* Leave this option enabled. (This scheduler is designed to control the IP traffic for various network services, including Real Time Communications traffic).
7. After you click the “Allow Access” button, let the wizard to complete the VPN installation and press “Close”.
Step 3: Forward VPN port to VPN server.
After you have setup the incoming VPN connection, you must log in to your Internet Router and configure it to allow and forward the VPN connections from external IP’s to your VPN Server’s IP Address. To do that:
1. Open your web browser and at the URL box, type your Router’s IP Address (e.g. 192.168.2.1) and press “Enter”. *
* Note: If you want to find your Router’s IP Address follow the instructions on this article.
2. Type the Router’s Administrator User name and Password and press “OK”. *
* Note: This information is commonly found on the router device (on its lower side) or in the router’s manual.
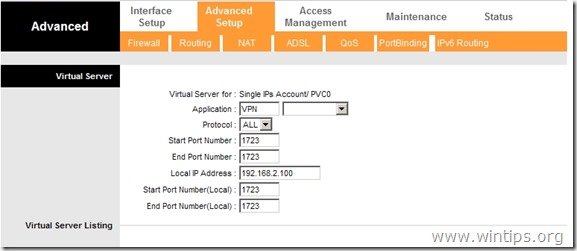
3. Inside the Router configuration setup, forward the port 1723 to the IP address of the computer where you created the new incoming connection and that acts as a VPN server. (See your Router’s manual on how to configure Port Forward).
- For example, if the computer where you created the incoming (VPN) connection has the IP 192.168.2.100 then you have to forward port 1723 to that IP.
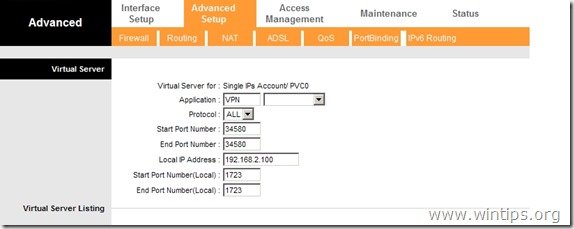
– If you want to have maximum security then you can use another unused external port for VPN connections (the Port range is: 1-65535). See this article to find an unused port: List of TCP and UDP port numbers
- For example if you specify the random (unused) port 34580 for incoming VPN connections then you will be protected from malicious programs which scan for well known open network ports and then compromise your network.
You ‘re done!
Additional instructions:
- In order to be able to connect to your VPN server from a distance you have to know the public IP Address of the VPN server. To find the pubic IP Address (from the VPN Server PC) navigate to this link: http://www.whatismyip.com/
- To ensure that you can always connect to your VPN server it is better to have a Static Public IP Address. To obtain a Static Public IP Address you must contact your internet service provider. If you don’t want to pay for a static IP Address, then you can setup a free Dynamic DNS service (e.g. no-ip.) on your router’s (VPN Server) side.
- To setup a new VPN connection at your client computer see these instructions: How to setup a VPN client.
We're hiring
We're looking for part-time or full-time technical writers to join our team! It's about a remote position that qualified tech writers from anywhere in the world can apply. Click here for more details.
- FIX: Error 0x8007025d in Windows 10 Update. - April 22, 2024
- How to Disable Device Encryption in Windows 11/10. - April 17, 2024
- How to View Permissions on Shared Folders on Windows 10/11. - April 15, 2024






February 15, 2017 @ 5:31 pm
How do i connect to the created VPN connection using the external port number? Thanks.
February 16, 2017 @ 11:10 am
@Aaron: Windows by default uses the port 1723 for VPN. to change that port on client side:
1. Open registry editor and navigate to: HKEY_LOCAL_MACHINE\SYSTEM\CurrentControlSet\Control\Class\{4D36E972-E325-11CE-BFC1-08002BE10318}\0003
2. At the right pane double click to open the "TcpPortNumber" value. Change to Decimal and at the value data change the 1723 port to the new port.
3. Close registry editor and restart the computer.
p.s. keep in mind that the change will affect all VPN connections on the machine.