How to remove Discount Buddy
“Discount-Buddy” (by 215 Apps) is a unwanted browser plugin that helps you save money everytime you make a purchase online. The “Discount-Buddy” plugin is bundled inside other software installation programs and upon installed, it displays ads and offers when you visit websites with online offers, like Amazon, Ebay, etc. The “Discount-Buddy” add-on is marked as a malicious program from some antivirus vendors.
If you want to remove “Discount Buddy” from your computer, use the steps below:
How to remove “Discount Buddy” from your computer:
Step 1. Uninstall applications installed by “215 Apps” from your Control panel.
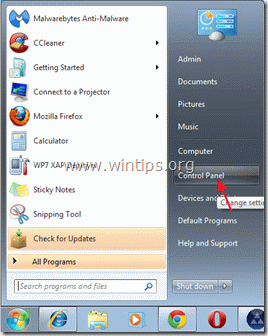
1. To do this, go to Start > Control Panel.
{Windows 8: Right click on the bottom left corner and select Control Panel }
{Windows XP: Start > Settings > Control Panel. }
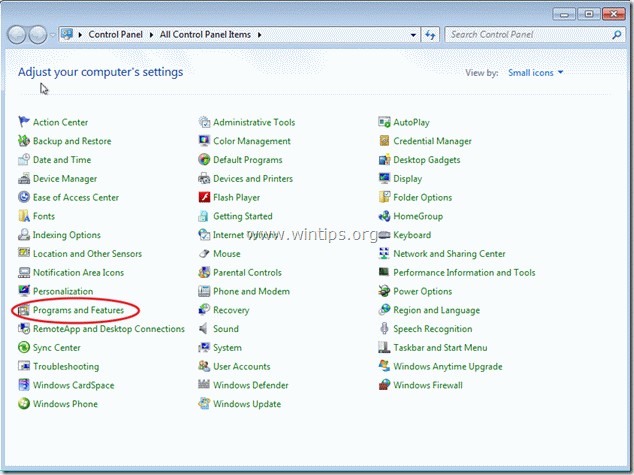
2. Double click to open “Add or Remove Programs” if you have Windows XP or
“Programs and Features” if you have Windows 8, 7 or Vista).
3. In the program list, find and remove/Uninstall these applications:
a. Discount Buddy (By 215 Apps)
Step 2. Remove “Discount Buddy” from your internet browser application.
After performing Step 1, (Uninstall “Discount Buddy” from your Control panel), your Internet browser should be clean.
If you want to check if your Internet browser is clean, then:
Internet Explorer, Google Chrome, Mozilla Firefox
Internet Explorer
How to remove “Discount Buddy” from Internet Explorer:
First uninstall “Discount Buddy” from your control panel (Step 1) and then check that none “Discount Buddy“ entry exists. To do this :
1. Open Internet Explorer and then from IE’s file menu, choose “Tools” > “Manage Add-ons”.
Notice*: In the latest versions of IE press the “Gear” icon ![]() on the top right.
on the top right.
2. Click on “Toolbars and Extensions” options at the left pane and make sure that “Discount Buddy” reference doesn’t exist.
3. Close all Internet Explorer windows and proceed to Step 3.
Google Chrome
How to remove “Discount Buddy”from Google Chrome:
1. Open Google Chrome and go to chrome menu ![]() and choose "Settings".
and choose "Settings".
2. Click on “Extensions” section on left pane.
3. In “Extensions” options click the recycle bin icon beside the “Discount Buddy 1.23.6” plugin to remove it .
4. Close all Chrome windows and proceed to Step 3.
How to remove “Discount Buddy”from Mozilla Firefox:
1. First you must have enabled the Firefox’s main “Menu Bar”.
* Right Click, on the empty space at right of “Page Tab” and enable Firefox “Menu Bar”.
2. From Firefox menu, go to “Tools” > “Add-ons”.
3. In “Add-ons” manager choose “Extensions” on the left pane.
4. Inside “Extensions” press “Remove” to remove “Discount Buddy 0.91.16” from Firefox.
6. Close all Firefox windows and proceed to the next Step.
Step 3. Clean your computer from other malicious threats.
Download and install MalwareBytes Antimalware to clean all the malicious threats remaining on your computer.*
*If you don't know how to install and use "MalwareBytes Anti-Malware", read these instructions.
1. Run MalwareBytes Antimalware and perform a quick scan:
2. When the scanning is completed, press the "Show results" button to view and remove the malicious threats.
3c. At the "Show Results" window check – using your mouse's left button- all the infected objects and then choose the "Remove Selected" option and let the program remove the selected threats.
3d. When the removal of the infected objects process is complete, "Restart your system to remove all active threats properly.
4. Important: To ensure your computer is clean and safe, perform a full scan using Malwarebytes Anti-Malware, in Windows "Safe Mode".*
*To get into Windows Safe mode, press the "F8" key as your computer is booting up, before the appearance of the Windows logo. When the "Windows Advanced Options Menu" appears on your screen, use your keyboard arrows keys to move to the Safe Mode option and then press "ENTER".
Step 4. Clean unwanted files and entries.
Use “CCleaner” program and proceed to clean your system from temporary internet files and invalid registry entries.*
*If you don’t how to install and use “CCleaner”, read these instructions.
Step 5. Restart your computer for changes to take effect and perform a full scan with your antivirus program.
We're hiring
We're looking for part-time or full-time technical writers to join our team! It's about a remote position that qualified tech writers from anywhere in the world can apply. Click here for more details.
- How to Disable or Remove BitLocker from Windows RE. - April 24, 2024
- FIX: Error 0x8007025d in Windows 10 Update. - April 22, 2024
- How to Disable Device Encryption in Windows 11/10. - April 17, 2024


