FIX: 0xc0000001 Your PC Couldn't start properly in Windows 10/11 (Solved).
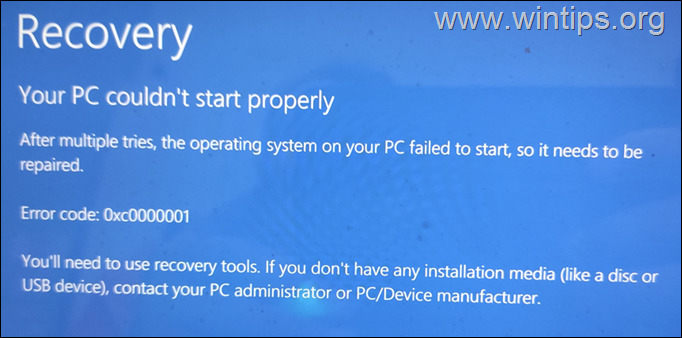
If your Windows 10/11 PC does not start and goes to the recovery screen with error code 0xc0000001 "Your PC Couldn't start properly", continue reading below to fix the problem.
The BSOD error 0xc0000001, usually appears after a Windows Update or a BIOS update. In other cases the problem appears after an improper computer shutdown or because of a damaged disk.
In this tutorial you 'll find instructions to resolve the Error 0xc0000001: Your PC Couldn't start properly, in Windows 11, 10 or 8 OS.
How to FIX: Your PC Couldn't start properly with Error code 0xc0000001, on Windows 10/8/7 OS.
Suggestion (Important): Before you continue to the methods below…
- Enter BIOS SETUP.
- Locate the SATA Configuration setting. (Commonly named as "SATA Mode" or "SATA Controller Mode" or "SATA Operation" or "Configure SATA as").
- If the SATA Mode is set to RAID then change it to AHCI. If the SATA Mode is set to AHCI then change it to IDE.
- Save Changes and Exit BIOS Settings.
- Try to boot in Windows. If Windows doesn't start, then revert the SATA setting back to what it was and proceed to apply the methods below.
Notes:
1. If you receive the 0xc0000001, on a system that you have used software mirroring for fault tolerance, then break the mirror first, with the DISKPART tool in Recovery Environment. Detailed instructions to do that can be found in Method-2 in this tutorial.
2. Requirement: In order to resolve the 0xc0000001 Boot error, you need to start your computer from a Windows USB installation/recovery media. If you don't own a Windows Installation Media, then you can create one (corresponding to your Windows Edition and Version) directly from Microsoft.
Method 1. Fix Error 0xc0000001 with Startup Repair
1. Power on your PC and boot from a Windows 10 installation/recovery media.
2. At the Windows Setup screen choose Repair > Troubleshoot > Advanced Options > Startup Repair.
3. Click on Windows 10 and when the repair is completed, remove try to boot to Windows normally.
Method 2. Fix Boot Configuration Data using BOOTREC tool.*
* Note: This method usually works on Windows 7 & 8 systems.
1. Power on your PC and boot from a Windows 10 installation/recovery media.
2. At the Windows Setup screen press SHIFT + F10 to access command prompt, or choose Next –> Repair your computer –> Troubleshoot –> Advanced Options –> Command Prompt.
3. In command prompt type the following commands in order:
- bootrec /fixmbr
- bootrec /fixboot
* Note: If after executing the above command you receive that "Access is denied" give this command "bootsect /nt60 sys" and continue below.
- bootrec /scanos *
* Note: If after executing the "bootrec /scanos" command you receive that "Total identified Windows installations = 0" then give the following commands, before you continue to next step:
-
- bcdedit /export C:\bcdbackup
- C:
- cd boot
- attrib bcd -s -h –r
- ren C:\boot\bcd bcd.old
4. Rebuild Boot Configuration Data:
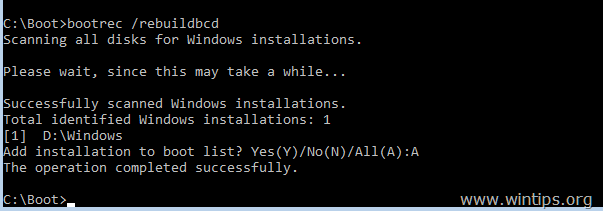
- bootrec /rebuildbcd
5. Press "A" to Add installation to boot list and press Enter.
6. Close all windows and restart your computer. If Windows still fails to boot, then try Method 2.
Method 3. Repair Boot Configuration Data using BCDBOOT tool.
* Note: This method usually works on Windows 10/11 systems.
1. Power on your PC and boot from a Windows 10 installation/recovery media.
2. At the Windows Setup screen press SHIFT + F10 to access command prompt, or choose Next –> Repair your computer –> Troubleshoot –> Advanced Options –> Command Prompt.
3. In command prompt type the following commands in order:
- diskpart
- select disk 0
- list partition
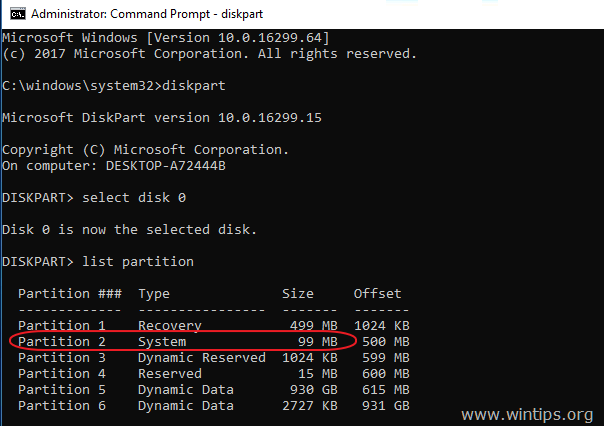
4. Note the size in Megabytes of System Partition. *
* e.g. As you can see at the screenshot below, the partition size of System partition is 99 MB.
5. Find out the volume number of the system partition * and the drive letter of OS drive,** by typing this command:
- list volume
* At the previous step we found that the system partition is 99 MB. So, from the screenshot below, we understand that the System partition is the "Volume 2".
** The OS Drive, is the drive where the Windows installed. Commonly this is the "Volume 0", the largest volume on the list. At this example the OS drive is located at "C" drive letter.
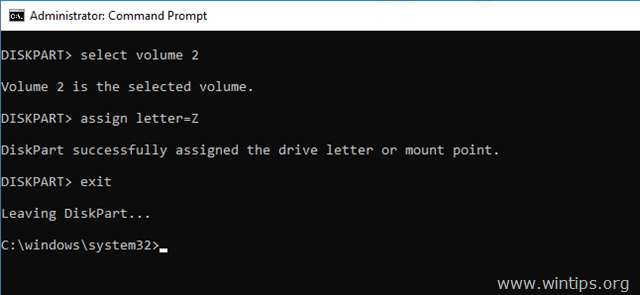
6. Select the System partition and assign a drive letter to it. Then exit DISKPART:
- select volume 2 *
- assign letter=Z
- exit
* Note: Change the Volume number according your case.
7. Finally, in command prompt give this command:
- bcdboot C:\windows /s Z: /f ALL
* Note: Replace the letter "C", according the drive letter of the OS volume at your case.
8. Close all windows, remove the Windows Recovery media and try to boot in Windows normally. If Windows doesn't boot, then follow the same steps, but at the end, type this command:
- bcdboot C:\windows /s Z: /f UEFI
Additional help: If you cannot fix the problem using the above methods, read this article: How to Repair Windows 10/11 without losing files.
That's it! Which method worked for you?
Let me know if this guide has helped you by leaving your comment about your experience. Please like and share this guide to help others.
We're hiring
We're looking for part-time or full-time technical writers to join our team! It's about a remote position that qualified tech writers from anywhere in the world can apply. Click here for more details.
- FIX: Numeric keypad Not Working on Windows 10/11 - July 24, 2024
- How to Share Files or Printers in Hyper-V? - July 22, 2024
- How to invoke Hyper-V Screen resolution prompt? - July 17, 2024


May 28, 2024 @ 6:54 pm
ok