FIX: CRITICAL PROCESS DIED bsod error on Windows 10.
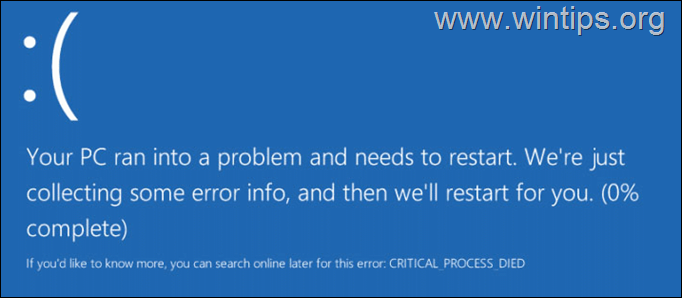
The CRITICAL_PROCESS_DIED blue screen error on Windows 10 (bug check 0x000000EF), indicates that a critical process who is important for the operation of Windows is stopped because is damaged or corrupted. The error may occur after a Windows or a driver update, but in some cases is due to a faulty hardware.
Problem details: Windows 10 can't start normally and displays the message "Your computer has encountered a problem and needs to restart…Search online for this error: CRITICAL PROCESS DIED" and then restarts.
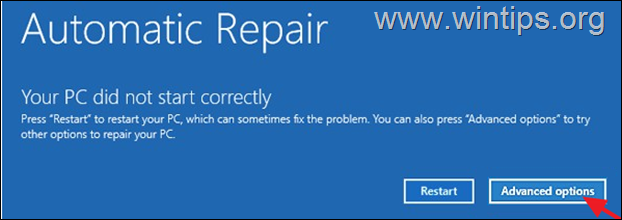
After restarting, Windows tries to repair the problem by using Automatic Repair but can not fix the problem, and prompts to restart the PC again or to use the "Advance options" to try other options to repair your PC in WinRE.
This tutorial contains instructions to fix the CRITICAL PROCESS DIED BSOD error in Windows 10.
How to FIX: CRITICAL PROCESS DIED (0x000000EF) in Windows 10.
Important: Before you continue to troubleshoot the "critical process died" blue screen problem:
1. Disconnect all external connected devices from the system that are not necessary for the operation of your computer. (e.g. USB Disks or Drives, Printer, etc.)
2. Ensure that you haven't changed your Software or Hardware: If you have recently changed your hardware on your machine (e.g. you added more RAM, or you have changed the VGA card), or you have installed a new hardware device driver or a new software (e.g. Antivirus), then, probably, this is the reason for the BSOD problem. In this case try to remove the newly installed hardware/software.
- Method 1. Restore your PC.
- Method 2. Check Disk and File System for Errors.
- Method 3. Repair Boot Files.
- Method 4. Restore Windows Registry.
- Method 5. Clean Install Windows 10 & Check Hardware.
Method 1. Restore your PC to a previous State with System Restore.
1. Click the Advanced Options button in Automatic Repair screen. *
* Note: If you Windows doesn't display the Advanced options menu then you have to start and to repair your PC using a USB Windows 10 installation media. To do that:
-
- From another PC, create a Windows 10 installation media on an empty USB drive (at least 8GB).
- Power on the affected computer and boot from the USB Windows Installation media.
- Click Next at the first screen and then click Repair your Computer.
- Continue to next step.
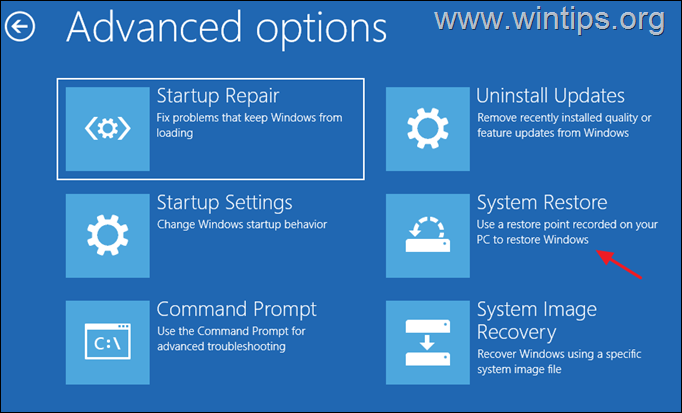
2. Click Troubleshoot –> Advanced options –> System Restore.
7. If prompted, select an account with administrative privileges, type a password for that account and click Continue.
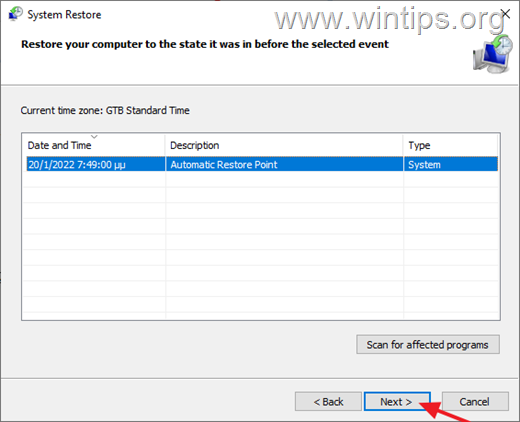
8. At System Restore screen, click Next. *
* Note: If you receive the message that "no restore points have been created on your computer…" skip to next method.
4. Choose an earlier restore point and click Next.
5. Click Finish and Yes again to start to restore process.
6. Now wait until the restore process is completed. During the restore process, your computer will restart several times and when it's done, you should enter in Windows without problems.
Method 2. Check Disk and File System for Errors.
The second method to resolve the CRITICAL PROCESS DIED BSOD at Windows startup, is to check the disk and the file system for errors. To do that:
1. Click Advanced Options in Automatic Repair screen, or boot from a Windows boot media and click Next > Repair your computer > Troubleshoot
2. From Advanced Options, select Command Prompt.
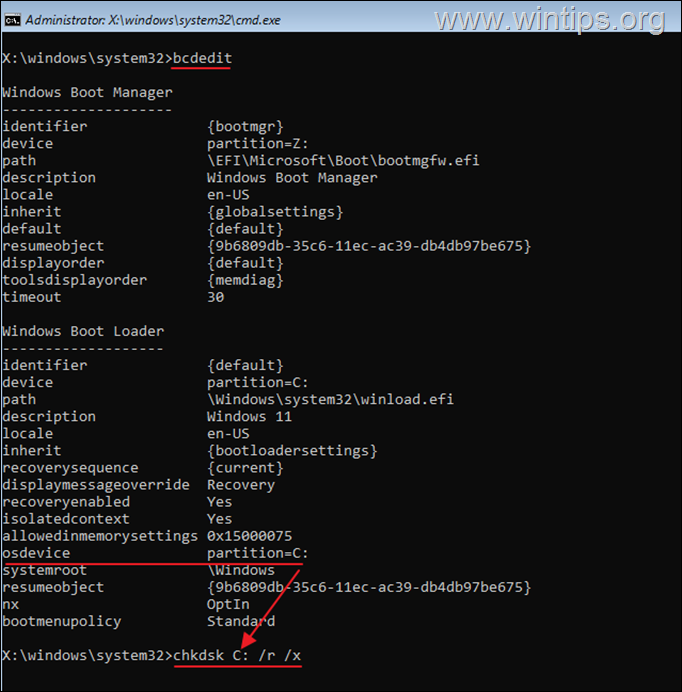
3. In command prompt, type the following command and press Enter.
- bcdedit
4. Notice the drive letter of OS partition (e.g. "osdevice –> partition=C: ")
5. Then give this command and press Enter:*
- chkdsk X: /r /x
* Note: Replace the red "X" in the above command with the drive letter you noticed above in the OS partition.*
* e.g. In this example the OS partition has the letter "C", so the command will be:
- chkdsk C: /r /x
5. When the CHKDSK process is completed, give this command: *
- SFC /SCANNOW
* Note: If after giving the "SFC /SCANNOW" you receive the errors "There is a system repair pending which requires reboot to complete. Restart Windows and run SFC again" & "Windows Resource Protection Could Not Perform the Requested Operation", give the following SFC command: **
- SFC /SCANNOW /OFFBOOTDIR=X:\ /OFFWINDIR=X:\Windows
** Replace the letter "X" in the above command with the drive letter you noticed above in the OS partition and add a space between \ /. ***
*** e.g. In this example the OS partition has the letter "C", so the command will be:
sfc /SCANNOW /OFFBOOTDIR=C:\ /OFFWINDIR=C:\Windows
- Related Article: How to Run SFC /SCANNOW command Offline.
6. After SFC scan, type exit to close command prompt window and power off your PC.
7. Power on again and try to boot Windows normally. If the same error persists, continue to the next method.
Method 3. FIX CRITICAL PROCESS DIED by Repairing Boot Files.
1. Click Advanced Options in Automatic Repair screen, or BETTER boot from a Windows boot media and click Next > Repair your computer > Troubleshoot.
2. From Advanced Options, open Command Prompt.
3. In command prompt type the following commands in order:
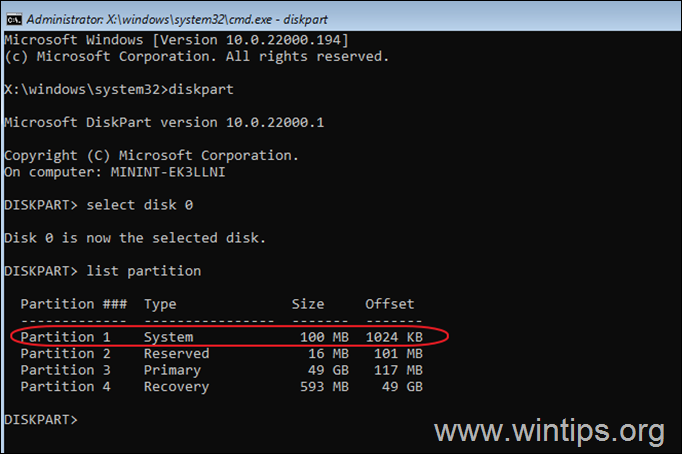
- diskpart
- select disk 0
- list partition
4. Note the size in Megabytes of System Partition. *
* e.g. As you can see at the screenshot below, the partition size of System partition is 100 MB.
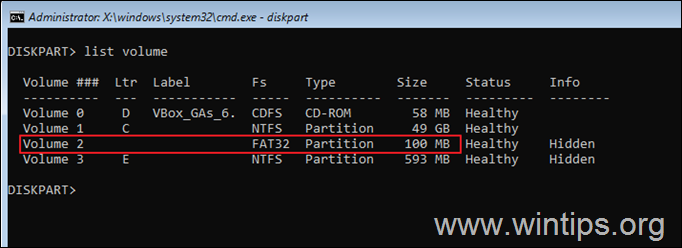
5. Find out the volume number of the system partition* and the drive letter of OS drive,** by typing this command:
- list volume
* At the previous step we found that the system partition is 100 MB. So, from the screenshot below, we understand that the System partition is the "Volume 2".
** The OS Drive, is the drive where the Windows installed. Commonly this is the "Volume 0", the largest volume on the list. At this example the OS drive is located at "C" drive letter.
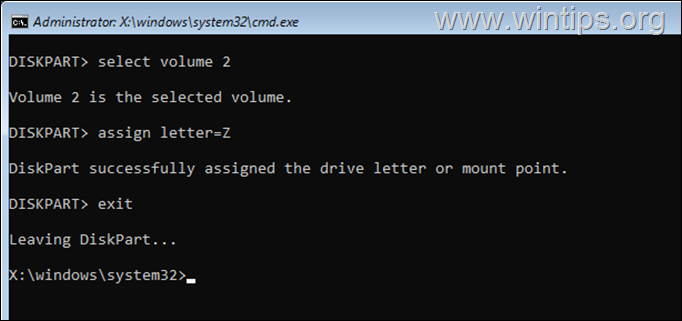
6. Now give the following commands to select the System partition by using its volume number (e.g. "2" in this example), and to assign a drive letter to it (e.g."Z"). When done, exit DISKPART:
- select volume 2 *
- assign letter=Z
- exit
* Note: Change the Volume number according your case.
7. Finally, in command prompt give this command:
- bcdboot C:\windows /s Z: /f UEFI
* Note: Replace the letter "C", according the drive letter of the OS volume at your case.
8. Close all windows, remove the Windows installation media and try to boot in Windows normally. If Windows doesn't boot, then follow the same steps, but at the end, type this command:
-
- bcdboot C:\windows /s Z: /f ALL
Method 4. Restore Windows Registry.
The next method to fix the CRITICAL PROCESS DIED BSOD error in Windows 10, is to restore the registry files from the "C:\Windows\System32\config\RegBackup" folder. To do that:
1. Click Advanced Options in Automatic Repair screen, or BETTER boot from a Windows boot media and click Next > Repair your computer > Troubleshoot.
2. From Advanced Options, open Command Prompt.
3. In command prompt, type the following command and press Enter.
- bcdedit
4. Notice the drive letter of the OS partition (e.g. "osdevice –> partition=C: ")
5. Then type the drive letter of the OS partition + : and press Enter (e.g. "C:" ).
6. Then give the following commands in order (press Enter after each command):
- cd \windows\system32\config
- md backupold
- copy *.* backupold
- cd regback
- copy *.* ..
* Notice: Press a when asked to overwrite all files in destination.
7. Type exit and press Enter to close command prompt.
8. Reboot your computer.
* Note: If after the restart, your PC doesn't start, with error "The operating system couldn't be loaded because the system registry file(s) is missing or contains errors", apply the following steps:
-
- Boot your PC from a Windows installation media and launch command prompt.
- Give the following command to restore the original registry files from the "backupold" folder, and then reboot your PC.
-
- cd \windows\system32\config\backupold
- copy *.* ..
- exit
Method 5. Clean Install Windows 10 & Check Hardware.
If none of the above methods resolve the "CRITICAL PROCESS DIED" problem, then your best option is to backup your files and to perform a clean installation of Windows 10 or to RESET your PC. *
* Note: If you experience the same error after a clean install of Windows 10, this indicates a problem with a device driver or a hardware problem. In such a case, proceed as follows to find the culprit:
-
- Check the memory (RAM) for problems to make sure it's okay.
- Use a stable or earlier driver version for your graphics adapter (VGA).
- If you can, replace the Graphics Adapter and check if the problem persists. (In many cases this is the culprit).
- Clean Install Windows on another Disk.
That's it! Which method worked for you?
Let me know if this guide has helped you by leaving your comment about your experience. Please like and share this guide to help others.
We're hiring
We're looking for part-time or full-time technical writers to join our team! It's about a remote position that qualified tech writers from anywhere in the world can apply. Click here for more details.
- FIX: Numeric keypad Not Working on Windows 10/11 - July 24, 2024
- How to Share Files or Printers in Hyper-V? - July 22, 2024
- How to invoke Hyper-V Screen resolution prompt? - July 17, 2024

