
FIX DISM Source Files Could not be Found Windows 10/8
"The source files could be found" error, after running the "DISM /Online /Cleanup-Image /RestoreHealth" command, is a common problem on Windows 10 and 8 based computers. ( DISM's source files could be found error codes: 0x800f081f or 0x800f0906 or 0x800f0907 )

The error "The Sources files could not be found files" in DISM tool, is commonly caused because of the following reasons:
Reason 1. DISM tool cannot find online (in Windows Update or WSUS) the files needed to perform the repair, when using this command: "DISM /Online /Cleanup-Image /RestoreHealth"
Reason 2. You have specified a wrong Windows Image (install.wim) file as the repair source, when using this command: "DISM /Online /Cleanup-Image /RestoreHealth /Source"
Reason 3. The install.wim or the install.esd file, that you 're using as a repair source, contains multiple install.wim files.
Reason 4. The Windows.ISO file that you 're using as the repair source may be damaged or wrong {it is not the same Windows Version, Edition & Architecture (32 or 64-bit) as the installed Windows}.
Related articles:
- FIX DISM 0x800f081f Error in Windows 10/8
- How to Extract Install.ESD to Install.WIM (Windows 10/8)
- How to Extract an INSTALL.WIM file that contains several INSTALL.WIM files.
In this troubleshooting guide you will find several methods to resolve the following DISM errors: "The Source Files Could not be Found", "0x800f081f", "0x800f0906", "0x800f0907".
How to FIX: DISM /RestoreHealth Could not Find Source Files to Repair Windows 10 or Windows 8/8.1.
Method 1. Clean and Analyze the WinSXS folder.
Method 2. Specify an alternative Repair Source in DISM by using the /Source switch.
Method 3. Specify an alternative Repair Source by using Policy Editor or Registry.
Method 4. Fix DISM Source Files Cannot be Found Error with Windows Repair Upgrade
Method 5. Fix DISM errors by examine the CBS.LOG file.
Method 6. Repair (Reinstall) Windows 10.
Method 1. Clean and Analyze the WinSXS folder.
The Windows Component Store folder, aka WinSXS (C:\Windows\winsxs), contains all the files needed during servicing operations in Windows, such as the installation of updates, hotfixes, etc. Additionally, the WinSXS folder, contains all the files needed for a Windows installation or repair.
In time, the size of WinSXS folder becomes large or corrupted, because of updates and new features that are added to the installation, so it needs cleaning before running the DISM tool. To do that:
1. Right click at Start menu ![]() and select Command Prompt (Admin).
and select Command Prompt (Admin).
2. Type the following commands in order:
- DISM /Online /Cleanup-Image /StartComponentCleanup
- SFC /SCANNOW
- DISM /Online /Cleanup-Image /AnalyzeComponentStore
- SFC /SCANNOW
3. Restart your computer.
4. After the restart, open command prompt (as admin) again and run DISM.
- DISM /Online /Cleanup-Image /RestoreHealth
Method 2. Specify an alternative Repair Source in DISM by using the /Source switch.
By default DISM looks online to find the required files to repair the Windows Image. But in most cases, this doesn't work, so you need to specify a local source for the known good files by using the /Source switch.
Requirements: To accomplish this task you need the install.wim file (X:\sources.install.wim) or the install.esd file (X:\sources.install.wim) , from a Windows installation media (USB, DVD or ISO), that has the same Windows version, edition and language with the installed version.
If you don't own a Windows installation media (USB, DVD or ISO), then you can obtain one, by using these options:
- Option A. Download Windows by using the Media Creation tool, or
- Option B. Download Windows in a ISO file by using the Windows ISO Downloader tool, by following the instructions on this article: How to Download Any Version of Windows or Office w/o a Product Key (Legally & Free)
To specify an alternative Repair Source in DISM:
1. Attach the Windows installation media (or mount the ISO file), on your system and notice the drive letter in Windows Explorer. (e.g. "D:")
2. Open Windows Explorer and explore the contents of "sources" directory, and see if it contains a file named "install.wim" or a file named "install.esd".
3. Next, open Command Prompt as Administrator.
4. According the file type of the "install" file: (.wim or .esd), give the corresponding command to list all the included Windows versions:
a. If you see an "install.wim" file in "sources" folder, give this command:
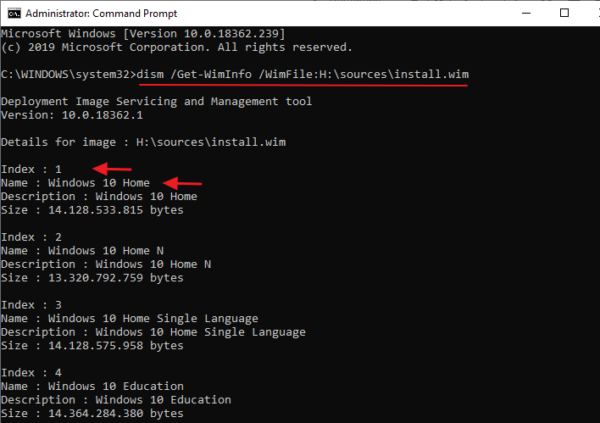
- dism /Get-WimInfo /WimFile:X:\sources\install.wim
b. If you see an "install.esd" file in "sources" folder, give this command:
- dism /Get-WimInfo /WimFile:X:\sources\install.esd
* Note: Replace the "X" drive letter according the drive letter of the attached installation media. For example, if the Windows installation media is at drive "H" and the "sources" folder contains an "install.wim" file, then the command will be:
- dism /Get-WimInfo /WimFile:H:\sources\install.wim
5. According to your Windows 10 installed version take note of the index number. *
* e.g.: If you have installed the Windows 10 Home edition on your system, then the Index number is "1".
6. Once you find out the index number of your installed Windows version, proceed and repair Windows 10, with the corresponding command, below:
a. If the sources folder contains an "install.wim" file, give this command:
- DISM /Online /Cleanup-Image /RestoreHealth /Source:WIM:X:\sources\install.wim:IndexNumber /LimitAccess
b. If the sources folder contains an "install.esd" file, give this command:
- DISM /Online /Cleanup-Image /RestoreHealth /Source:ESD:X:\sources\install.esd:IndexNumber /LimitAccess
* Note: Replace the "X" drive letter and the index number, according to your case. For example, if the Windows installation media is at drive "D", and contains an "install.wim" file on "sources" folder, and the index number is "1" (for Windows 10 Home), then the command will be:
- DISM /Online /Cleanup-Image /RestoreHealth /Source:WIM:D:\sources\install.wim:1 /LimitAccess

7. Be patient until DISM repairs the Windows image component store.
8. When the operation is completed, you should be informed that the "operation is completed successfully". *
* Note: If the DISM tool fails again with "Error 0x800f081f: The Sources files could not be found", then:
- Extract a corresponding to your Windows version "install.wim" file from the installation media. **
- Use the extracted "install.wim" file as the repair source in DISM, with the below command (see the detailed instructions here).
- DISM /Online /Cleanup-Image /RestoreHealth /Source:WIM:c:\install.wim:1 /LimitAccess
** To extract the corresponding to your Windows version "install.wim" file, follow the instructions below according your case:
1. If you have used the Media creation tool (option A), to download Windows 10, then extract the according to your Windows version install.wim file from the install.esd file (X:\sources\install.esd), by using the instructions in this article: How to Extract Install.ESD to Install.WIM (Windows 10/8)
2. If you have used the Windows ISO Downloader tool (option B), to download Windows 10/8 ISO, then extract the according to your Windows version install.esd file from the install.wim file (X:\sources\install.esd) file, by using the instructions on this article: How to Extract an INSTALL.WIM file that contains several INSTALL.WIM files.
9. Finally, to complete the repairs run the sfc /scannow command:
- SFC /SCANNOW

10. When the SFC scan is completed successfully, you 're done!
Method 3. Specify an alternative Repair Source by using Policies or Registry.
1. Attach the Windows installation media on your system and use the steps 1-5 from the method 2 above, to find out the index number for the installed Windows 10 version.
2. Copy the install.wim file from the Windows installation media (e.g. (X:\sources.install.wim) to the C:\ drive (root folder).
3. According to your Windows version (Pro or Home), follow the instructions below to specify the C:\install.wim file, as the default source to repair the Windows Image.
2A. Windows 10 Pro & Windows 8/8.1 Pro
– Specify DISM /Source in Local Group Policy Editor:
1. Press Windows ![]() + R keys on your keyboard to load the Run dialog box.
+ R keys on your keyboard to load the Run dialog box.
2. Type gpedit.msc and press Enter to open the Local Group Policy Editor.

3. In Group Policy Editor navigate (from the left side) to:
- Computer Configuration > Administrative Templates > System
4. At the right pane open the "Specify settings for optional component installation and component repair" setting.

5. Apply the following settings:
1. Check Enabled
2. At "Alternate source file path" type: *
wim:C:\install.wim:IndexNumber
3. Check Never attempt to download payload from Windows Update
* Note: Replace the IndexNumber according your case. For example, if the index number is "1", type: "wim:C:\install.wim:1"

6. Click OK and close Policy Editor.
7. Restart your computer.
8. After the restart, run the "DISM /Online /Cleanup-Image /RestoreHealth" command again.
10. When the repair is completed, then undo the changes in Policies.
2B. Windows 10 Home & Windows 8/8.1 Home
– Specify DISM /Source in Windows Registry:
1. Press “Windows” ![]() + “R” keys to load the Run dialog box.
+ “R” keys to load the Run dialog box.
2. Type regedit and press Enter to open the Windows Registry Editor.

3. At the left pane, navigate to this key:
- HKEY_LOCAL_MACHINE\SOFTWARE\Microsoft\Windows\CurrentVersion\Policies
4. Right click at Policies key and select New > Key
5. Give at the new key the name: Servicing

6. Highlight the Serving key.
7. Right click at the right pane and choose New > Expandable String Value
8. Give at the new value the name: LocalSourcePath

9. Double click at "LocalSourcePath" and at the value data box, type: wim:C:\install.wim:IndexNumber
* Note: Replace the IndexNumber according your case. For example, if the index number is "1", type: "wim:C:\install.wim:1"
10. Click OK.

11. Right click again at the right pane, and choose New > DWORD (32-bit) Value.
12. Give at the new value the name: UseWindowsUpdate

13. Double click at "UseWindowsUpdate" and at the value data box, type: 2
14. Click OK
* 2 = Do Not use Windows Update
")
15. Close registry editor and restart your computer.
16. After the restart, run the "DISM /Online /Cleanup-Image /RestoreHealth" command again.
17. When the repair is completed, then undo the changes in Windows Registry.
Method 4. Fix DISM Source Files Cannot be Found Error with Windows Repair Upgrade.
The other method to fix DISM errors is to perform a repair upgrade of Windows 10.
Step 1. Repair/Upgrade Windows 10 by using the Media Creation Tool.
1. Download and run the media creation tool according to your OS Version.
2. Accept the License Terms.
3. Choose the option Upgrade this PC now and press Next.

4. Wait until Windows is upgraded.
Step 2. Use DISM and SFC tools to complete repairs.
– After Windows upgrade:
1. Right click at Start menu ![]() and select Command Prompt (Admin).
and select Command Prompt (Admin).
2. At the command prompt window give the following command in order to complete the repairs:
- DISM /Online /Cleanup-Image /StartComponentCleanup
- Dism /Online /Cleanup-Image /RestoreHealth
- sfc /scannow
Method 5. Fix DISM errors by examine the CBS.LOG file.
(UPDATED on 17/5/2017)
After it's execution, DISM creates a log file named "CMS.log" at "C:\Windows\Log\CBS" directory (e.g. C:\Windows\Log\CBS\ CBS.log), that captures any issues found, when DISM command tool is executed.
So, the last method to fix DISM's "Source Files Cannot be Found" error, is to examine the CBS.LOG file, in order to find out and remove the installed package(s) that causes the problem.
Step 1. Examine DISM's log file (CBS.LOG).
1. Navigate to C:\Windows\Log\CBS directory and open the CBS file.

2. Using the Find tool (View > Find), search for "Checking System Update Readiness".

3. Now look under the "Checking System Update Readiness" line, to find out the corrupted package(s). *
* e.g As you can see at the below screenshot, the corrupted package is named: "Microsoft-Windows-TestRoot-and-FlightSigning-Package~31bf3856ad364e35~amd64~~10.0.15063.0"

4. Once, you find out, the name of the corrupted package, then continue to the next step.
Step 2. Remove the corrupted package's registry entry.
1. Simultaneously press the Windows ![]() + R keys to open the RUN command box.
+ R keys to open the RUN command box.
2. Type regedit and press Enter to open the Windows Registry Editor.
IMPORTANT: Before you continue to modify the registry, first take a backup. To perform a registry backup:
a. From the main menu, go to File & select Export.
b. Specify a destination location (e.g. your Desktop), give a filename (e.g. “RegistryBackup”) and press Save.
3. From the left pane navigate and select this key:
- HKEY_LOCAL_MACHINE\SOFTWARE\Microsoft\Windows\CurrentVersion\Component Based Servicing

5. With the Component Based Servicing key highlighted, go to Edit > Find (from the menu) and search for the corrupted package name in the registry. To do that, just copy and paste in the search box, the name of the corrupted package from the CBS.LOG. (e.g. "Microsoft-Windows-TestRoot-and-FlightSigning-Package~31bf3856ad364e35~amd64~~10.0.15063.0")

6. At this occasion, the name of the corrupted package was found at the following two (2) registry locations/keys:
-
- HKEY_LOCAL_MACHINE\SOFTWARE\Microsoft\Windows\CurrentVersion\Component Based Servicing\PackageIndex\Microsoft-Windows-TestRoot-and-FlightSigning-Package~31bf3856ad364e35~amd64~~0.0.0.0
- HKEY_LOCAL_MACHINE\SOFTWARE\Microsoft\Windows\CurrentVersion\Component Based Servicing\Packages\Microsoft-Windows-TestRoot-and-FlightSigning-Package~31bf3856ad364e35~amd64~~10.0.15063.0
7. Now, for safety reasons, backup all the registry key(s) you found, by right-clicking on each of them (on the left pane) and choose Export. *
* Note: Save the registry keys on your desktop, in order to easy import them backup if something goes wrong. (Double click at the exported key(s) and Merge).

8. Then, assign full control permissions, to the all key(s) you found, to Administrators. To do that:
1. Right click on each key and select Permissions.

2. Highlight Administrators, place a check mark on Full Control checkbox and click OK.

9. Finally, delete all the registry key(s) you found. (Right click on each key and Delete)

10. Close Registry Editor.
Step 3. Move the corrupted packages to other location on disk.
1. Navigate to C:\Windows\Servicing\Packages folder.
2. Now find and move to your desktop, all the packages that their name begins with the name of the damaged package in the CBS.LOG.
e.g. At this occasion I found (and moved to my desktop) the following four (4) files, that their name begins with the name of the corrupted package: Microsoft-Windows-TestRoot-and-FlightSigning-Package
-
- Microsoft-Windows-TestRoot-and-FlightSigning-Package~31bf3856ad364e35~amd64~~10.0.15063.0
- Microsoft-Windows-TestRoot-and-FlightSigning-Package~31bf3856ad364e35~amd64~~10.0.15063.0.mum
- Microsoft-Windows-TestRoot-and-FlightSigning-WOW64-Package~31bf3856ad364e35~amd64~~10.0.15063.0
- Microsoft-Windows-TestRoot-and-FlightSigning-WOW64-Package~31bf3856ad364e35~amd64~~10.0.15063.0.mum
 ,
,
3. Restart you computer.
4. Run the "DISM /Online /Cleanup-Image /RestoreHealth" command again.
5. If DISM is completed without errors, then proceed and delete permanently the exported registry key(s) and the moved packages from your desktop.
Method 6. Repair Windows 10.
If after applying all the above methods, you still receive the error "Source Files Could not be Found" in DISM, then I suggest to perform a Repair Installation of Windows 10.
Good luck! Let me know if this guide has helped you by leaving your comment about your experience. Please like and share this guide to help others.

- How to Resolve Hyper Backup Error "Failed to Export System Configuration" on Synology NAS. - June 17, 2026
- How to Require MFA for All Users in Microsoft 365 with a Conditional Access Policy. - June 15, 2026
- How to Resolve Error "Something Went Wrong 657rx" in Outlook or Microsoft 365 Apps. - June 10, 2026


March 12, 2026 @ 9:34 pm
I'm very impressed! Thank yoy very-very much!
Best wishes to you and stay helthy:)
August 8, 2024 @ 4:28 pm
For my W10P PC, both KB5040425 and KB5040427 refused to install.
I missed reading method 4 and used method 5 instead. I had 9 corruptions listed in the CBS.log. I suspect these were all obsolete package versions. I did not delete all the matching subkeys, just the top key folders in the "\..\Packages" branch that matched the full package name. This was all that was needed to get past the windows update issues. No permission changes were needed. This does leave some matching subkeys in other registry branches and I'll probably dig down and remove those too.
The instructions also show deleting top key folders in the "\..\PackageIndex" branch (typically ending in ".0.0.0.0") that while containing a full name match as a subkey, may also contain other non-matching subkeys that would be deleted. Wouldn't it be safer to only delete the top key folders and subkeys that fully match the key/package name in question?
June 15, 2023 @ 8:17 am
Fantastic! Spent a ridiculous amount of time failing to install an update, following countless useless tutorials, not being able to run DISM, then not being able to run DISM using the local copy extracted to C drive…
Almost gave up hope – but [Method 4] has made everything Tickety-Boo once more!
Brilliant resource, exhaustively detailed and still being helpful years later. Thank you!
July 9, 2021 @ 5:32 pm
Don't give up, guys. I got to method 4 and it finally worked :)
May 31, 2021 @ 10:16 am
Thanks heaps, I had major crashes going on and only just managed to get Restore to load a previous version, but SFC was finding errors in that as well, the first method worked.. only after I ensured it was in fact able to access the internet. All good for now, thanks heaps
April 23, 2021 @ 3:24 pm
DISM /Online /Cleanup-Image /RestoreHealth /Source:WIM:H:\sources\install.wim:1 /LimitAccess
I used the above command and got the following error: Error 87
The restorehealth option is not recognized in this context.
Also, when I downloaded the win 8.1 files to my ssd G drive, it couldn't
find the path. For some reason the files also ended up on the H drive which is my
CD drive. That is why I used the H drive in the command.
Can you tell me what went wrong?
Tom
April 24, 2021 @ 9:09 am
1. Error 87 often indicates a syntax error in the command, so ensure that you type it correctly.
2. Ensure that you specified correctly the path of the source files. For your description the source files are on drive G:, so you have to type:
DISM /Online /Cleanup-Image /RestoreHealth /Source:WIM:G:\sources\install.wim:1 /LimitAccess
November 23, 2020 @ 5:53 am
Thanks a lot for the help! I had been working with my laptop last 2 days to fix the issue with the Start Menu no working.
My complete computer crashed trying things, like reinstalling the apps or resetting the OS.
with Method 1. Clean and Analyze the WinSXS folder. It worked!!!!!
Thanks again!!!! Hope you guys receive more success, blesses!
April 15, 2020 @ 2:51 pm
Congratulation by this wonderful article. I had trouble wih my Windows 10. The O.S.'s updating does not work completly. And when I tried to use command DISM ( /Online /Cleanup-Image /RestoreHealth), system showed error 0x800f081f (The source files could not be found). Then, thanks to God I found your article. But was necessary performe four methods. Fortunately when I performed 4th method (Fix DISM Source Files Cannot be Found Error with Windows Repair Upgrade), the trouble was solved. God bless you !
March 13, 2020 @ 7:17 am
Hi, I'm still having problems. I tried all repair solutions on all articles and none of them worked.
Note:
Cmds Completed/Error:
sfc /scannow – windows resource collection found corrupt files but were unable to fix some of them etc
DISM /Online /Cleanup-Image /StartComponentCleanup – completed
DISM /Online /Cleanup-Image /AnalyzeComponentStore – completed
DISM /Online /Cleanup-Image /RestoreHealth – the source files could not be found etc
I did the install.esd/install.wim method correctly and failed
I previously tried using all these methods and articles a few months back and wiped and installed a fresh version of windows 10 home.
I did not look to see if it worked after I did the DISM /Online /Cleanup-Image /RestoreHealth cmd or sfc /scannow cmd to see if it worked as I had no problems with windows update (my current problem)
Whilst looking through registry editor I could not find my package but I found 2 with a similar registry folder name under "PackageDetect"
I couldn't find any file anything similarly named in the package name in my Windows Explorer either in the Packages folder.
However, I did notice it was not a windows related package it was Adobe Flash Player instead which I am aware that I have purposefully installed.
These are the names of the packages (through cbs.log file) I hope we can find a solution to this:
1. amd64_adobe-flash-for-windows_31bf3856ad364e35_10.0.18362.172_none_815470a5fb446c4e
2. wow64_adobe-flash-for-windows_31bf3856ad364e35_10.0.18362.172_none_8ba91af82fa52e49
March 13, 2020 @ 11:22 am
JWHero123: Follow the instructions on step-2 and delete these registry keys. Then try to run the DISM again.
November 24, 2019 @ 1:12 am
Thank you. I couldn't get the command that utilizes the win10 iso as a repair source but method 1: "Clean and Analyze the Win SXS folder" fixed my corrupt file problem. I haven't had my computer freeze or the cortana search box disappear since. Thank you so much!!
September 26, 2019 @ 7:57 am
…after a couple of sleepless night and epic fails, finally I fixed it with method 4 of this article! Many thanks for your helpful site :)
September 6, 2019 @ 4:04 am
Yeah, hello. I followed through all the steps, none worked. Now at the regedit option I have my corrupt files to be
"(p) CSI Payload Corrupt (n)
amd64_windows-defender-management-powershell_31bf3856ad364e35_10.0.18875.1000_none_2a030c985f27afeb\MSFT_MpComputerStatus.cdxml
2019-09-06 01:36:35, Info
CBS Repair failed: Missing replacement payload."
There are nine(9) of these buggers there and when I search for them in the registry, somehow, they do not exist. I have tried to solve this dism with no luck. Anyone with any info on this issue, please share.
September 10, 2019 @ 12:22 pm
If DISM is not able to repair the system files, then I suggest to perform a repair install.
September 10, 2019 @ 9:39 pm
Yeah, I have decided to do a neat install instead of trying to solve this issue… This issue really bugs me out. Thanks anyway
August 27, 2019 @ 5:12 pm
My laptop can't connect to the internet. What are the other options to repair this issue?
August 28, 2019 @ 9:51 am
@Chaim Pollak: Follow the steps in this article.
August 18, 2019 @ 6:19 pm
thank you very much, method 1 worked for me :)
August 11, 2019 @ 10:44 am
DISM /Online /Cleanup-Image /RestoreHealth /Source:WIM:X:\sources\install.wim:IndexNumber /LimitAccess
I used this command. Then I ran sfc/scannow. Then after that, I tried to install new driver software (my laptop model Dell Inspiron 3442 4th Gen Pentium dual core) made by Dell technologies. The driver software installation operation fails Everytime & shoes error. How to fix it?
August 7, 2019 @ 7:04 pm
Thanks. I had fixed the problem. The method 4 worked for me.
March 17, 2019 @ 6:16 am
Thank god for this webpage. I kept trying each item going down the page and failing. But the windows media creation tool step did it. I'll send you a few $ if you have a patreon account.
February 12, 2019 @ 6:46 pm
Had an error enabling .NET Framework 3.5 on W10.
This did it: https://support.microsoft.com/en-ph/help/2734782/net-framework-3-5-installation-error-0x800f0906-0x800f081f-0x800f0907
+ Your Method 3 (group Policy) ->
1) Create a Win10 ISO
2) Open the MMC + group Policy
3) Set the alternate dir to the [letter:sources\sxs] folder from the ISO and check to disable Windows Update
4) Run "gpupdate /force"
5) Run "dism /Online /Enable-Feature /FeatureName:WCF-HTTP-Activation /All" <- Yay!
6) Restore the group Policy
7) Run "gpupdate /force"
:)
January 10, 2019 @ 1:51 am
I'm troubleshooting an issue with my GPU mining rig running the trial version of Windows 10. Suddenly, multiple different mining applications didn't recognize any of my AMD graphics cards, but they were shown in Device Manager. I noticed that I was getting the notification "Application has been blocked from accessing graphics hardware", which brought me here. DISM couldn't find the source files (error 0x800f081f) and also wouldn't recognize the install.wim file from the freshly downloaded ISO. Ultimately, Method 4 worked and a repair was successful. Thank you very much for taking the time to create such a thorough guide!
December 5, 2018 @ 4:25 pm
Just wanted to thank you for your excellent instructions how to fix this issue. Your article is the only one I found that helps people like me who aren't that computer savvy. In the end, I had to do a non-destructive Windows re-install to fix the update error.
November 4, 2018 @ 10:19 pm
Even though the descriptions of the different methods are very clear, I wasn't able to solve the problem yet. I feel like I'm going in circles from one method to another now without making any progress. So If anyone could give me any hints based on the log file below I would be very grateful.
Checking System Update Readiness.
2018-11-04 14:33:51, Info CBS
2018-11-04 14:33:51, Info CBS (p) CSI Manifest Corrupt (n) amd64_b6eb56d3a1ffc6dbde7f8d8eb688a286_31bf3856ad364e35_10.0.17134.165_none_90c9a1eb6668c11c
2018-11-04 14:33:51, Info CBS Repair failed: Missing replacement manifest.
2018-11-04 14:33:51, Info CBS (p) CSI Manifest Corrupt (n) amd64_f4ebfb19ca40545b5b70cb6de1d79fb0_31bf3856ad364e35_10.0.17134.165_none_5a9f0441ba4fe9a6
2018-11-04 14:33:51, Info CBS Repair failed: Missing replacement manifest.
2018-11-04 14:33:51, Info CBS
2018-11-04 14:33:51, Info CBS Summary:
2018-11-04 14:33:51, Info CBS Operation: Detect and Repair
2018-11-04 14:33:51, Info CBS Operation result: 0x800f0907
2018-11-04 14:33:51, Info CBS Last Successful Step: Entire operation completes.
2018-11-04 14:33:51, Info CBS Total Detected Corruption: 2
2018-11-04 14:33:51, Info CBS CBS Manifest Corruption: 0
2018-11-04 14:33:51, Info CBS CBS Metadata Corruption: 0
2018-11-04 14:33:51, Info CBS CSI Manifest Corruption: 2
2018-11-04 14:33:51, Info CBS CSI Metadata Corruption: 0
2018-11-04 14:33:51, Info CBS CSI Payload Corruption: 0
2018-11-04 14:33:51, Info CBS Total Repaired Corruption: 0
* I'm using windows Home version
September 21, 2018 @ 10:14 am
Win10 Home. After try almost everything, couple times, i've been finding for any 'manually' approach. The 5th method – the log, the log!- seems to finally solved my problem.
Thxs a lot.
September 20, 2018 @ 12:12 am
Man… I've spent months trying to fix this error on and off. Went through every fix on all of these pages… except reinstall, which finally fixed it. Next time, I'm just reinstalling!!! Easy peasy!
May 15, 2018 @ 12:29 pm
Hi I cant find those files in regedit, I cant repair it please help.
=================================
Checking System Update Readiness.
(p) CSI Manifest Corrupt amd64_0e9075b73b1af304ca71bb474bade76e_31bf3856ad364e35_10.0.16299.371_none_402e1fbfb487c610
Repair failed: Missing replacement manifest.
(p) CSI Manifest Corrupt amd64_302f1d1561cd93b80b770710a9c6c951_31bf3856ad364e35_10.0.16299.371_none_45635903fb6c44b9
Repair failed: Missing replacement manifest.
Summary:
Operation: Detect and Repair
Operation result: 0x800f081f
Last Successful Step: Entire operation completes.
Total Detected Corruption: 2
CBS Manifest Corruption: 0
CBS Metadata Corruption: 0
CSI Manifest Corruption: 2
CSI Metadata Corruption: 0
CSI Payload Corruption: 0
Total Repaired Corruption: 0
CBS Manifest Repaired: 0
CSI Manifest Repaired: 0
CSI Payload Repaired: 0
CSI Store Metadata refreshed: True
Total Operation Time: 1390 seconds.
May 15, 2018 @ 2:03 pm
@Kaan: Follow the steps in this article: https://www.wintips.org/fix-dism-0x800f081f-error-in-windows-10-8/
May 15, 2018 @ 3:11 pm
Thanks , I tried all the steps.
But it is still same
CMD
C:\>DISM /Online /Cleanup-Image /RestoreHealth /Source:WIM:c:\install.wim:1 /LimitAccess
Deployment Image Servicing and Management tool
Version: 10.0.16299.15
Image Version: 10.0.16299.431
[===========================89.1%=================== ]
Error: 0x800f081f
The source files could not be found.
Use the "Source" option to specify the location of the files that are required to restore the feature. For more information on specifying a source location, see http://go.microsoft.com/fwlink/?LinkId=243077.
…………………….
Checking System Update Readiness.
(p) CSI Manifest Corrupt amd64_0e9075b73b1af304ca71bb474bade76e_31bf3856ad364e35_10.0.16299.371_none_402e1fbfb487c610
Repair failed: Missing replacement manifest.
(p) CSI Manifest Corrupt amd64_302f1d1561cd93b80b770710a9c6c951_31bf3856ad364e35_10.0.16299.371_none_45635903fb6c44b9
Repair failed: Missing replacement manifest.
……………
May 15, 2018 @ 4:35 pm
@Kaan: I think that the needed files belongs to a third party app. I suggest to repair Windows 10 with an in=-place upgrade.
May 15, 2018 @ 5:27 pm
Thank you very mcuh for your help.
I think there are no solution left than make that reset to keep my files.
Also I will ask a question.
Can I keep using windows like this.
May 15, 2018 @ 8:00 pm
@Kaan: I hope not
November 12, 2017 @ 4:12 pm
Worked fine for me!!
September 7, 2017 @ 8:27 pm
My Windows 10 Home 64-bit system suddenly started acting weird. I ran an sfc /scannow and noted 4 corruptions: fdeploy.dll, fde.dll, gptext.dll, and gpedit.dll.
Followed your Method 1 and seem to have resolved the problem but am curious about the last sfc /scannow CBS.log – it showed 'source file in store is also corrupted' for all four corruptions, but then showed 'All files and registry keys listed in this transaction have been successfully repaired'
Never even got to the DISM /Online /Cleanup-Image /RestoreHealth step.
Is that even possible? Could sfc/scannow have cleaned things up without the RestoreHealth, given the stated corruptions?
Or is this just one of the Microsoft mysteries?
September 8, 2017 @ 1:11 pm
@George Sinkinson: I suggest to run all the commands mentioned at the method 1, to ensure that your system is OK.
May 30, 2017 @ 1:57 am
Thanks. It was impossible to correct using DISM. Everything was correct, like path, Windows version. The outcome was always source not found. However method 4 worked. Sfc came out successfully and so DISM and errors gone.
May 11, 2017 @ 8:43 pm
With minor differences, I tried the solution at
https://www.bleepingcomputer.com/forums/t/643994/windows-package-file-bad-digital-signature/
posted by DAC324 and it worked perfectly:
DISM /Online /Cleanup-Image /RestoreHealth
Deployment Image Servicing and Management tool
Version: 10.0.15063.0
Image Version: 10.0.15063.0
[==========================100.0%==========================] The restore operation completed successfully.
The operation completed successfully.
sfc /scannow
Beginning system scan. This process will take some time.
Beginning verification phase of system scan.
Verification 100% complete.
Windows Resource Protection did not find any integrity violations.
Before I get into the details of what I did, I have a suggestion for this webpage: I would add a "last resort" Method 5 that describes running
DISM /Online /Cleanup-Image /ScanHealth
and then examining the bottom of the C:\Windows\Logs\CBS\CBS.log file to see exactly what the problem(s) is(are). Then search the Internet for possible solutions. In this case, it appears that someone at Microsoft left a "testroot" in the packages of the production version of Windows 10 when it shouldn't have been there.
Here is what I did:
1. I found two instances of "testroot" packages in the registry at
HKEY_LOCAL_MACHINE\SOFTWARE\Microsoft\Windows\CurrentVersion\Component Based Servicing\PackageIndex
of my Windows 10 Home 64-bit version 1703 build 15063.296. They were:
Microsoft-Windows-TestRoot-and-FlightSigning-Package~31bf3856ad364e35~amd64~~10.0.15063.0
Microsoft-Windows-TestRoot-and-FlightSigning-WOW64-Package~31bf3856ad364e35~amd64~~10.0.15063.0
2. I exported each of these two registry entries to my desktop for safe keeping, just in case I needed them later.
3. Then I changed the permissions on the two registry entries giving myself full control.
4. Then I deleted both registry entries.
5. Then I searched my C: drive (using the Everything program) for "testroot" files. There were 4, all located in the
C:\Windows\Servicing\Packages folder:
Microsoft-Windows-TestRoot-and-FlightSigning-Package~31bf3856ad364e35~amd64~~10.0.15063.0.mum
Microsoft-Windows-TestRoot-and-FlightSigning-Package~31bf3856ad364e35~amd64~~10.0.15063.0.cat
Microsoft-Windows-TestRoot-and-FlightSigning-WOW64-Package~31bf3856ad364e35~amd64~~10.0.15063.0.mum
Microsoft-Windows-TestRoot-and-FlightSigning-WOW64-Package~31bf3856ad364e35~amd64~~10.0.15063.0.cat
6. I MOVED all 4 to my Desktop for safe keeping, just in case I needed them later.
7. The I rebooted.
The reboot went perfectly and, as you saw above, "DISM /Online /Cleanup-Image /ScanHealth" and "SFC /Scannow" both work perfectly.
Stu
May 12, 2017 @ 12:20 pm
Thank you for the info and I 'm glad that you found the solution.
April 27, 2018 @ 6:17 pm
Thanks a lot for this information! After a year it still helps people who still have this problem.
May 10, 2017 @ 3:03 pm
Continuing from my mistakenly placed comments at the bottom of
https://www.wintips.org/fix-dism-0x800f081f-error-in-windows-10-8/:
I followed your instructions which were:
Windows 10 has many bugs. Anyway try the following:
1. In a elevated command prompt give the following commands in order:
DISM /Online /Cleanup-Image /StartComponentCleanup
SFC /SCANNOW
DISM /Online /Cleanup-Image /AnalyzeComponentStore
SFC /SCANNOW
2. After SFC > Restart your computer.
3. After Restart, open command prompt (as admin) again and try again > DISM /Online /Cleanup-Image /RestoreHealth
Step 1:
DISM /Online /Cleanup-Image /StartComponentCleanup completed successfully with no comments about fixing anything.
SFC /SCANNOW just said "Verification 100% complete. Windows Resource Protection did not find any integrity violations.".
DISM /Online /Cleanup-Image /AnalyzeComponentStore said:
Component Store (WinSxS) information:
Windows Explorer Reported Size of Component Store : 4.11 GB
Actual Size of Component Store : 4.01 GB
Shared with Windows : 3.41 GB
Backups and Disabled Features : 451.65 MB
Cache and Temporary Data : 145.43 MB
Date of Last Cleanup : 2017-05-10 08:03:33
Number of Reclaimable Packages : 0
Component Store Cleanup Recommended : No
The operation completed successfully.
SFC /SCANNOW just said "Verification 100% complete. Windows Resource Protection did not find any integrity violations.".
Step 2: The computer restarted normally.
Step 3:
DISM /Online /Cleanup-Image /RestoreHealth result was:
[===========================98.2%======================== ]
Error: 0x800f081f
The source files could not be found.
Use the "Source" option to specify the location of the files that are required to restore the feature. For more information on specifying a source location, see http://go.microsoft.com/fwlink/?LinkId=243077.
The DISM log file can be found at C:\WINDOWS\Logs\DISM\dism.log
What could it possibly be?
May 11, 2017 @ 9:48 am
@Stu Berg: Definitely this is a Windows bug and I 'm afraid that the only option is to perform a fresh Windows 10 installation.
p.s. have you tried Method 2 & Method 3 from this article?
May 11, 2017 @ 2:33 pm
Yes, I've tried all 4 methods and get the same problem. What makes me think I do NOT have to reinstall Windows 10 is that when I run
DISM /Online /Cleanup-Image /CheckHealth
I get
Deployment Image Servicing and Management tool
Version: 10.0.15063.0
Image Version: 10.0.15063.0
The component store is repairable.
The operation completed successfully.
It says "The component store is repairable" which means to me that there must be a way to repair it short of doing a complete reinstall from scratch. When I run
DISM /Online /Cleanup-Image /ScanHealth
the C:\Windows\Logs\CBS\CBS.log says
2017-05-11 08:07:01, Info CBS Repr: CSI meta data corruption found, will commit repair transaction if repair is asked.
2017-05-11 08:07:01, Info CBS Repr: CSI Store check completes
2017-05-11 08:07:01, Info CBS Ensure WCP corruption flag is clear
2017-05-11 08:07:01, Info CBS All CSI corruption was fixed, ensure CorruptionDetectedDuringAcr is clear
2017-05-11 08:07:01, Info CBS Failed to clear CorruptionDetectedDuringAcr store corrupt flag (slow mode trigger). [HRESULT = 0x80070002 – ERROR_FILE_NOT_FOUND]
2017-05-11 08:07:01, Info CBS
=================================
Checking System Update Readiness.
(p) CBS MUM Corrupt Microsoft-Windows-TestRoot-and-FlightSigning-Package~31bf3856ad364e35~amd64~~10.0.15063.0
Summary:
Operation: Detect only
Operation result: 0x0
Last Successful Step: CSI store detection completes.
Total Detected Corruption: 1
CBS Manifest Corruption: 1
CBS Metadata Corruption: 0
CSI Manifest Corruption: 0
CSI Metadata Corruption: 0
CSI Payload Corruption: 0
Total Repaired Corruption: 0
CBS Manifest Repaired: 0
CSI Manifest Repaired: 0
CSI Payload Repaired: 0
CSI Store Metadata refreshed: True
I believe I found the solution here:
https://www.bleepingcomputer.com/forums/t/643994/windows-package-file-bad-digital-signature/
Look for the posting by DAC324. What do you think? Should I try it?
Stu
May 11, 2017 @ 3:25 pm
@Stuart Berg: Looks promising. Export these keys or backup you registry first and then follow the instructions in the original post : https://www.tenforums.com/performance-maintenance/81413-creators-update-component-store-shows-corruption-but-unable-repair-3.html#post991296
p.s. PLS post the results
July 12, 2017 @ 1:18 pm
I am downloading windows 8.1 media creation tool , why it is very slow.
July 12, 2017 @ 1:54 pm
@jennie: The download speed is slow because of Microsoft servers.
July 13, 2017 @ 12:39 am
Lakonst, thanks for your reply .
I have downloaded for 24 hours day and night. How long would it take to get all files ready?
On the installation screen, there does not show how many percentage of files have been downloaded, only show “ estimating time” characters, but there is no any exact estimateing time indicated.
Also, I did not see any files downloaded in my USB drive.
Thanks again.
July 13, 2017 @ 8:55 am
@jennie: I suggest to stop the current operation/download and then to restart your computer. After restart start the Media Creation tool and try to download Windows 8.1 again.