
FIX: Windows 11 shows that there is No internet access but Internet is working.
If Windows 11 displays the "globe" icon informing you that there is "No Internet Access" while you have access to the Internet, continue reading below to learn how to fix this annoying problem.
Symptom: Internet works fine, but Windows 11 shows the network icon in the taskbar as a "Globe" that says "Unidentified network. No Internet access". Simply put, web browsers access the Internet just fine, Outlook and other Microsoft Store apps (i.e. Mail, Xbox, etc.) work without any issues, but Windows 11 reports there is not internet access.

How to FIX: Internet is working but Windows 11/10 shows "Unidentified network. No Internet access".
- Disconnect from VPN.
- Install all Windows Updates.
- Reset Network.
- Disable TCP/IP v6.
- Restart your Router.
- Fix "No Internet Access" in Registry.
- Repair Windows with DISM & SFC tools.
- Repair Windows with In-Place Upgrade.
- Reset Windows.
- Clean Install Windows.
Method 1. Disconnect from VPN.
The "Unidentified network. No Internet Access" issue may occur when connecting via VPN or when a VPN client application is running in the background. So, before you proceed with the instructions below, disconnect from the VPN and make sure that no VPN apps are running in the background to ensure that the problem is "not due to VPN.
Method 2. Install all Windows & Optional Updates.
Usually Windows 11 shows the "No Internet Access" message when they are not fully updated. So, proceed and install all available updates and when done, proceed and install also all the optional updates. To do that:
1. Navigate to Start -> Settings -> Windows Update, click Check for updates and then click Download & install to install all the available updates.

2. After installing the standard Windows Updates, navigate again to Start -> Settings -> Windows Update, click Advanced Options and then click Optional Updates under "Additional Options".

3. In Optional updates, check all the checkboxes to install all the available Windows and Driver updates and click Download & install.

4. When the installation is complete, restart your computer and check if the "No Internet Access" error is resolved.
Method 3. Reset Network.
1. Navigate to Start -> Settings -> Network & Internet -> Advanced network settings -> Network reset and click Reset now.
2. Restart your PC and then check if the "No Internet" problem is solved.

Method 4. Disable TCP/IP v6 Protocol.
In some cases, the "No Internet Access" problem despite Internet connection is caused when the "TCP/IP v6" protocol is active. So do the following:
1a. Press the Windows  + R keys to open the Run command box.
1b. Type ncpa.cpl and press OK or hit Enter to open Network Connections.

2. Right click on the active network connection and choose Properties.

3. In network connection properties, uncheck the Internet Protocol Version 6 (TCP/IPv6) checkbox and click OK (twice) to save and close the network properties.

3a. Now, open Command Prompt as Administrator. (To do that, type "cmd" in Search and then at "Command Prompt" result, select "Run as Administrator")

3b. Now, type the following command and press Enter to clear the DNS cache:
- ipconfig /flushdns

7. Finally, restart you computer and check if the problem is fixed.
Method 5. Restart your Router.
Sometimes, the mentioned problem occurs because your ISP router is not working properly. So, do the following:
1. Unplug your router's power cord for 30 seconds, and then shut down the PC.
2. Connect again the router's power cord and wait until all the lights are ON and stable.
3. Finally, turn on your PC and check if the problem is fixed.
Method 6. Fix "Windows 11 No internet access " in Registry.
An invalid registry entity can cause Windows 11/10 to report "No Internet access" even though you are connected to the Internet. To fix the registry problem, first backup the registry and continue with the instructions below:*
* Important: Since making changes to Registry settings is risky because even a small mistake can lead to system damage, it is important to back up the registry before modifying it & to create a System Restore point.
1. Simultaneously press the Windows + R keys to open Run command box.
2. In run command box, type "regedit" and press Enter.

3a. In Registry Editor navigate to this path:
- HKEY_LOCAL_MACHINE\SOFTWARE\Policies\Microsoft\Windows\NetworkConnectivityStatusIndicator
3b. Look at the right pane and notice the "NoActiveProbe" REG_DWORD value. Then, according the result do the following:*
- If the "NoActiveProbe" REG_DWORD is missing or its value is "0" (like in screenshot below), continue to next step.
- If the If the "NoActiveProbe" value data is "1", either delete the "NoActiveProbe" REG_DWORD, or double-click on it change the value to "0" and click OK. Then, continue to next step:
* Info: The "NoActiveProbe" should either not present, or the value must be "0".

4a. Now, navigate to this registry path:
- HKEY_LOCAL_MACHINE\SYSTEM\CurrentControlSet\Services\NlaSvc\Parameters\Internet
4b. Look at the right pane and notice the "EnableActiveProbing" REG_DWORD. Then, according the result do the following:*
- If the "EnableActiveProbing"REG_DWORD value is "1" (like in screenshot below), continue to
next step. - If the "EnableActiveProbing"REG_DWORD value is "0", double-click on
it, change the value to "1" and click
OK. Then, continue to next step:
* Info: The "EnableActiveProbing" value must be "1".
4c. While you're here, also make sure that all the listed registry values have the following value data and if not change them accordingly:
"ActiveDnsProbeContent"="131.107.255.255"
"ActiveDnsProbeContentV6"="fd3e:4f5a:5b81::1"
"ActiveDnsProbeHost"="dns.msftncsi.com"
"ActiveDnsProbeHostV6"="dns.msftncsi.com"
"ActiveWebProbeContent"="Microsoft Connect Test"
"ActiveWebProbeContentV6"="Microsoft Connect Test"
"ActiveWebProbeHost"="www.msftconnecttest.com"
"ActiveWebProbeHostV6"="ipv6.msftconnecttest.com"
"ActiveWebProbePath"="connecttest.txt"
"ActiveWebProbePathV6"="connecttest.txt"
"CaptivePortalTimer"=dword:00000000 (0)
"CaptivePortalTimerBackOffIncrementsInSeconds"=dword:00000005 (5)
"CaptivePortalTimerMaxInSeconds"=dword:0000001e (30)
"EnableActiveProbing"=dword:00000001 (1)
"PassivePollPeriod"=dword:0000000f (15)
"StaleThreshold"=dword:0000001e (30)
"WebTimeout"=dword:00000023 (35)

5. When done, close Registry Editor and restart your computer if you have made changes to the registry, otherwise continue to next method.
Method 7. Fix "No Internet Access" error message by repairing system files.
The next method to fix problems in Windows 10/11, is to repair the Windows installation and System Files using the DISM and SFC tools. *
* Note: If you face the problem after performing a clean installation of Windows, skip this step.
1. Open Command Prompt as Administrator. (To do that, type "cmd" in Search and then at "Command Prompt" result, select "Run as Administrator")

2. At the command prompt window, type the following command & press Enter:
- dism.exe /Online /Cleanup-Image /Restorehealth
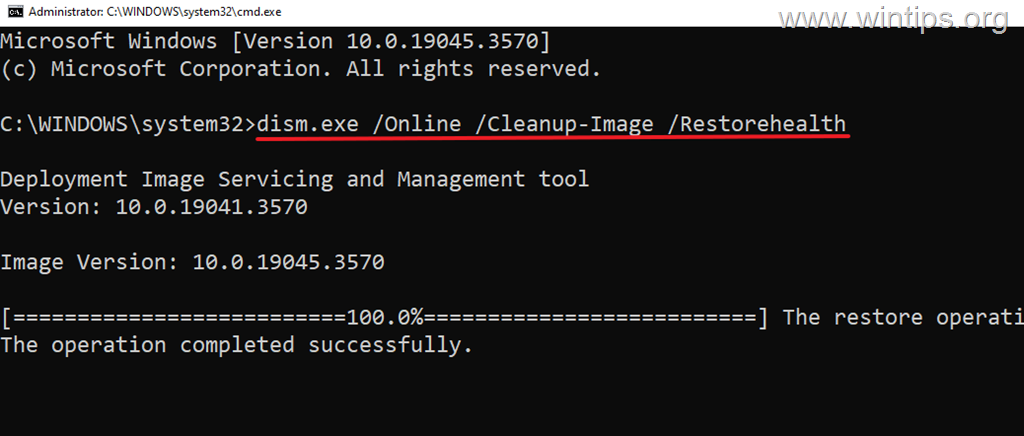
3. Be patient until 'Deployment Image Servicing and Management' (DISM) tool repairs the component store.
4. When the operation is completed, give the command below to repair the system files and press Enter:
- sfc /scannow
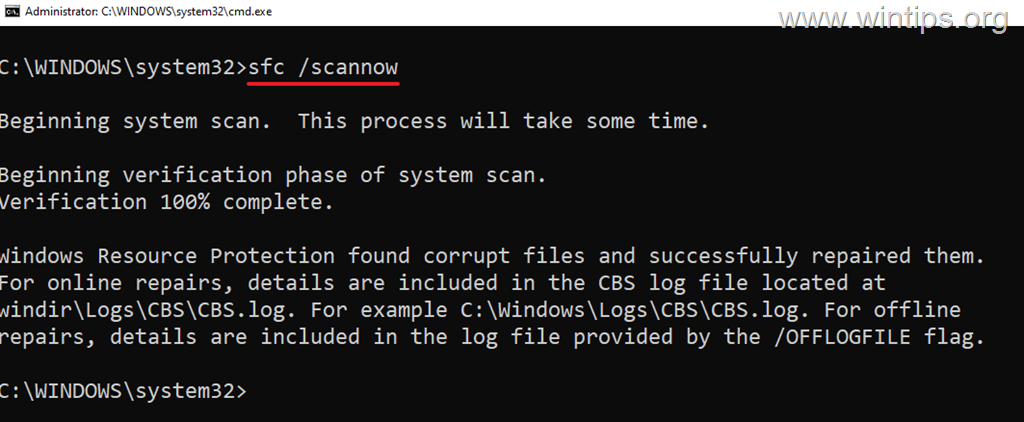
5. When SFC scan is completed, restart your computer.
6. After restarting check if the problem is fixed.
Method 8. Repair Windows 10 with an in-place Upgrade using Windows ISO file.
Another method to solve Windows 10/11 problems is to repair & upgrade Windows from a Windows ISO file. For this task, read the instructions in the articles below, according to your operating system version.
- How to Repair Windows 10 with an In-Place Upgrade.
- How to Repair Windows 11 with an In-Place Upgrade.
Method 9. Reset Windows.
Resetting Windows to their default state, is another method to fix problems in Windows 10/11. For this task, read the instructions in the articles below, according to your operating system version.
Method 10. Clean Install Windows.
The final method to fix Windows problems, is to backup your files and to perform a fresh installation of Windows. For this task, read the instructions in the articles below, according to your operating system version.
That's it! Which method worked for you?
Let me know if this guide has helped you by leaving your comment about your experience. Please like and share this guide to help others.
Frequently Asked Questions
Why does Windows 11 show 'No Internet Access' even though the internet works?
This issue can arise due to various reasons, such as software glitches, VPN connections, or specific network settings. Despite the 'No Internet Access' notification, applications like web browsers and Microsoft Store apps continue to work normally.
How can I fix the 'Unidentified network. No Internet Access' error on Windows 11?
Try disconnecting from any VPN, installing all Windows and optional updates, resetting the network, or disabling TCP/IP v6. Restarting your router or repairing Windows using DISM & SFC tools might also resolve the error.
What steps should I take if the 'No Internet Access' message appears after a Windows update?
Ensure all Windows updates, including optional updates, are fully installed. Navigate to Start -> Settings -> Windows Update to check for and install any available updates. This can often resolve the 'No Internet Access' message.
How can I disable the TCP/IP v6 protocol on Windows 11?
Press the Windows + R keys, type 'ncpa.cpl', and press Enter to open Network Connections. Right-click your active network, select Properties, uncheck 'Internet Protocol Version 6 (TCP/IPv6)', and click OK. Afterward, flush the DNS cache by typing 'ipconfig /flushdns' in the Command Prompt as Administrator, and restart your computer.


- Fix New Outlook and Teams Not Opening After KB5121003 on ARM PCs - September 3, 2026
- Windows 11 KB5120998 Breaks Mouse Cursor and Wallpaper Personalization (FIX) - September 1, 2026
- Microsoft Defender Antivirus Is Turned Off Even Though It Is Running – How to Verify Your Protection - August 31, 2026

May 21, 2026 @ 1:33 pm
I had trouble connecting to a public WiFi where a login page did not appear for me to connect. Kostas' suggestion of Method 3 worked like a charm. Many thanks!
February 1, 2026 @ 7:00 am
Very recent MS update broke WIN 11 HOME.
No VPN.
I did steps 2, 3, 5, 4, 6 in that order.
BUT, I added changing primary and alternate DSN for each adapter to 8.8.8.8
8 and 8.8.4.4.
Yes it worked as I had two adapters. Changed Ethernet first and rebooted — it worked.
Then, changed Wi-Fi second, rebooted and it works.
Cheers and thanks.